
A blender is one of the most frequently used appliances in modern kitchens, from making morning smoothies to blending soups and sauces. Over time, residue builds up not just in the jar but around the base—especially near the blade assembly and motor housing. While cleaning the pitcher is straightforward, many users hesitate when it comes to the base, fearing water damage or motor failure. The truth is, with the right approach, you can deep clean your blender base thoroughly and safely. This guide walks you through every step, highlighting best practices, common mistakes, and expert-backed techniques that protect your appliance while restoring its performance.
Why Cleaning the Blender Base Matters
The base of your blender houses the motor, control panel, and coupling mechanism that connects to the blade assembly. Food particles, moisture, and oils can seep into crevices during use, especially if the gasket or seal on the pitcher becomes worn. Left unattended, this buildup leads to odors, mold growth, reduced efficiency, and even electrical hazards. A clean base isn’t just about appearance—it’s critical for hygiene, longevity, and safe operation.
Manufacturers often warn against submerging the base in water, but that doesn’t mean it should be ignored. Regular maintenance prevents grime accumulation and helps avoid costly repairs or premature replacement.
Understanding Your Blender’s Design
Before attempting any deep cleaning, it’s essential to understand your blender’s construction. Most countertop blenders consist of three main parts:
- Jar or Pitcher: Typically made of glass or BPA-free plastic, removable for easy washing.
- Blade Assembly and Gasket: Attached to the bottom of the pitcher; seals tightly to prevent leaks.
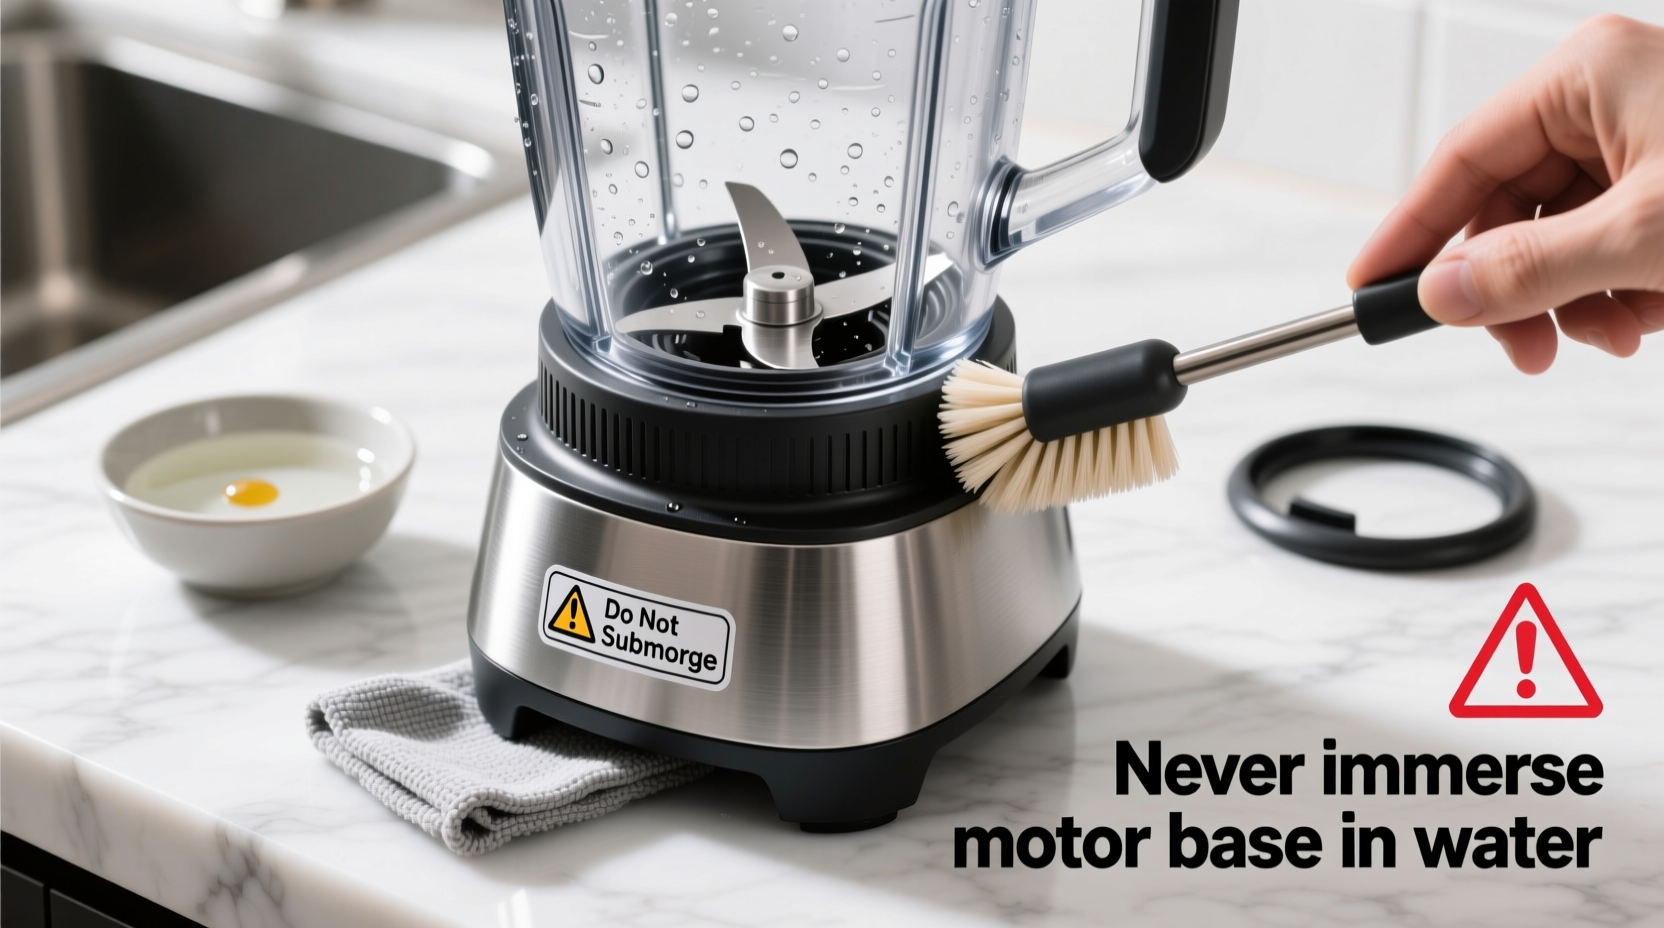
- Motor Base: Contains electronics, motor, and drive shaft; must remain dry.
The point where the pitcher meets the base—the drive socket—is particularly vulnerable. Spills, condensation, and over-tightening can compromise seals, allowing liquid to migrate toward internal components. High-performance models like Vitamix or Blendtec have advanced sealing systems, but even they require periodic inspection and gentle cleaning.
“Many blender failures aren’t due to motor burnout—they’re caused by neglecting basic hygiene around the base. A few minutes of care can extend your appliance’s life by years.” — David Lin, Appliance Engineer and Home Kitchen Consultant
Step-by-Step Guide to Safely Deep Clean the Blender Base
Cleaning the motor base requires caution, precision, and the right tools. Follow this sequence to ensure a thorough yet safe process:
- Unplug the Blender
Always disconnect the unit from power before starting. Safety begins here—never attempt cleaning while plugged in. - Remove the Pitcher and Blade Assembly
Take off the jar and inspect the rubber gasket underneath. If food debris is stuck there, clean it separately (soak in warm soapy water), then reassemble only after drying completely. - Inspect the Drive Socket and Surrounding Area
Look for visible grime, discoloration, or sticky residue around the rotating post. Use a flashlight if needed. Avoid inserting sharp objects into the socket. - Prepare a Cleaning Solution
Mix equal parts white vinegar and water, or use mild dish soap diluted in warm water. These solutions cut grease and disinfect without damaging plastic or electronic housings. - Dampen a Microfiber Cloth or Soft Brush
Wring out excess liquid thoroughly. The cloth should be moist, not wet. For tight spaces, wrap the cloth around a wooden skewer or use a soft-bristled toothbrush (not electric). - Clean the Exterior and Ventilation Areas
Wipe down the entire surface, focusing on seams, buttons, and air vents. Dust and moisture trapped in vents can impair cooling and lead to overheating. - Address Stubborn Residue
For dried-on spills or oily film, apply a small amount of baking soda paste (baking soda + water) to the cloth and gently scrub. Rinse the area immediately with a clean damp cloth to remove residue. - Dry Completely Before Reassembly
Use a dry microfiber towel to absorb all moisture. Let the base air-dry for at least 30–60 minutes in a well-ventilated area before reconnecting the pitcher. - Test Operation
Once dry, reattach the pitcher and run the blender briefly on low speed to ensure normal function.
Do’s and Don’ts When Cleaning a Blender Base
| Do’s | Don’ts |
|---|---|
| Use a slightly damp cloth with mild cleaner | Submerge the base in water or run it under the tap |
| Clean monthly, or more often with heavy use | Use abrasive pads or steel wool |
| Check and clean the gasket regularly | Spray liquids near control panels or vents |
| Allow ample drying time before reuse | Use bleach or ammonia-based cleaners |
| Refer to your user manual for model-specific advice | Ignore signs of mold or persistent odors |
Real Example: How One User Saved Their Blender from Failure
Sarah, a busy mother of two from Portland, used her high-speed blender daily for meal prep. After six months, she noticed a faint burning smell during operation and occasional stuttering when blending thick mixtures. She almost replaced it, assuming the motor had failed. Instead, she decided to investigate.
After unplugging the unit, she removed the pitcher and discovered a cracked gasket allowing liquid to drip into the base. Around the drive socket, she found a dark, sticky residue—likely a mix of fruit pulp and oil. Using a vinegar-soaked cloth and a soft brush, she carefully cleaned all accessible surfaces, then let the base dry overnight. She replaced the gasket (available online for $8) and reassembled the blender.
The burning smell disappeared, and performance returned to normal. Sarah estimates she saved over $300 by addressing a simple maintenance issue rather than buying a new machine. Her story underscores the importance of routine inspection and proactive cleaning.
When to Seek Professional Service
While most cleaning can be done at home, certain situations require expert attention:
- Visible water inside the base: If you see condensation or puddling beneath the housing, discontinue use immediately.
- Unusual noises or vibrations: Grinding or clicking sounds may indicate internal damage.
- Burn marks or melted plastic: Signs of electrical shorting or overheating.
- Failed power-up after exposure to moisture: Even brief contact with water can corrode circuits.
In such cases, contact the manufacturer or an authorized repair center. Some brands offer free diagnostics or extended warranties for registered products.
Preventative Maintenance Checklist
To keep your blender base in top condition between deep cleans, follow this monthly checklist:
- ✅ Unplug and wipe down the exterior with a damp cloth
- ✅ Inspect the gasket for cracks, warping, or trapped debris
- ✅ Clean the drive socket area with a dry or slightly damp brush
- ✅ Check air vents for dust buildup
- ✅ Ensure the pitcher seats properly and rotates smoothly
- ✅ Store with the cord neatly wrapped, away from heat sources
- ✅ Replace worn gaskets every 6–12 months with regular use
Frequently Asked Questions
Can I use alcohol wipes to clean the blender base?
Yes, but sparingly. Isopropyl alcohol (70%) can disinfect surfaces effectively, but repeated use may degrade certain plastics or leave residues. Apply to a cloth—not directly—and avoid buttons and seams. Always follow with a dry pass.
Is it safe to use my blender if the base has minor staining?
Stains alone aren’t dangerous if the unit operates normally and remains dry internally. However, persistent discoloration near seals could signal recurring leakage. Address the root cause—often a worn gasket—before continuing use.
How often should I deep clean the blender base?
Every 1 to 3 months, depending on usage. Daily users should aim for monthly cleaning. Light users can stretch to quarterly, but never go longer than six months without inspecting the base and seal.
Final Thoughts: Protect Your Investment
Your blender is more than a convenience—it’s a workhorse designed to last years with proper care. Deep cleaning the base isn’t complicated, but it demands respect for the appliance’s limitations. Water and electricity don’t mix, but cleanliness and safety do. By following these guidelines, you preserve both performance and safety, avoiding unnecessary replacements and reducing household waste.
Treat your blender like the precision tool it is. A few minutes of mindful maintenance pays off in reliability, hygiene, and long-term savings. Whether you own a budget model or a premium high-performance unit, the principles are the same: keep it dry, keep it clean, and address small issues before they become big problems.


 浙公网安备
33010002000092号
浙公网安备
33010002000092号 浙B2-20120091-4
Comments
No comments yet. Why don't you start the discussion?