
A blender is one of the most frequently used appliances in modern kitchens. Whether you're whipping up smoothies, soups, or sauces, its convenience makes it indispensable. But with regular use comes residue buildup—especially in hard-to-reach crevices near the blade assembly and sealing ring. Most users instinctively want to unscrew the base to scrub every corner, but doing so can compromise the motor seal, void warranties, or even create electrical hazards. The good news: you can achieve a thorough, hygienic deep clean without ever touching the screws.
This guide walks through safe, effective methods that preserve your blender’s integrity while eliminating odors, stains, and bacterial growth. From natural cleaning agents to strategic blending techniques, these approaches are backed by appliance care experts and tested in real kitchens.
Why You Should Never Disassemble the Blender Base
The base of a blender houses the motor, electronics, and often a waterproof gasket designed to keep moisture out. Tampering with this unit—especially by removing the blade assembly from the jar—can lead to irreversible damage. Even if reassembly seems successful, microscopic gaps may allow liquid seepage during future use, leading to short circuits or mold growth inside the housing.
“Once water breaches the motor compartment, corrosion starts silently. By the time symptoms appear—like strange noises or failure to start—the damage is usually beyond repair.” — Daniel Reyes, Appliance Engineer at HomeTech Labs
Manufacturers like Vitamix, Ninja, and KitchenAid explicitly warn against disassembling the base in their user manuals. Instead, they recommend cleaning methods that maintain the sealed integrity of the unit while ensuring hygiene.
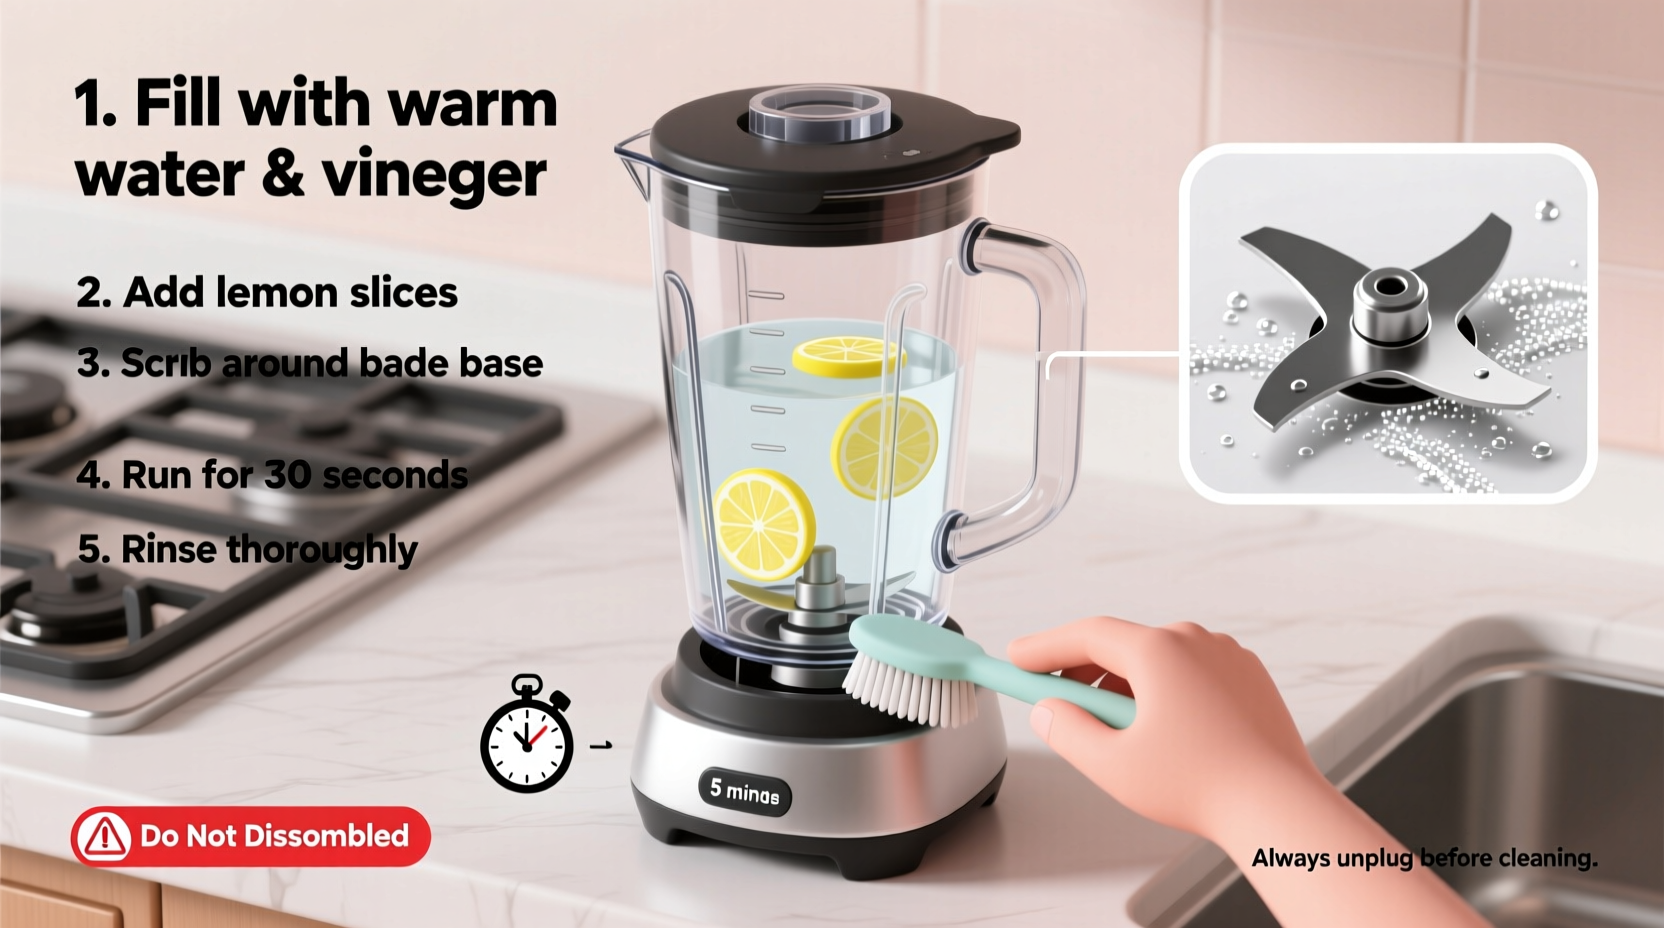
Step-by-Step Guide to Deep Cleaning Without Disassembly
Cleaning a blender thoroughly without opening the base relies on leveraging motion, chemistry, and heat—all generated within the jar itself. Follow this detailed process to achieve professional-level results.
- Unplug the blender – Always ensure the appliance is disconnected from power before starting any cleaning procedure.
- Rinse immediately after use – Rinse the jar and lid under warm water as soon as possible to prevent dried-on food from bonding to surfaces.
- Add cleaning solution – Fill the jar halfway with warm water. Add one tablespoon of dish soap, or two tablespoons of white vinegar, or one teaspoon of baking soda depending on the method you choose (see below).
- Blend for 30–60 seconds – Replace the lid securely and run the blender on high speed. The agitation lifts debris from the blades, gaskets, and sidewalls.
- Scrub gently with a bottle brush – After blending, pour out the solution and use a long-handled brush to reach around the blade area. Avoid pressing down excessively on the blade.
- Rinse and air dry – Rinse thoroughly with clean water and invert the jar on a drying rack overnight to ensure all moisture evaporates, especially under the rubber gasket.
Three Proven Cleaning Methods Compared
Different types of residue require different treatments. Below is a comparison of three reliable methods suitable for daily maintenance and periodic deep cleans.
| Method | Best For | Ingredients | Frequency |
|---|---|---|---|
| Soap & Water Blend | Everyday cleaning, light residue | Warm water + 1 tbsp dish soap | After each use |
| Vinegar Soak & Blend | Mineral deposits, mildew odor | 1 cup white vinegar + warm water | Weekly or biweekly |
| Baking Soda Scrub Cycle | Stains, stubborn film, deodorizing | 1 tsp baking soda + warm water | Monthly deep clean |
Each method exploits a different chemical property: soap emulsifies oils, vinegar dissolves lime and kills bacteria, and baking soda acts as a gentle abrasive and odor neutralizer.
Vinegar Method: Eliminating Lingering Odors
If your blender smells sour or musty despite regular rinsing, microbial growth may be present beneath the blade gasket. Vinegar's acetic acid effectively sanitizes without harsh fumes.
Pour one cup of white vinegar into the jar, add warm water to fill halfway, secure the lid, and blend on high for 60 seconds. Let the solution sit for 10 minutes to penetrate hidden areas, then repeat blending for another 30 seconds. Rinse thoroughly and dry completely.
Baking Soda Paste for Stain Removal
For blenders used frequently with turmeric, spinach, or tomato-based recipes, discoloration can set into plastic jars. Create a paste using baking soda and a few drops of water. Apply it around the blade area using a cotton swab or soft brush (do not scratch plastic). Then fill the jar with warm water, blend for 30 seconds, and rinse. This non-abrasive scrub lifts pigments without damaging surfaces.
Checklist: Safe Blender Deep Cleaning Routine
- ✅ Unplug the blender before cleaning
- ✅ Use only warm (not boiling) water to avoid warping plastic
- ✅ Choose non-abrasive tools: bottle brushes, microfiber cloths, cotton swabs
- ✅ Clean the lid and rubber gasket separately—remove if detachable
- ✅ Air-dry upside down on a rack for at least 12 hours
- ✅ Wipe the base with a slightly damp cloth; never immerse
- ✅ Perform a vinegar cycle monthly to prevent biofilm buildup
Real Example: How Sarah Fixed Her Smelly Blender
Sarah, a health coach from Portland, used her blender daily for green smoothies. After six months, she noticed a persistent earthy smell—even after washing. She almost disassembled the base until her sister, an appliance technician, advised against it.
Instead, Sarah tried the vinegar method: she added one cup of white vinegar and filled the jar halfway with warm water. After blending for a minute and letting it sit for 15 minutes, she poured it out and was shocked to see brownish flakes swirling down the drain—likely decomposed plant matter trapped beneath the gasket.
She repeated the process once more, then followed up with a baking soda cycle. The odor vanished, and her blender performed better than before. “I had no idea so much grime could hide where I couldn’t see,” she said. “Now I do a vinegar cleanse every Sunday.”
Do’s and Don’ts of Blender Maintenance
To protect your investment and ensure food safety, follow these essential guidelines.
| Do’s | Don’ts |
|---|---|
| Wipe the base after each use | Never immerse the base in water |
| Remove and wash the lid and gasket regularly | Use steel wool or scouring pads on the jar |
| Run a cleaning blend immediately after tough jobs (e.g., nut butters) | Leave liquid sitting in the jar for hours |
| Air dry fully before reassembling | Tighten the blade assembly excessively—it can crack the jar |
| Use distilled white vinegar for descaling | Use bleach unless specified by manufacturer |
“The key to longevity isn’t just cleaning—it’s preventing moisture entrapment. That tiny rubber ring holds more bacteria than people realize.” — Dr. Lena Torres, Microbiologist specializing in kitchen hygiene
Frequently Asked Questions
Can I use lemon juice instead of vinegar?
Yes, lemon juice contains citric acid and can help deodorize and cut through grease. However, it’s less effective than vinegar at killing mold and mineral buildup. Use half a lemon blended with warm water for a fresh scent, but don’t rely on it for disinfection.
How often should I replace the rubber gasket?
Inspect the gasket every 6–12 months. If it becomes brittle, cracked, or develops a permanent odor, replace it. Most manufacturers sell replacement seals. A worn gasket compromises the watertight seal and increases contamination risk.
Is it safe to put hot liquids in the blender for cleaning?
Only if your blender model is rated for hot contents. High-end models like Vitamix allow hot soup blending, which doubles as a self-cleaning method. However, sudden temperature changes can crack glass or warp plastic jars. Always check your manual first.
Final Thoughts: Keep It Clean, Keep It Safe
Your blender works hard for you—return the favor by maintaining it properly. Deep cleaning without disassembling the base isn’t just safer; it’s smarter. By respecting the sealed design and using targeted cleaning cycles, you extend the appliance’s life, improve hygiene, and avoid costly repairs or replacements.
Consistency matters more than intensity. A quick soap-and-water blend after each use, combined with a monthly vinegar treatment, prevents problems before they start. Small habits yield big results over time.


 浙公网安备
33010002000092号
浙公网安备
33010002000092号 浙B2-20120091-4
Comments
No comments yet. Why don't you start the discussion?