
Mechanical keyboards are prized for their tactile feedback, durability, and customization options. However, with regular use comes the inevitable accumulation of dust, crumbs, oils from fingertips, and even mold spores. Over time, this grime can affect switch performance, cause key chatter, and create an unhygienic workspace. While many users attempt quick fixes like blowing air or wiping keys, true deep cleaning requires a methodical approach that preserves the integrity of sensitive mechanical switches. Done incorrectly, cleaning can lead to corrosion, lubricant displacement, or switch failure. This guide provides a comprehensive, step-by-step process to deep clean your mechanical keyboard safely and effectively—without risking damage to its core components.
Why Deep Cleaning Matters for Mechanical Keyboards
Mechanical switches consist of precision-engineered parts: metal contacts, springs, plastic housings, and sometimes silicone dampeners. These components are designed to last tens of millions of keystrokes—but only if maintained properly. Dust and debris can interfere with contact points, leading to inconsistent actuation. Skin oils and moisture attract more dirt and promote microbial growth, especially in humid environments. Additionally, sticky residue under keys can make typing uncomfortable and reduce responsiveness.
Unlike membrane keyboards, mechanical models allow individual keycap removal and greater access to internal areas. Yet, their exposed switches are vulnerable to liquid intrusion and particulate buildup. A neglected keyboard doesn’t just look unsightly—it becomes less functional over time. Regular maintenance extends lifespan, ensures consistent performance, and improves hygiene, particularly important for those who spend hours typing daily.
“Proper cleaning isn’t just about appearance—it’s critical for preserving electrical integrity and mechanical longevity.” — Daniel Ruiz, Senior Technician at SwitchLab Electronics
Essential Tools and Materials
Before beginning any cleaning procedure, gather the right supplies. Using inappropriate tools (like wet cloths or household cleaners) is one of the most common causes of switch damage. The following list outlines what you’ll need for a thorough yet safe deep clean:
- Keycap puller – Prevents scratching or prying damage when removing caps.
- Compressed air canister – Dislodges loose debris without moisture.
- Soft-bristled brush (e.g., clean toothbrush or electronics brush) – Removes fine particles from crevices.
- Isopropyl alcohol (IPA), 70% minimum, preferably 90–99% – Evaporates quickly and disinfects without residue.
- Lint-free microfiber cloths – For wiping surfaces without shedding fibers.
- Damp sponge or foam swabs – Useful for controlled application of IPA on plate and case surfaces.
- Bowl of warm soapy water (optional) – Only for soaking keycaps, never for the PCB or switches.
- Ultrasonic cleaner (optional but recommended) – Efficiently cleans large batches of keycaps.
- Plastic tray or mat – To organize removed parts and prevent loss.
Step-by-Step Guide to Deep Cleaning
Cleaning a mechanical keyboard involves three main phases: preparation, execution, and reassembly. Each phase must be handled carefully to avoid introducing moisture into sensitive areas or misplacing small components.
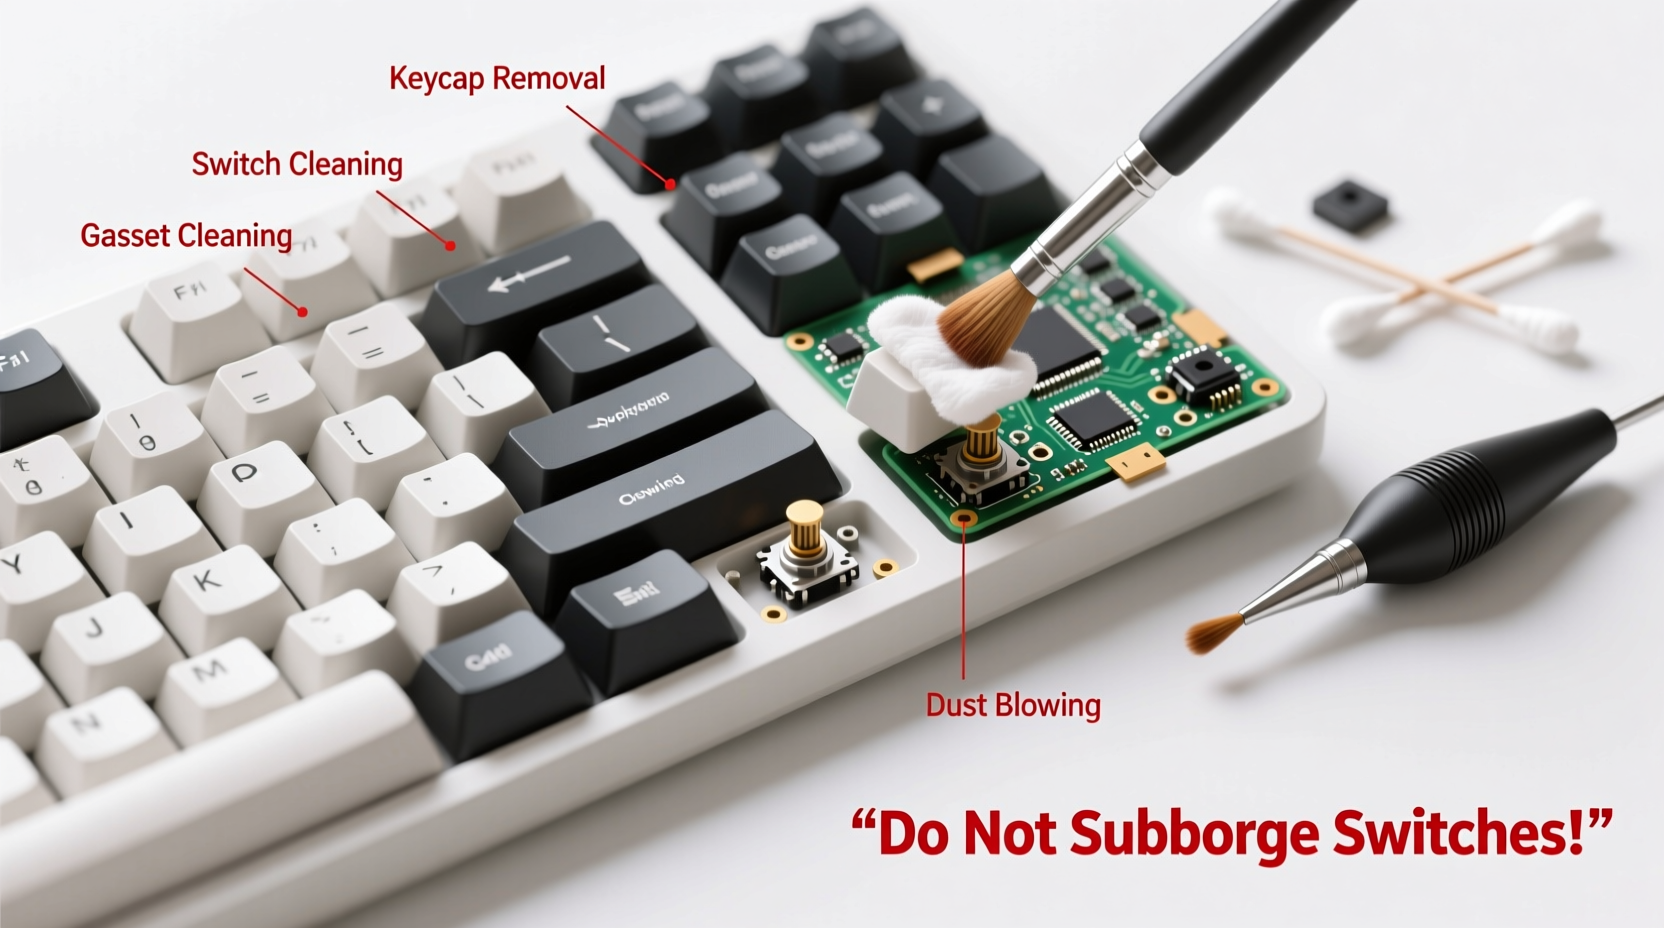
- Power down and disconnect – Unplug the keyboard from your computer or turn off wireless mode. Never clean a powered device.
- Remove keycaps – Use a keycap puller to gently lift each cap straight up. Start with smaller keys (ASDF, JKL;) then move to larger stabilizer-equipped keys (spacebar, shift, enter). Place them in labeled sections to maintain order.
- Blow out debris – Hold the compressed air upright and spray at a 45-degree angle across the switch stems and between rows. Avoid shaking the can, as it may release propellant liquid.
- Brush away residue – Use a dry soft brush to sweep loosened particles toward the edges. Focus on corners and around switch housings.
- Clean keycaps – Soak keycaps in lukewarm water with mild dish soap for 15–30 minutes. Scrub lightly with a sponge or brush to remove film. Rinse thoroughly and lay flat to dry completely (minimum 4–6 hours).
- Disinfect switch area – Dampen a microfiber cloth or foam swab with high-concentration IPA. Wipe around switch stems and the top of the PCB. Do not pour or spray alcohol directly onto the board.
- Tackle stubborn grime – For caked-on dirt near switches, wrap a cotton swab tightly in cloth, moisten slightly with IPA, and gently roll it around the base. Replace frequently to avoid redepositing dirt.
- Allow full drying time – Wait at least 30 minutes after cleaning the bare board before reattaching keycaps. Ensure no moisture remains near contacts.
- Reattach keycaps – Press each cap straight down until it clicks. Double-check alignment, especially for larger keys with stabilizers.
- Test functionality – Reconnect the keyboard and open a text editor. Press every key to confirm registration and smooth action.
Optional: Ultrasonic Cleaning for Keycaps
If you own multiple keyboards or collect custom keysets, investing in an ultrasonic cleaner saves time and delivers superior results. Fill the tank with water and a few drops of degreasing solution or dedicated keycap cleaner. Submerge keycaps (avoid aluminum unless specified) and run cycles in 5-minute intervals. Rinse and dry thoroughly afterward.
Do’s and Don’ts: Protecting Your Switches
To prevent accidental damage during cleaning, follow these guidelines based on real-world technician insights.
| Do’s | Don’ts |
|---|---|
| Use 90%+ isopropyl alcohol for disinfection | Use water, window cleaner, or bleach-based products |
| Let all components dry fully before reassembly | Reassemble while parts are still damp |
| Clean every 3–6 months depending on usage | Wait until keys feel sticky or malfunction |
| Store keycaps in a sealed container post-clean | Leave them exposed to dust or pets |
| Label stabilizer positions before removal | Assume all stabilizers are identical |
Real Example: Recovering a Neglected Work Keyboard
A software developer in Seattle used the same mechanical keyboard daily for over two years without cleaning. After noticing intermittent missed keystrokes and a faint odor, they decided to disassemble it. Upon removing the keycaps, visible clumps of bread crumbs, hair, and oxidized skin oil were found beneath the WASD cluster. Using compressed air and a 90% IPA-dampened swab, they cleaned each switch stem and surrounding plate. The keycaps were soaked overnight due to heavy staining from hand oils. After complete drying, the keyboard was reassembled. Not only did typing feel smoother, but key consistency improved dramatically—chatter ceased entirely. This case highlights how routine neglect impacts performance and how proper cleaning restores function without hardware replacement.
Frequently Asked Questions
Can I wash my entire keyboard?
No. Submerging a mechanical keyboard—even in alcohol—can trap liquid inside switches and damage the printed circuit board (PCB). Only removable parts like keycaps should be washed. Some ruggedized industrial keyboards are waterproof, but consumer models are not.
How often should I deep clean my mechanical keyboard?
Every 3 to 6 months is ideal for regular users. Heavy typists, gamers, or those who eat near their desk may benefit from quarterly cleaning. Light users can extend to twice a year, provided surface dust is wiped monthly.
Are optical switches easier to clean than traditional mechanical ones?
Optical switches use infrared beams instead of metal contacts, making them slightly more resistant to dust-induced failures. However, physical debris can still block the light path. Cleaning procedures remain largely the same, though optical variants may tolerate minor exposure better due to lack of oxidation concerns.
Checklist: Safe Keyboard Deep Clean
Follow this checklist to ensure no step is missed and your keyboard stays protected throughout the process.
- ✅ Disconnect power source
- ✅ Remove all keycaps with a proper puller
- ✅ Blow out loose debris with compressed air
- ✅ Brush remaining dust from switch stems and plate
- ✅ Wash keycaps separately in soapy water or ultrasonic bath
- ✅ Wipe case and plate with IPA-dampened cloth (not dripping)
- ✅ Clean stubborn spots with alcohol-swabbed cotton swabs
- ✅ Allow minimum 30-minute drying period for internals
- ✅ Ensure keycaps are 100% dry before reattachment
- ✅ Reinstall keycaps and test all keys
“The difference between a well-maintained and neglected mechanical keyboard isn’t just cosmetic—it’s measurable in response accuracy and long-term reliability.” — Lin Zhao, Hardware Engineer at KeyMech Labs
Conclusion: Maintain Performance Through Smart Care
Deep cleaning a mechanical keyboard doesn’t require technical expertise, but it does demand patience and attention to detail. By respecting the sensitivity of mechanical switches and avoiding common pitfalls like moisture exposure or aggressive scrubbing, you preserve both function and longevity. A clean keyboard performs better, feels more satisfying to type on, and contributes to a healthier workspace. Whether you're a writer, programmer, or competitive gamer, taking one afternoon every few months to perform this maintenance pays dividends in comfort and reliability. Your fingers—and your future self—will thank you.


 浙公网安备
33010002000092号
浙公网安备
33010002000092号 浙B2-20120091-4
Comments
No comments yet. Why don't you start the discussion?