
A steady stream of water used daily in the bathroom inevitably leads to mineral deposits, bacterial growth, and grime buildup inside your showerhead. Over time, this affects water pressure, spray consistency, and even hygiene. While commercial cleaners exist, most contain harsh chemicals that aren’t always necessary. The good news: you can achieve a thorough deep clean using common household items like white vinegar, baking soda, and dish soap. This guide walks you through effective, safe, and affordable methods to restore your showerhead’s performance—no special tools or store-bought products required.
Why Regular Showerhead Cleaning Matters
Your showerhead is exposed to hard water minerals (especially calcium and magnesium), chlorine byproducts, and organic matter from skin cells and soap residue. These accumulate in the nozzles and internal channels, reducing flow efficiency and creating an environment where bacteria like Legionella and Mycobacterium avium can thrive—especially in warm, moist conditions.
According to the Centers for Disease Control and Prevention (CDC), poorly maintained showerheads may contribute to respiratory risks, particularly for individuals with compromised immune systems. A study published in the journal *Proceedings of the National Academy of Sciences* found that biofilm formation in showerheads correlates with increased airborne microbial exposure during showers.
“Even minor buildup can harbor pathogens. Regular cleaning with non-toxic solutions like vinegar significantly reduces microbial load.” — Dr. Laura Chen, Environmental Health Researcher at Columbia University
Cleaning your showerhead every 1–3 months prevents long-term damage, maintains optimal water pressure, and supports better hygiene. And it doesn't require anything beyond what's already in your kitchen cabinet.
Essential Household Items You’ll Need
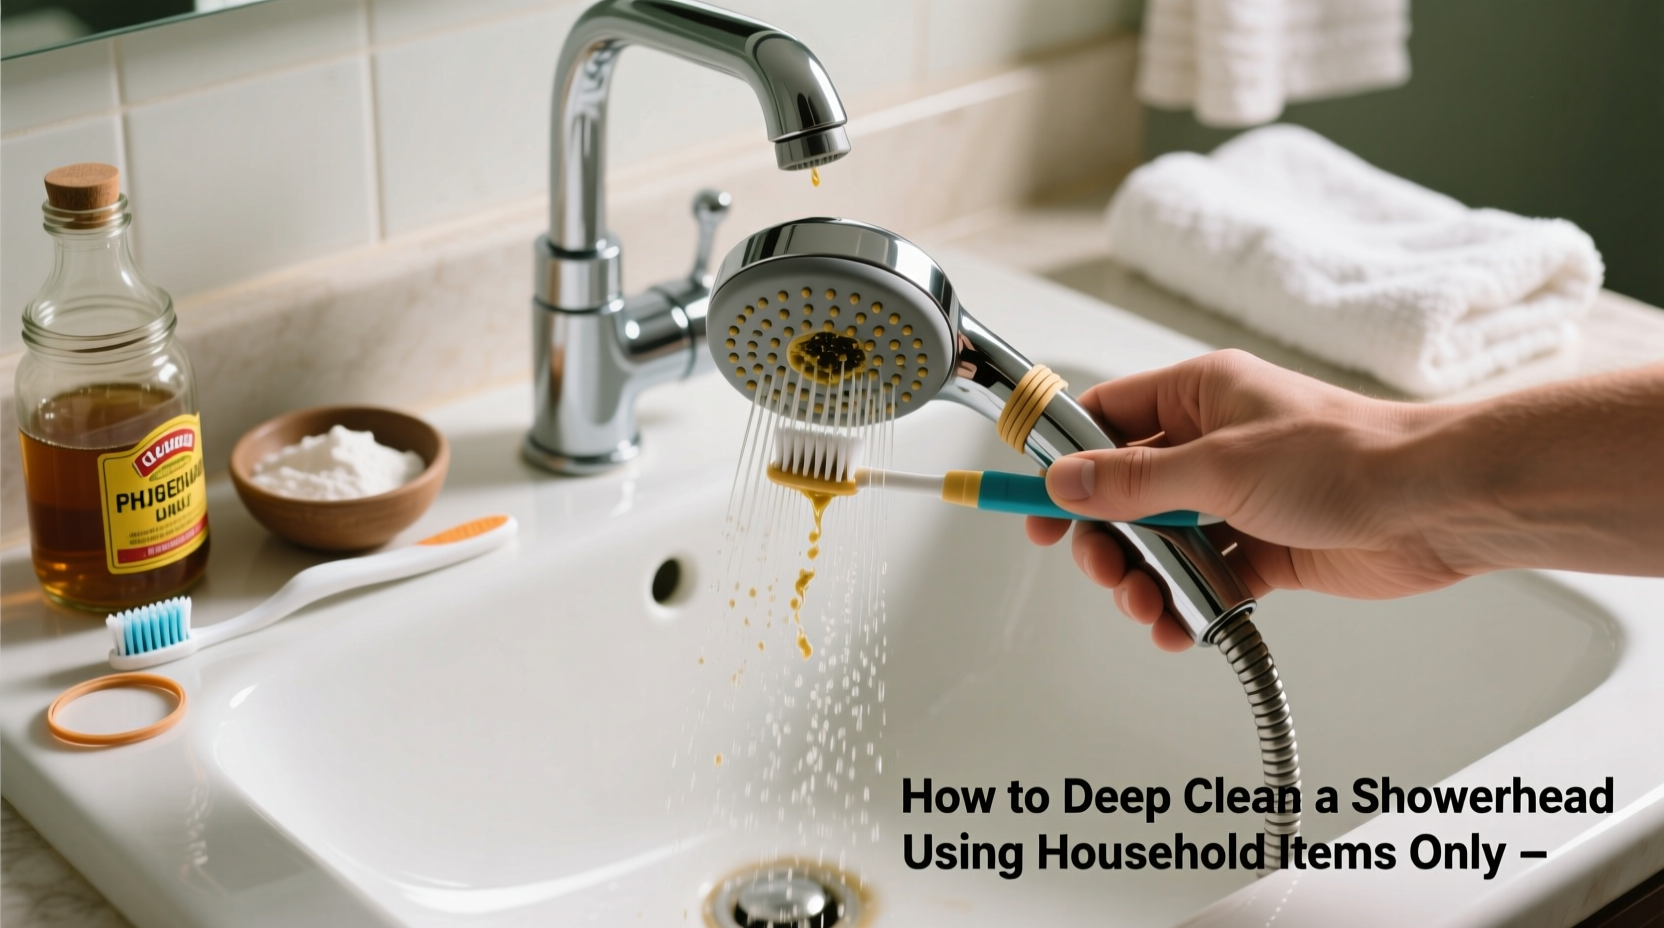
The following items are commonly found in most homes and are highly effective for descaling and disinfecting:
- White vinegar – Acetic acid breaks down limescale and kills many types of bacteria and mold.
- Baking soda – A mild abrasive that helps scrub away stubborn deposits when combined with vinegar.
- Dish soap – Cuts through grease and soap scum on exterior surfaces.
- Toothbrush (old or dedicated) – Ideal for scrubbing small nozzle openings without causing damage.
- Plastic bag or container – Used to submerge the showerhead in solution if removal isn’t possible.
- Rubber band or twist tie – Secures the bag around the showerhead during soaking.
- Microfiber cloth – For drying and polishing after cleaning.
Step-by-Step Deep Cleaning Process
Follow this detailed timeline-based method to deep clean any type of showerhead—fixed, handheld, or rain-style—using only household supplies.
- Turn off the water supply – While not always necessary, shutting off the main bathroom valve prevents accidental leaks if you're removing the showerhead.
- Remove the showerhead (if possible) – Use adjustable pliers wrapped in a cloth to avoid scratching chrome finishes. Unscrew it counterclockwise from the pipe. If it's sealed with plumber’s tape, expect some resistance.
- Inspect for visible buildup – Look closely at the nozzles. White, chalky crust indicates limescale; black specks suggest mold; greenish tint may point to copper corrosion.
- Soak in vinegar solution – Fill a bowl or large cup with undiluted white vinegar. Submerge the showerhead completely. Let it soak for at least 30 minutes. For heavy buildup, extend to 1–2 hours—but do not exceed 4 hours, as prolonged exposure may degrade rubber seals or plastic components.
- Create a paste for extra scrubbing power – Mix two tablespoons of baking soda with one tablespoon of water to form a thick paste. Add a few drops of dish soap for degreasing effect.
- Scrub all surfaces – Use the toothbrush dipped in the paste to gently scrub the faceplate, nozzles, and crevices. Pay attention to areas where water exits—the tiny holes often trap debris.
- Flush internally – After scrubbing, hold the showerhead under running cold water. Open your hand over the nozzles briefly to build backpressure, helping dislodge internal particles.
- Reattach and test – Screw the showerhead back onto the pipe. Hand-tighten first, then give a quarter-turn with pliers if needed. Turn on the water and check for leaks and improved flow.
No-Removal Method: Bag Soak Technique
If your showerhead is difficult to remove or permanently fixed, use this alternative approach:
- Fill a plastic sandwich bag halfway with white vinegar.
- Place the bag over the showerhead so the nozzles are submerged.
- Secure the bag tightly with a rubber band or twist tie around the shower arm.
- Let sit for 30–60 minutes.
- Remove the bag and use a toothbrush to wipe away loosened residue.
- Run hot water through the showerhead for 1–2 minutes to flush out remaining particles.
Do’s and Don’ts When Cleaning Your Showerhead
| Do’s | Don’ts |
|---|---|
| Use white vinegar for descaling | Use bleach on metal showerheads—it can corrode brass or chrome |
| Soak plastic parts no longer than 2 hours | Use steel wool or abrasive pads—they scratch surfaces |
| Disinfect with vinegar or hydrogen peroxide | Mix vinegar with bleach—this creates toxic chlorine gas |
| Check manufacturer guidelines if under warranty | Ignore persistent low pressure after cleaning—could indicate pipe issues |
| Clean every 1–3 months depending on water hardness | Leave soaking parts overnight unless specified as safe |
Real Example: Reviving a 5-Year-Old Showerhead
Sarah, a homeowner in Denver, Colorado, noticed her master bathroom shower had weak pressure and uneven spray patterns. Her home uses municipal water known for moderate hardness. She tried wiping the surface but saw no improvement. Following the vinegar-soak method described above, she removed the chrome-plated brass showerhead and soaked it in white vinegar for 90 minutes. During soaking, she observed bubbles forming—indicating active mineral breakdown.
After scrubbing with a baking soda paste and rinsing thoroughly, she reinstalled it. The difference was immediate: water pressure increased noticeably, and the spray pattern became uniform again. “I couldn’t believe how much gunk came out,” she said. “It looks almost new. I didn’t realize such a simple fix could make such a big difference.”
Sarah now schedules cleaning every two months and keeps a spare toothbrush in her cleaning caddy specifically for fixtures.
Enhancing Results with Natural Boosters
While vinegar alone handles most jobs, combining it with other safe household agents enhances effectiveness:
- Vinegar + Baking Soda: Though the fizzing reaction is mostly visual, the combination improves mechanical scrubbing ability on external surfaces.
- Vinegar + Lemon Juice: Citric acid adds extra descaling power. Mix equal parts lemon juice and vinegar for tough scale.
- Hydrogen Peroxide (3%): After vinegar soaking, rinse and soak in hydrogen peroxide for 20 minutes to kill lingering microbes.
Note: Do not mix these simultaneously. Apply sequentially—vinegar first, then peroxide, with a water rinse in between.
Frequently Asked Questions
How often should I deep clean my showerhead?
Every 1–3 months is ideal. Homes with hard water or well water should lean toward monthly cleaning. Signs it’s time include reduced water pressure, spitting noises, or visible discoloration.
Can I use apple cider vinegar instead of white vinegar?
No. Apple cider vinegar lacks sufficient acetic acid concentration and contains sugars and sediments that may leave residues or promote microbial growth rather than eliminate it.
Is it safe to soak a plastic showerhead in vinegar?
Yes, but limit soaking time to 1 hour. Prolonged exposure may weaken certain plastics or degrade internal O-rings. Always rinse thoroughly afterward.
Final Checklist Before You Begin
- Pre-Cleaning Checklist
-
- ✅ Gather white vinegar, baking soda, dish soap, toothbrush, and a container or plastic bag
- ✅ Turn off water supply (optional but recommended)
- ✅ Prepare workspace with towel to protect finish during removal
- ✅ Inspect showerhead for cracks or leaks before cleaning
- ✅ Check if detachable—if not, prepare bag method
- Post-Cleaning Verification
-
- ✅ Reinstall securely without overtightening
- ✅ Run water for 1–2 minutes to flush debris
- ✅ Observe spray pattern and pressure
- ✅ Wipe dry with microfiber cloth to prevent water spots
- ✅ Mark calendar for next cleaning date
Conclusion: Simple Habits, Lasting Results
Deep cleaning your showerhead doesn’t require expensive tools or chemical-laden sprays. With just white vinegar, a little elbow grease, and a few common household items, you can maintain peak performance, extend fixture life, and improve bathroom hygiene. The process takes less than an hour and pays dividends in water efficiency and comfort. Make it part of your regular home maintenance routine—your morning shower will feel noticeably better, and you’ll know you’re minimizing exposure to hidden contaminants.


 浙公网安备
33010002000092号
浙公网安备
33010002000092号 浙B2-20120091-4
Comments
No comments yet. Why don't you start the discussion?