
Making your makeup brushes a regular part of your beauty routine isn’t just about appearance—it’s about hygiene. Over time, brushes accumulate oil, dead skin cells, bacteria, and leftover product that can lead to breakouts, infections, or uneven makeup application. While many turn to commercial cleansers, a simple, effective, and budget-friendly solution lies in two common household items: white vinegar and dish soap. When used correctly, this combination breaks down stubborn residue, disinfects bristles, and prolongs the life of your tools—all without harsh chemicals.
The key is knowing not only *how* to use these ingredients but also *when* and *why* they work. This guide walks you through a safe, thorough method for deep cleaning your makeup brushes using vinegar and dish soap, including best practices, precautions, and real-world tips from industry professionals.
Why Vinegar and Dish Soap Work So Well
Vinegar and dish soap are more than kitchen staples—they’re powerful cleaning agents with distinct roles in brush maintenance.
White vinegar, particularly distilled white vinegar, is naturally acidic (around pH 2.5), which makes it excellent at killing bacteria, mold, and mildew. It dissolves mineral deposits and helps lift dried pigments from synthetic and natural bristles alike. Because it evaporates quickly and leaves no residue when rinsed properly, it won’t degrade brush glue or handles over time—unlike some alcohol-based cleaners.
Dish soap, especially fragrance-free varieties like Dawn or Seventh Generation Free & Clear, is formulated to cut through grease and oils. Since most makeup products (foundation, concealer, cream blushes) are oil-based, dish soap effectively emulsifies and removes them without damaging bristle integrity. Its surfactant properties allow water to penetrate deeply into the brush head, lifting debris from the base where buildup often hides.
Together, they create a synergistic cleaning solution: dish soap lifts grime, while vinegar sanitizes and deodorizes. The result? Brushes that look, feel, and perform like new.
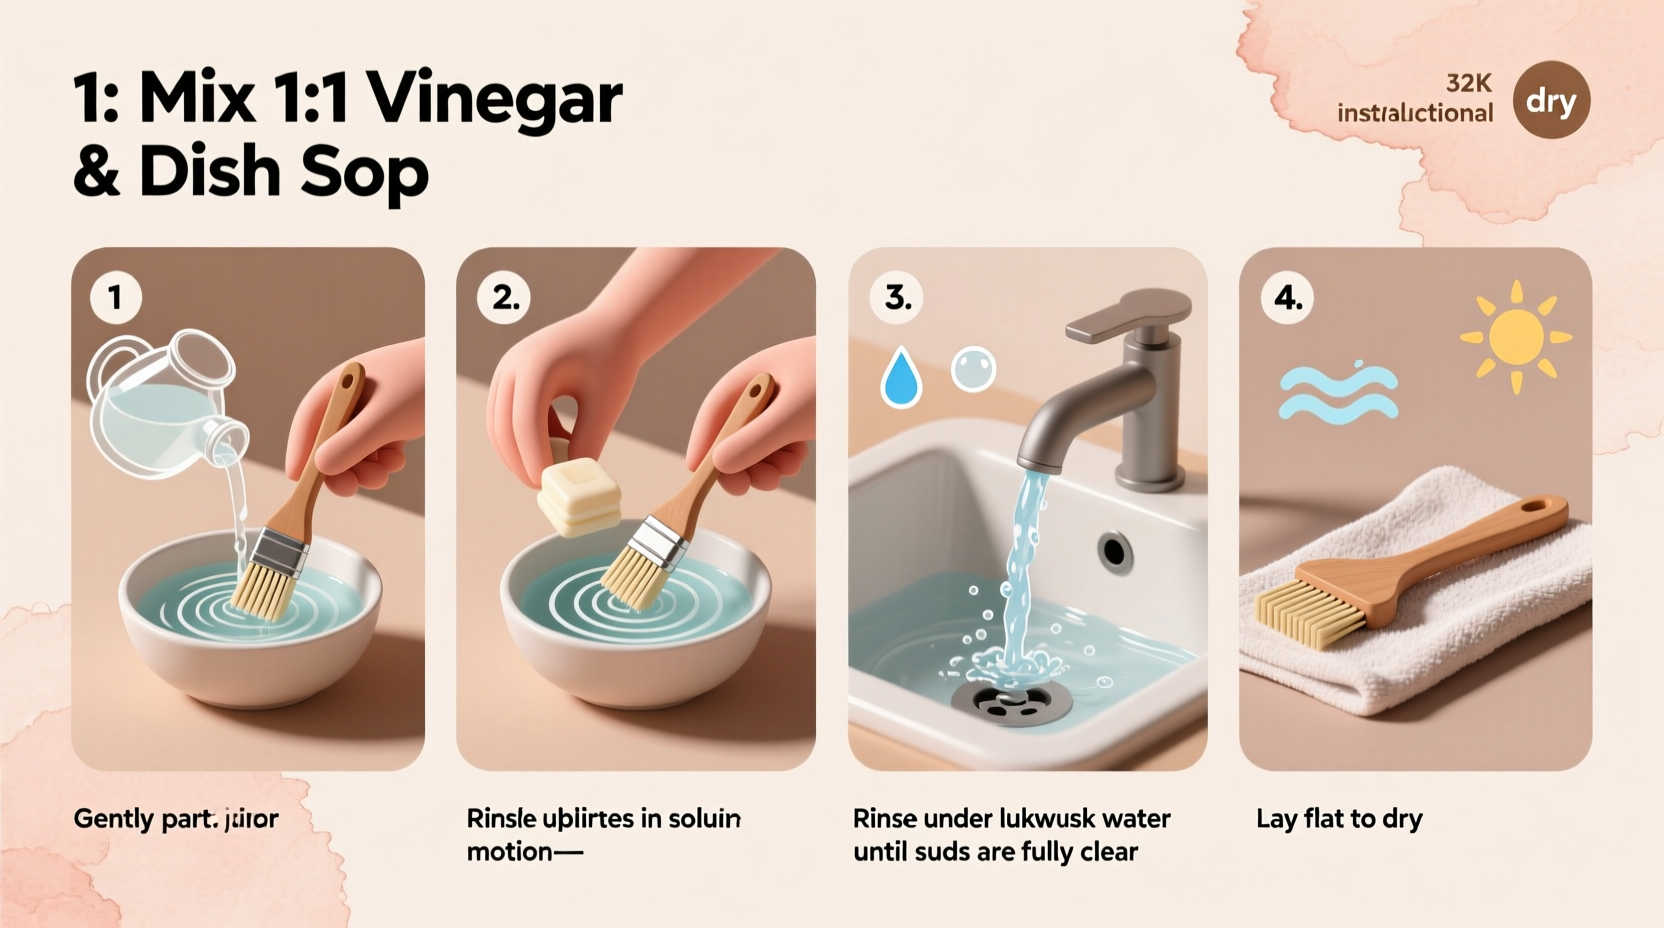
Step-by-Step Guide: Deep Cleaning Your Makeup Brushes Safely
Cleaning your brushes with vinegar and dish soap doesn’t require special tools or hours of effort. Follow this detailed process to ensure every brush is thoroughly sanitized without damage.
- Gather Supplies: You’ll need distilled white vinegar, mild liquid dish soap, two bowls (one for cleaning, one for rinsing), a clean towel, and optionally, a silicone brush-cleaning mat or textured surface.
- Prepare the Cleaning Solution: In one bowl, mix equal parts warm water and distilled white vinegar (e.g., ½ cup each). Add 1–2 drops of dish soap. Swirl gently to combine. Avoid creating too many suds, as excess foam can trap air in the ferrule (the metal part) and loosen the glue.
- Swirl and Wash Each Brush: Holding the brush at an angle, swirl the bristles in the solution using small circular motions on the bottom of the bowl or a cleaning mat. Focus on the base of the bristles where product builds up. Do not submerge the entire brush—keep the ferrule above water to prevent moisture from weakening the adhesive.
- Rinse Thoroughly: Transfer the brush to a second bowl filled with clean lukewarm water. Swirl again until the water runs clear. Repeat if necessary. Residual soap or vinegar can irritate skin or alter makeup texture.
- Squeeze and Reshape: Gently press the bristles between your fingers to remove excess water. Never wring or twist them, as this misaligns fibers and damages shape. Reshape the tip with your fingers so it dries pointed and smooth.
- Dry Properly: Lay brushes flat on a clean towel with the bristles hanging slightly off the edge to allow airflow. Alternatively, use a brush drying rack. Never stand brushes upright in a cup while wet—the water will seep into the handle and cause shedding or mold.
- Wait 6–8 Hours Before Use: Ensure brushes are completely dry before using. Damp bristles pick up less product and can introduce bacteria during application.
This process should be performed every 2–3 weeks for frequently used brushes and monthly for occasional ones. For concealer or foundation brushes, consider weekly spot-cleaning with a quick spray of diluted vinegar solution between deep cleans.
Do’s and Don’ts of Brush Cleaning with Vinegar and Dish Soap
To maximize effectiveness and protect your investment, follow these guidelines:
| Do | Don’t |
|---|---|
| Use lukewarm water—hot water can warp bristles and loosen glue. | Soak brushes overnight; prolonged exposure weakens adhesives. |
| Spot-test natural hair brushes first—some may react to acidity. | Use scented or antibacterial dish soaps; fragrances and preservatives can irritate skin. |
| Deep clean in the evening so brushes dry overnight. | Store damp brushes in closed containers—this promotes bacterial growth. |
| Label separate bowls to avoid cross-contamination. | Apply vinegar full-strength directly to bristles—it’s too harsh undiluted. |
| Replace old towels regularly to prevent lint transfer. | Use a hairdryer to speed drying—heat damages both bristles and glue. |
Real Example: A Makeup Artist’s Weekly Routine
Jamila Reyes, a professional makeup artist based in Los Angeles, uses over 30 brushes across her kit. She once developed a recurring rash along her jawline and traced it back to contaminated foundation brushes. “I was wiping them down between clients but never doing a proper soak,” she recalls. “Once I started deep cleaning with vinegar and dish soap every Sunday night, my skin cleared up within two weeks.”
Now, Jamila dedicates 45 minutes weekly to brush maintenance. She sorts brushes by type—synthetic for liquids, natural for powders—and cleans them in batches. Her secret? A silicone scrubbing mat with different textures: fine ridges for eyeshadow brushes, deeper grooves for stippling tools. “It mimics the pores of the skin, so it really gets the gunk out from the base of the bristles,” she says. “And because I dilute the vinegar, my expensive goat-hair blending brushes haven’t shed a single fiber.”
Her clients notice the difference too. “They comment on how smoothly the powder goes on now,” she adds. “Clean brushes don’t just protect your skin—they elevate your results.”
Expert Insight on Hygiene and Longevity
Dr. Lena Patel, a dermatologist specializing in cosmetic safety, emphasizes the health implications of neglected tools. “Makeup brushes harbor more bacteria than most people realize,” she explains. “Staphylococcus, Propionibacterium, and even fungal spores have been found on improperly cleaned brushes. These can trigger folliculitis, acne mechanica, or perioral dermatitis.”
“Using a vinegar-dish soap solution twice a month reduces microbial load by over 90%. It’s one of the most accessible ways to maintain facial hygiene without spending on specialty products.” — Dr. Lena Patel, MD, Dermatology Specialist
She also warns against skipping the drying step: “Airflow is critical. Bacteria thrive in moist environments. If you store a brush before it’s fully dry, you’re undoing all the cleaning work.”
Frequently Asked Questions
Can I use this method on natural hair brushes like sable or goat?
Yes—but with caution. Natural bristles are more porous and sensitive to pH changes. Always dilute vinegar (use a 1:3 ratio of vinegar to water) and limit soaking time to under 5 minutes. Rinse immediately and condition occasionally with a drop of argan oil after drying to restore softness.
Will the vinegar smell linger on my brushes?
No, not if rinsed properly. Any faint odor dissipates completely once the brush dries. If concerned, do a final rinse with water mixed with a few drops of essential oil like lavender (optional and only for non-sensitive users).
How do I know when it’s time to replace a brush?
Even well-maintained brushes wear out. Replace them if you notice excessive shedding (more than 5–6 hairs per wash), permanent deformation, split tips, or a musty smell that persists after cleaning. With proper care, most quality brushes last 1–3 years.
Checklist: Deep Clean Your Brushes Safely
- ☑ Gather supplies: vinegar, dish soap, two bowls, towel
- ☑ Mix 1:1 warm water and vinegar + 1–2 drops dish soap
- ☑ Swirl bristles in solution (keep ferrule dry)
- ☑ Rinse thoroughly in clean water until clear
- ☑ Gently squeeze and reshape bristles
- ☑ Lay flat or hang upside-down to dry
- ☑ Wait 6–8 hours before reuse
- ☑ Repeat every 2–3 weeks for daily-use brushes
Final Thoughts: Make Clean Brushes a Non-Negotiable
Your makeup brushes are tools of transformation—but only when kept in top condition. Relying on visual cues alone (“they don’t look dirty”) is a gamble with your skin’s health. The vinegar and dish soap method offers a proven, economical, and eco-conscious way to maintain hygiene without compromising brush quality.
Unlike chemical-laden sprays or costly foams, this approach uses ingredients already in your home, delivering salon-level cleanliness with everyday simplicity. Whether you're a minimalist who owns three brushes or a collector with dozens, consistent deep cleaning ensures every stroke applies makeup—not microbes.


 浙公网安备
33010002000092号
浙公网安备
33010002000092号 浙B2-20120091-4
Comments
No comments yet. Why don't you start the discussion?