
A blender is one of the most frequently used appliances in modern kitchens—whipping up smoothies, soups, sauces, and nut butters with ease. But despite regular rinsing, residue often lingers in hidden areas, especially around the blade assembly and base seal. Over time, this buildup can harbor bacteria, cause unpleasant odors, and even compromise blending efficiency. Most users overlook the base seal, a small but critical component that sits between the blade and the jar, making it a breeding ground for mold and grime if not properly maintained. A thorough deep clean isn’t just about aesthetics; it’s essential for hygiene, performance, and extending the life of your appliance.
Why Deep Cleaning the Base Seal Matters
The base seal—also known as the gasket or O-ring—is a rubber or silicone ring located beneath the blade assembly where it attaches to the blender jar. Its primary function is to create a watertight seal, preventing leaks during operation. However, because it’s tucked beneath metal blades and tightly secured, food particles, oils, and moisture easily become trapped underneath. This dark, damp environment is ideal for bacterial growth and mildew.
Ignoring this area leads to more than just smells. In high-speed blenders, compromised seals can result in wobbling blades, reduced torque, and even motor strain. According to appliance engineers at Vitamix, “A poorly maintained blade base can reduce blending efficiency by up to 30% over time due to imbalance and drag.” Furthermore, repeated exposure to degraded organic matter may eventually lead to material breakdown, requiring costly replacements.
“Most blender failures attributed to ‘motor burnout’ are actually preventable through routine maintenance of the blade assembly and seal.” — Carlos Mendez, Appliance Durability Analyst, HomeTech Labs
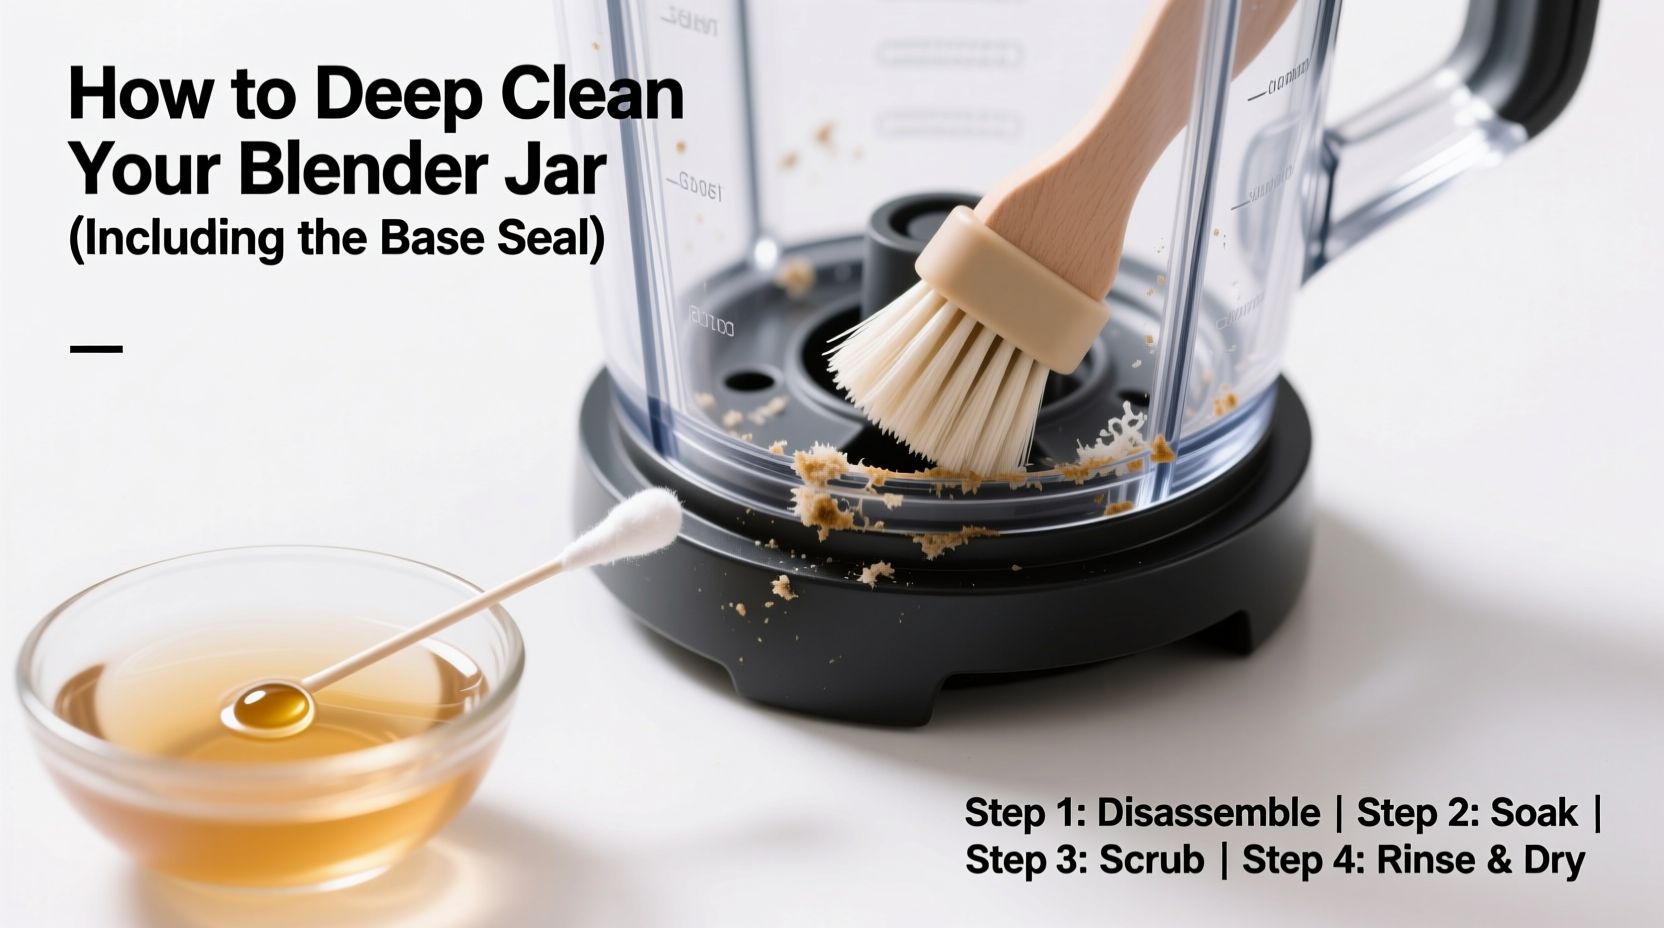
Step-by-Step Guide to Deep Cleaning Your Blender Jar and Base Seal
Cleaning the entire blender jar is straightforward, but accessing the base seal requires careful disassembly and attention to detail. Follow this comprehensive process to ensure every crevice is sanitized and safe for use.
- Unplug the blender – Safety first. Always disconnect the unit before handling blades or disassembling parts.
- Remove the jar from the base – Lift it straight off the motor housing to access the underside.
- Invert the jar and locate the blade assembly – On most models, the blades are secured with a central screw or locking nut.
- Use the appropriate tool to loosen the blade assembly – Typically a Phillips or flat-head screwdriver (check your manual). Turn counterclockwise to unscrew.
- Carefully remove the blade unit – Lift it straight out. Handle with gloves or a towel to avoid cuts.
- Extract the base seal – Gently pry the rubber or silicone ring from its groove using a non-metallic utensil like a plastic spudger or butter knife.
- Inspect both the seal and blade housing – Look for cracks, warping, or embedded debris. Replace the seal if damaged.
- Soak components in warm, soapy water – Use dish soap and hot water (not boiling) for 15–20 minutes. Add a tablespoon of baking soda for deodorizing power.
- Scrub with a bottle brush or toothbrush – Focus on blade crevices, threads, and the interior groove where the seal sits.
- Rinse thoroughly and dry completely – Moisture left in the housing can lead to rust or mold upon reassembly.
- Reinstall the clean base seal – Ensure it sits flat and fully seated in the groove.
- Reattach the blade assembly securely – Tighten the screw or nut firmly, but do not over-torque.
- Wipe down the exterior of the jar – Use a microfiber cloth and vinegar solution for shine and disinfection.
Do’s and Don’ts of Blender Maintenance
Mistakes in cleaning can damage your blender or reduce its lifespan. Refer to this table to avoid common pitfalls.
| Do’s | Don’ts |
|---|---|
| Disassemble the blade unit monthly for deep cleaning | Never submerge the motor base in water |
| Use soft-bristle brushes to clean blade edges | Avoid steel wool or abrasive pads that scratch surfaces |
| Dry all components completely before reassembly | Don’t leave the base seal damp—it encourages mold |
| Replace worn seals every 6–12 months | Don’t overtighten the blade screw—this can crack the jar |
| Store the jar upside down to prevent dust accumulation | Avoid using bleach unless specified by the manufacturer |
Real Example: The Forgotten Smoothie Residue
Sarah, a health coach from Portland, prided herself on daily green smoothies. After six months, she noticed a faint sour smell every time she turned on her blender. She washed the jar after each use, but the odor persisted. Assuming it was the motor, she nearly replaced the entire unit. Instead, she consulted an online forum and learned about the base seal. Upon disassembling the blade, she found a thick layer of oxidized spinach and banana pulp cemented beneath the rubber ring. After soaking and scrubbing, the smell vanished. “I had no idea that tiny ring could trap so much,” she said. “Now I clean it every month—it runs quieter and blends smoother.”
This case illustrates how routine visual inspection can prevent unnecessary repairs and maintain optimal performance. What seems like a mechanical issue is often just neglected hygiene.
Alternative Cleaning Methods for Stubborn Buildup
Sometimes, soap and water aren’t enough—especially when oily residues or protein films accumulate from nut butters or dairy-based recipes. Try these proven alternatives:
- Vinegar and Baking Soda Soak: Mix 1 cup white vinegar with 2 tablespoons baking soda in the jar. Let it fizz for 10 minutes, then scrub. Effective for mineral deposits and odor removal.
- Lemon Juice Wash: Fill the jar halfway with warm water and add juice from one lemon. Blend for 1 minute, then disassemble and rinse. Citric acid breaks down organic films naturally.
- Dishwasher Safe Components: If your model allows, place the jar, blade, and seal on the top rack. Use a heated dry cycle to ensure complete drying. Confirm compatibility with your user manual first.
- Hydrogen Peroxide Disinfection: For mold-prone seals, soak in 3% hydrogen peroxide for 15 minutes. Rinse thoroughly. Safer than chlorine bleach and effective against fungi.
Checklist: Monthly Blender Deep Clean Routine
Stay consistent with this actionable checklist. Perform it once a month—or more often if you use your blender daily.
- ☐ Unplug the blender and remove the jar
- ☐ Unscrew the blade assembly using the correct tool
- ☐ Remove and inspect the base seal for damage
- ☐ Soak jar, blade, and seal in warm, soapy water for 15–20 mins
- ☐ Scrub blade threads and seal groove with a soft brush
- ☐ Rinse all parts under running water
- ☐ Dry components completely with a lint-free cloth
- ☐ Reinstall the clean, dry base seal
- ☐ Reattach the blade unit securely
- ☐ Run a vinegar-water blend (1:1 ratio) for 30 seconds, then rinse
- ☐ Wipe down the motor base with a damp cloth
- ☐ Store the jar upside down with the lid off for airflow
Frequently Asked Questions
How often should I replace the base seal?
Base seals should be replaced every 6 to 12 months with regular use. Signs it’s time for a replacement include cracking, hardening, loss of elasticity, persistent odor, or visible mold that won’t clean off. High-end blenders often offer replacement kits directly from the manufacturer.
Can I clean the blender base without removing the seal?
You can perform surface cleaning without disassembly, but it won’t eliminate trapped debris. Rinsing or blending soapy water helps, but only full disassembly ensures hygiene in the seal area. Skipping this step leads to gradual contamination.
Is it safe to use bleach on the base seal?
Bleach can degrade rubber and silicone over time, causing brittleness and leaks. If disinfection is necessary, dilute household bleach (1 tablespoon per quart of water), soak for no more than 5 minutes, and rinse extensively. Hydrogen peroxide or vinegar are safer long-term options.
Conclusion: Make Deep Cleaning a Seamless Habit
Your blender works hard for you—return the favor with proper care. The base seal may be small, but its impact on hygiene, performance, and longevity is significant. By incorporating a monthly deep clean into your routine, you prevent odors, maintain blending power, and avoid premature wear. The few minutes it takes to disassemble and sanitize the jar pay off in years of reliable service. Don’t wait for a strange smell or leaking jar to act. Take control of your kitchen hygiene today and keep your blender operating like new.


 浙公网安备
33010002000092号
浙公网安备
33010002000092号 浙B2-20120091-4
Comments
No comments yet. Why don't you start the discussion?