
A blender is one of the most frequently used appliances in modern kitchens, essential for smoothies, soups, sauces, and more. But with regular use comes a hidden problem: residue buildup, especially in the crevices around the blade base. Over time, food particles, oils, and moisture can accumulate beneath the blades—areas that are notoriously difficult to access. This trapped debris not only causes lingering odors but can also harbor bacteria and mold. A quick rinse after use isn’t enough. To keep your blender hygienic, efficient, and long-lasting, a thorough deep cleaning routine is essential. This guide walks you through proven techniques to sanitize every inch of your blender jar, focusing on the often-neglected blade assembly.
Why Deep Cleaning Matters Beyond Surface Rinse
Most people assume that rinsing a blender with water immediately after use is sufficient. While this prevents dried-on messes, it doesn't address microbial growth or odor-causing residues embedded under the blade gasket or within the sealing ring. The blade base—where the blades attach to the jar—is sealed with rubber or silicone gaskets to prevent leaks. These seals create small pockets where liquids and soft foods like bananas, yogurt, or nut butters can seep in and decompose unnoticed.
According to Dr. Lena Torres, a food safety microbiologist at the National Kitchen Hygiene Institute, “Blender jars, particularly the blade assemblies, are among the top five germ hotspots in home kitchens. The moist, dark environment under the blades is ideal for bacterial colonies like E. coli and mold species such as Aspergillus.”
“Blender jars, particularly the blade assemblies, are among the top five germ hotspots in home kitchens.” — Dr. Lena Torres, Food Safety Microbiologist
Ignoring these areas compromises not just hygiene but performance. Buildup increases friction, dulls blades prematurely, and may cause motor strain over time. A deep clean restores functionality and ensures what you blend stays fresh and safe.
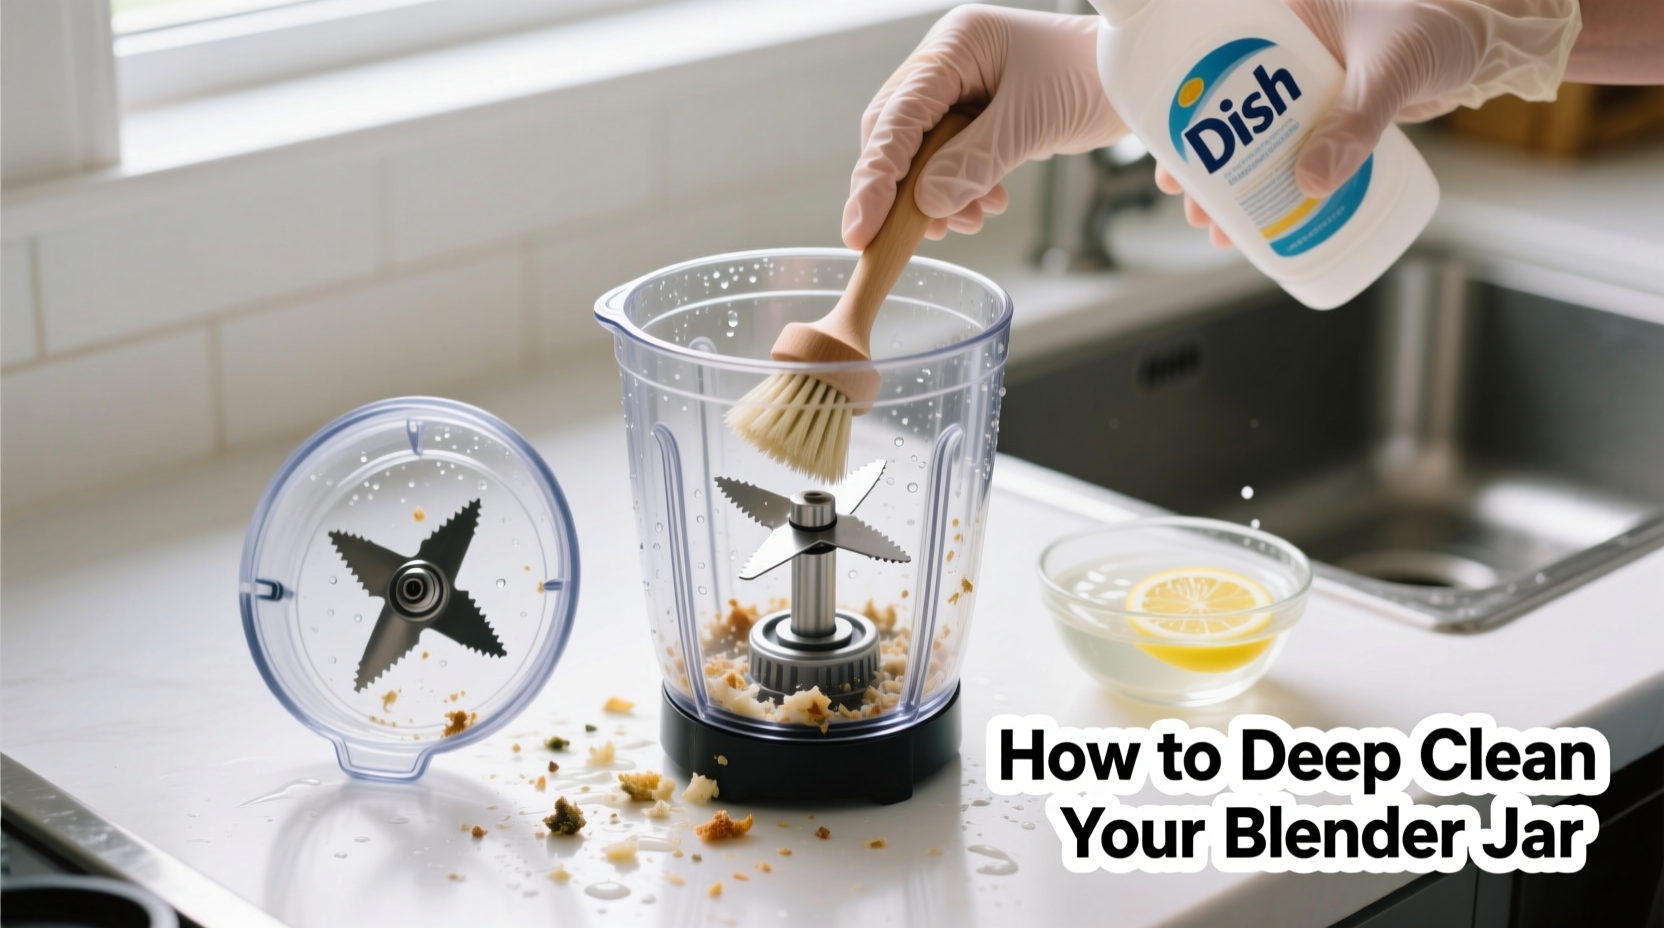
Step-by-Step Guide to Disassembling and Cleaning the Blade Base
The key to accessing the hard-to-reach areas lies in proper disassembly. Not all blenders allow full detachment of the blade unit from the jar base, but many high-performance models do. Always consult your user manual before proceeding, as forcing parts can damage seals or void warranties.
- Unplug and empty the blender: Ensure the appliance is disconnected from power and completely emptied of any contents.
- Invert the jar: Turn the blender jar upside down on a clean towel to access the bottom.
- Remove the blade assembly: Using a wrench (if required), unscrew the central bolt holding the blade unit in place. Some models feature a twist-off design. Handle blades carefully—they remain sharp even when worn.
- Separate components: Detach the metal blades, rubber gasket, and any plastic washers. Keep track of their order for reassembly.
- Inspect for wear: Check the gasket for cracks, warping, or permanent staining. Replace if compromised—typically every 6–12 months with frequent use.
Cleaning Each Component Thoroughly
Now that the parts are separated, clean each element individually using appropriate methods.
- Blades: Soak in warm, soapy water for 10 minutes. Use an old toothbrush to scrub both sides and edges. For stubborn film, dip the brush in baking soda paste (two parts baking soda to one part water) and gently scrub. Avoid abrasive pads that could scratch metal surfaces.
- Rubber or silicone gasket: This is the primary trap zone for grime. Rub both inner and outer surfaces with a damp cloth dipped in vinegar or mild dish soap. Pay special attention to the underside where it contacts the jar base. If mold spots appear, soak in a 1:1 white vinegar and water solution for 15 minutes before scrubbing.
- Jar interior and base: Clean the inside of the jar with warm soapy water and a non-scratch sponge. Then focus on the threaded area where the blade attaches. Use a narrow bottle brush or pipe cleaner to remove buildup in grooves.
- Exterior and lid: Wipe down the outside with a disinfectant wipe. For lids with vents or spout covers, disassemble and clean separately to prevent odor retention.
Effective Deep-Cleaning Methods for Fully Assembled Jars
If disassembly isn’t possible or preferred, several in-place cleaning techniques can still deliver excellent results. These methods use common household items and require minimal effort.
Method 1: Baking Soda & Warm Water Scrub Cycle
This approach uses the blender’s own motion to agitate a cleaning solution.
- Add 1–2 cups warm water to the jar.
- Sprinkle in 1 tablespoon of baking soda.
- Run the blender on high for 30–60 seconds.
- Pour out the mixture and rinse thoroughly.
Baking soda acts as a gentle abrasive and deodorizer, loosening stuck-on particles without damaging surfaces.
Method 2: Vinegar Sanitizing Blend
Vinegar’s acetic acid kills up to 82% of mold species and 99.9% of common bacteria, according to EPA research.
- Fill the jar halfway with equal parts white vinegar and warm water.
- Blend for 1 minute.
- Let sit for 10 minutes, then blend again for 30 seconds.
- Rinse well and air dry upside down.
Method 3: Dishwasher-Safe Components Only
Check your blender model’s manual. Many modern jars and removable lids are dishwasher-safe—but never put the entire base unit or blade assembly in the dishwasher unless explicitly approved. If safe, place the jar and detachable lid on the top rack. Hand-wash the blade unit to preserve its integrity.
Do’s and Don’ts of Blender Jar Maintenance
| Do’s | Don’ts |
|---|---|
| Disassemble and deep clean monthly with heavy use | Never submerge the motor base in water |
| Use soft brushes or cloths to avoid scratching | Avoid steel wool or harsh abrasives |
| Dry all parts completely before reassembly | Don’t store the jar with the lid sealed immediately after washing—trapped moisture breeds mold |
| Replace worn gaskets promptly | Don’t overtighten the blade bolt—it can crack the jar base |
| Run a cleaning cycle after blending sticky ingredients (e.g., dates, peanut butter) | Never use bleach unless recommended by the manufacturer |
Real Example: How One Home Cook Fixed Her Persistent Blender Smell
Sarah M., a meal-prep enthusiast from Portland, noticed a sour smell every time she made her morning smoothie—even though she rinsed the blender daily. She tried vinegar blends and baking soda cycles, but the odor returned within days. Frustrated, she decided to disassemble the blade unit for the first time in two years. Beneath the rubber seal, she found a thick layer of blackened, moldy residue—likely from repeated banana and yogurt use.
She soaked the gasket in vinegar, scrubbed the threads with a toothpick, replaced the old seal with a new one ordered online, and cleaned the jar with hydrogen peroxide. After reassembling, she ran a final rinse cycle. The smell vanished completely and hasn’t returned in six months. “I had no idea that tiny ring was hiding so much gunk,” she said. “Now I clean it every month like clockwork.”
Essential Checklist for a Complete Blender Deep Clean
- Pre-Cleaning Prep
- ☐ Unplug the blender
- ☐ Empty and rinse the jar
- ☐ Lay out tools: wrench, toothbrush, towels
- Disassembly
- ☐ Remove blade assembly safely
- ☐ Separate blades, gasket, and washers
- ☐ Inspect for damage or wear
- Cleaning Process
- ☐ Soak metal parts in soapy water
- ☐ Scrub blades and gasket with brush
- ☐ Clean jar threads and interior
- ☐ Sanitize with vinegar or baking soda solution
- Drying & Reassembly
- ☐ Air-dry all components fully
- ☐ Reattach parts in correct order
- ☐ Tighten securely but not excessively
- Post-Clean Verification
- ☐ Run a plain water cycle to check for leaks
- ☐ Store jar inverted or open to prevent moisture buildup
Frequently Asked Questions
How often should I deep clean my blender jar?
For average use (2–4 times per week), perform a full deep clean every 4–6 weeks. With daily use or frequent blending of oily or sticky ingredients (like nut butters or dressings), clean monthly. The rubber gasket should be inspected every three months and replaced if cracked or discolored.
Can I use lemon juice instead of vinegar?
Yes, lemon juice has natural citric acid that helps cut grease and deodorize. However, it’s less effective than vinegar at killing mold and bacteria. For sanitizing purposes, white vinegar is superior. Lemon juice works well as a final rinse for freshness but shouldn’t replace vinegar in deep cleaning routines.
Why does my blender still smell after cleaning?
If odors persist, the source is likely trapped moisture or biofilm under the blade gasket. Ensure all parts are fully disassembled and dried. Soak the gasket in a 3% hydrogen peroxide solution for 10 minutes, then scrub and rinse. Also, verify that the jar’s base cavity isn’t cracked or retaining water. In rare cases, persistent smells indicate irreversible contamination—replacement may be necessary.
Final Steps: Maintaining Long-Term Blender Hygiene
Deep cleaning is only effective when paired with consistent maintenance. Make it a habit to rinse the blender immediately after use and run a quick cleaning cycle with soapy water or vinegar once a week. Store the jar upside down on a rack to promote airflow and discourage microbial growth. Label spare gaskets with purchase dates to track replacement schedules.
Remember, your blender processes raw ingredients that go directly into your body. Keeping it truly clean isn’t just about convenience—it’s a health imperative. Taking 15 minutes every few weeks to dismantle and sanitize the blade base pays off in flavor, performance, and peace of mind.


 浙公网安备
33010002000092号
浙公网安备
33010002000092号 浙B2-20120091-4
Comments
No comments yet. Why don't you start the discussion?