
Gaming consoles are precision electronics designed to deliver high-performance experiences over extended periods. However, like any device that runs intensive processes, they generate heat and attract dust—two of the biggest threats to internal components. Over time, accumulated dust can clog ventilation systems, reduce cooling efficiency, and lead to overheating, throttling, or even permanent hardware failure. A regular deep cleaning routine is not just about aesthetics; it’s a critical maintenance practice that preserves performance, prevents system crashes, and extends the usable life of your console. Whether you own a PlayStation, Xbox, or Nintendo Switch docked setup, understanding how to safely and effectively deep clean your system ensures you get the most out of your investment.
Why Deep Cleaning Matters for Performance and Longevity
Dust may seem harmless, but inside a gaming console, it acts like an insulator. When fans and heatsinks become coated in grime, airflow is restricted, and heat builds up around the CPU and GPU. This thermal stress forces the system to throttle performance to avoid damage, resulting in lower frame rates, longer loading times, and unexpected shutdowns. In extreme cases, sustained overheating can degrade solder joints or damage capacitors, leading to costly repairs or replacement.
A study by Sony’s engineering team revealed that consoles operating in poorly ventilated environments with minimal cleaning saw a 37% higher failure rate over three years compared to regularly maintained units. Similarly, Microsoft’s Xbox reliability reports highlight fan obstructions as one of the top causes of service returns. These findings underscore a simple truth: consistent internal cleaning directly correlates with system stability and lifespan.
“Dust buildup is the silent killer of consumer electronics. A well-maintained console can last five to seven years or more. One buried in dust? Maybe two.” — Dr. Alan Reyes, Electronics Durability Analyst at TechLife Labs
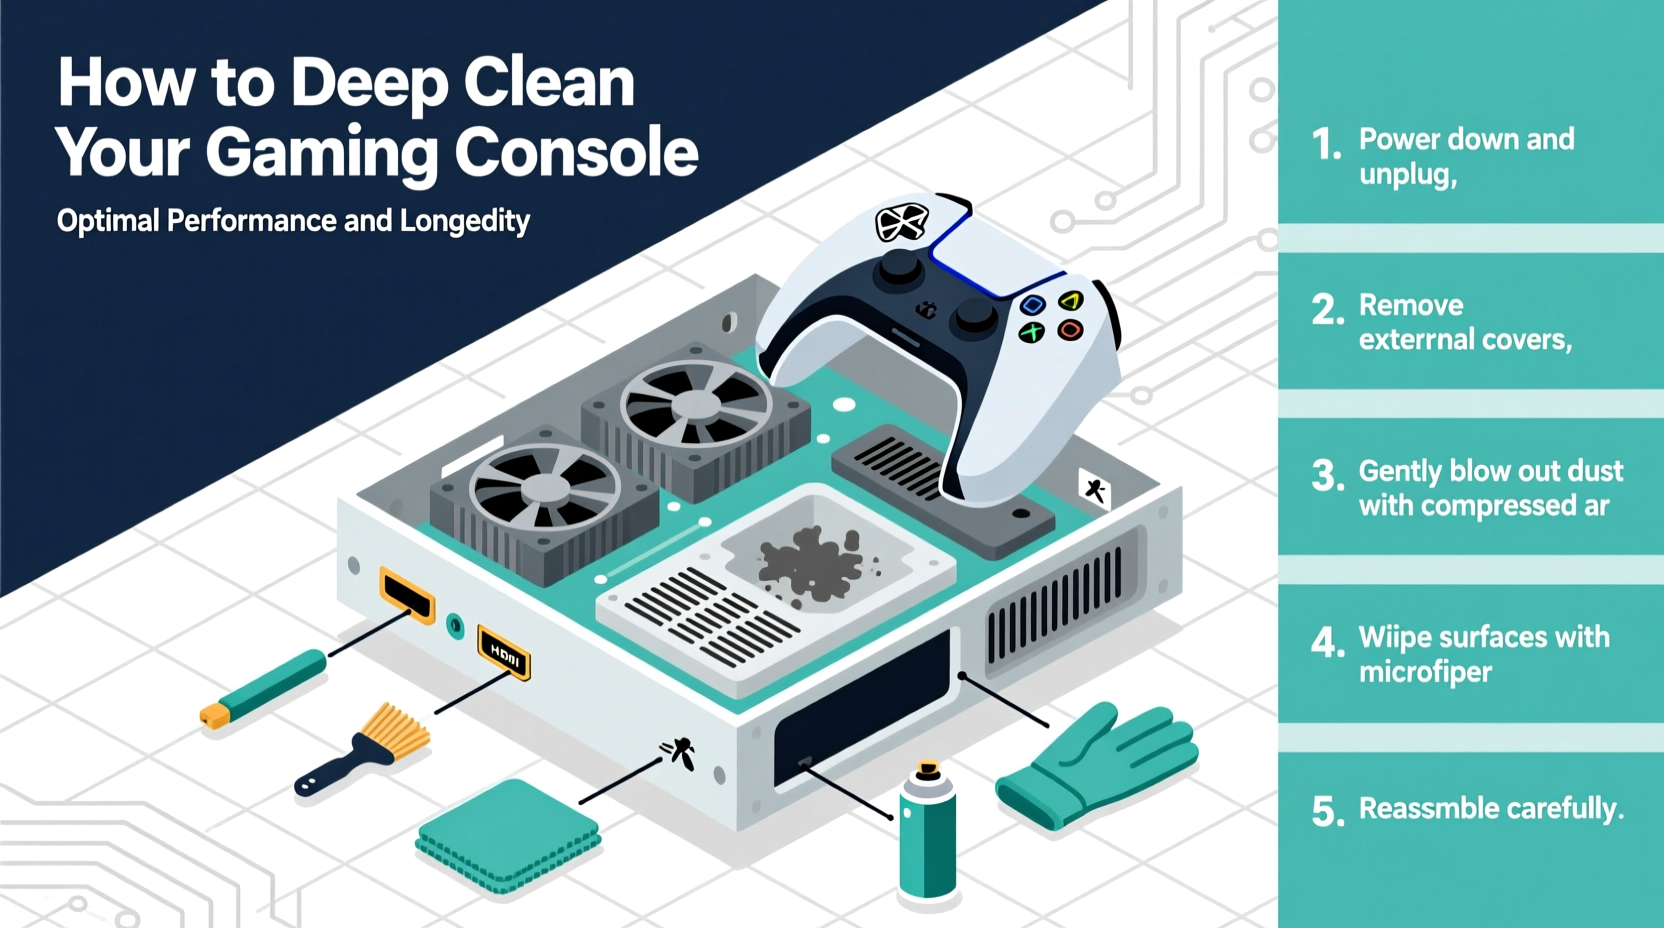
Step-by-Step Guide to Safely Deep Clean Your Console
Cleaning your console doesn’t require advanced technical skills, but it does demand caution and attention to detail. Follow this comprehensive timeline to ensure a thorough yet safe process.
- Power Down and Unplug: Turn off your console completely and disconnect all cables, including power, HDMI, and USB peripherals. Never attempt cleaning while the system is plugged in or warm.
- Choose a Clean Workspace: Work on a non-static surface like a wooden table, ideally with good lighting. Lay down a microfiber cloth to prevent scratches.
- Remove External Debris: Use a dry, soft-bristle brush or compressed air to gently remove loose dust from vents, disc trays, and ports. Hold the can upright when using compressed air to avoid moisture discharge.
- Open the Console (If Possible): Some models, like the PS4 and Xbox One, allow access to internal components without voiding warranty if done correctly. Refer to official disassembly guides for your model. Newer consoles like the PS5 and Xbox Series X have more complex designs—proceed only if confident or consider professional help.
- Clean Internal Components: Use short bursts of compressed air to blow dust from the fan blades, heatsink fins, and motherboard. Avoid touching circuitry with tools. For stubborn grime, use a cotton swab lightly dampened with 90%+ isopropyl alcohol on non-electrical surfaces.
- Inspect and Clean the Fan: Hold the fan in place with a finger or plastic tool while blowing air to prevent overspinning, which can damage bearings.
- Reassemble Carefully: Once dry and debris-free, reattach panels and reconnect cables. Double-check that all screws are secured and no parts are left behind.
- Test the System: Power on the console and monitor startup behavior. Listen for unusual fan noise and check system temperature in settings or via third-party apps if available.
Essential Tools and Supplies You’ll Need
Using the right tools makes the difference between effective maintenance and accidental damage. Here’s what every gamer should keep in their cleaning kit:
- Compressed air can: The cornerstone of dust removal. Look for models with a flexible straw nozzle for precision.
- Soft microfiber cloths: Ideal for wiping exteriors without scratching glossy finishes.
- Cotton swabs and lens cleaning wipes: Useful for cleaning disc drives and optical lenses (for disc-based consoles).
- Isopropyl alcohol (90% or higher): Effective for removing sticky residue or smudges on non-electronic surfaces.
- Plastic spudger or opening tools: Helpful for prying open panels without marring the casing.
- Small screwdriver set: Precision Phillips-head sizes are often needed for internal access.
- Anti-static wrist strap (optional): Recommended if you’re handling internal components frequently.
Avoid using household cleaners, paper towels, vacuum cleaners (they generate static), or water-based solutions directly on the console. These can corrode plastics or short-circuit components.
Do’s and Don’ts of Console Cleaning
| Do’s | Don’ts |
|---|---|
| Use compressed air in short bursts to avoid moisture buildup. | Shake or tilt the compressed air can while spraying—it can release liquid propellant. |
| Clean in a well-ventilated area to avoid inhaling dust. | Use a vacuum cleaner near internal components—static electricity can damage circuits. |
| Wipe the exterior with a microfiber cloth slightly dampened with alcohol. | Apply liquids directly to the console surface. |
| Let the console sit unplugged for 10 minutes before reassembly to dissipate static. | Force open panels or use metal tools that could scratch or conduct electricity. |
| Check ventilation space—keep at least 4 inches of clearance around all sides. | Place the console on carpet or in enclosed cabinets where airflow is restricted. |
Real Example: How One Gamer Prevented a Costly Repair
Mark T., a long-time PlayStation user from Austin, noticed his PS4 Pro was shutting down during intense gaming sessions. At first, he assumed it was a software glitch and reinstalled the system twice. When the issue persisted, he recorded internal temperatures using a fan monitoring app and discovered readings exceeding 85°C under load—well above the safe threshold of 75°C.
Instead of sending it in for repair, Mark decided to open the console and found the heatsink almost entirely clogged with pet hair and dust. After a careful cleaning with compressed air and a few cotton swabs dipped in isopropyl alcohol, the system cooled to a stable 68°C. The shutdowns stopped immediately, and the console regained its original performance. Mark estimates he saved over $150 in potential repair fees—all with a 30-minute cleaning session and supplies he already owned.
Expert Tips for Maximizing Long-Term Console Health
Beyond periodic deep cleans, adopting smart usage habits enhances your console’s durability. Consider these proven strategies:
- Improve Room Ventilation: Keep the room cool and avoid placing the console near radiators, direct sunlight, or other heat-emitting devices.
- Use a Surge Protector: Power surges can damage internal circuitry. Invest in a quality surge-protected power strip.
- Enable Rest Mode Wisely: While convenient, leaving the console in rest mode for days increases passive dust intake. Turn it off completely when not in use for extended periods.
- Update Firmware Regularly: Manufacturers often release updates that optimize fan curves and thermal management.
- Monitor Fan Noise: An increasingly loud or erratic fan is an early warning sign of dust buildup or bearing wear.
Frequently Asked Questions
Can I clean my console without opening it?
Yes, external cleaning with compressed air through the vents is safe and effective for light maintenance. However, for optimal results—especially after a year of use—internal access provides far better dust removal. If you're uncomfortable opening the device, consider professional cleaning services offered by local electronics repair shops.
Will cleaning my console void the warranty?
It depends on the manufacturer and region. Opening the console may void the warranty if tamper-evident seals are broken. Check your warranty terms before disassembling. Many companies now acknowledge that basic maintenance like fan cleaning shouldn’t automatically invalidate coverage, especially if no damage occurs.
How do I know if my console needs cleaning?
Warning signs include excessive fan noise, frequent overheating messages, sudden shutdowns during gameplay, visible dust in vents, or unusually hot casing. You can also use built-in system info menus to check current temperatures if available, or download diagnostic tools compatible with your console model.
Final Checklist: Your Deep Cleaning Action Plan
- Unplug the console and remove all cables.
- Gather supplies: compressed air, microfiber cloth, cotton swabs, isopropyl alcohol, screwdrivers.
- Clean exterior surfaces gently with a dry or slightly damp cloth.
- Blow out dust from all vents using compressed air.
- If applicable, open the casing following official guidelines.
- Clear dust from fan, heatsink, and internal compartments with short air bursts.
- Reassemble the console carefully and reconnect cables.
- Power on and verify normal operation and reduced fan noise.
- Schedule your next cleaning 6–12 months ahead.
Conclusion: Take Control of Your Console’s Lifespan
Your gaming console is more than entertainment—it’s a powerful computer subjected to daily thermal stress. By integrating deep cleaning into your routine, you protect both performance and longevity. The process takes less time than a single gaming session, yet the payoff in system stability and extended usability is immense. Don’t wait for warning signs. Act now, follow these steps, and give your console the care it deserves. A little maintenance today means smoother gameplay, fewer frustrations, and years of reliable service tomorrow.


 浙公网安备
33010002000092号
浙公网安备
33010002000092号 浙B2-20120091-4
Comments
No comments yet. Why don't you start the discussion?