
Gaming mice are precision tools, subjected to constant use, sweat, dust, and grime. Over time, this buildup can affect tracking accuracy, button responsiveness, and overall hygiene. While most users know their mouse needs cleaning, many hesitate—fearing damage to the sensitive optical sensor or internal circuitry. Done incorrectly, a deep clean can shorten your mouse’s lifespan. But when performed with care and the right tools, it restores performance and extends usability. This guide provides a comprehensive, safe method to deep clean your gaming mouse without risking the sensor or electronics.
Why Cleaning Your Gaming Mouse Matters
A gaming mouse is one of the most frequently touched peripherals. Hours of daily use expose it to skin oils, dead cells, and environmental dust. These contaminants accumulate in crevices, under buttons, and around the scroll wheel. The result? Sticky clicks, inconsistent cursor movement, and even bacterial growth. Beyond performance, unclean devices pose hygiene risks—especially if shared or used near food.
Professional esports players and streamers often rotate or clean their mice weekly. As competitive gamer and Twitch streamer Jordan Lee explains:
“After tournaments, my mouse feels like it’s been through a war. A proper clean resets its feel—like getting a new one without spending a dime.” — Jordan Lee, Professional FPS Player
The optical sensor, located on the underside, is especially vulnerable. It relies on a clear lens and unobstructed light path to track movement accurately. Dust or smudges on the sensor window can cause jitter, lift-off errors, or complete tracking failure. Yet, many users avoid touching this area out of fear. The truth? With the right approach, you can clean it safely and effectively.
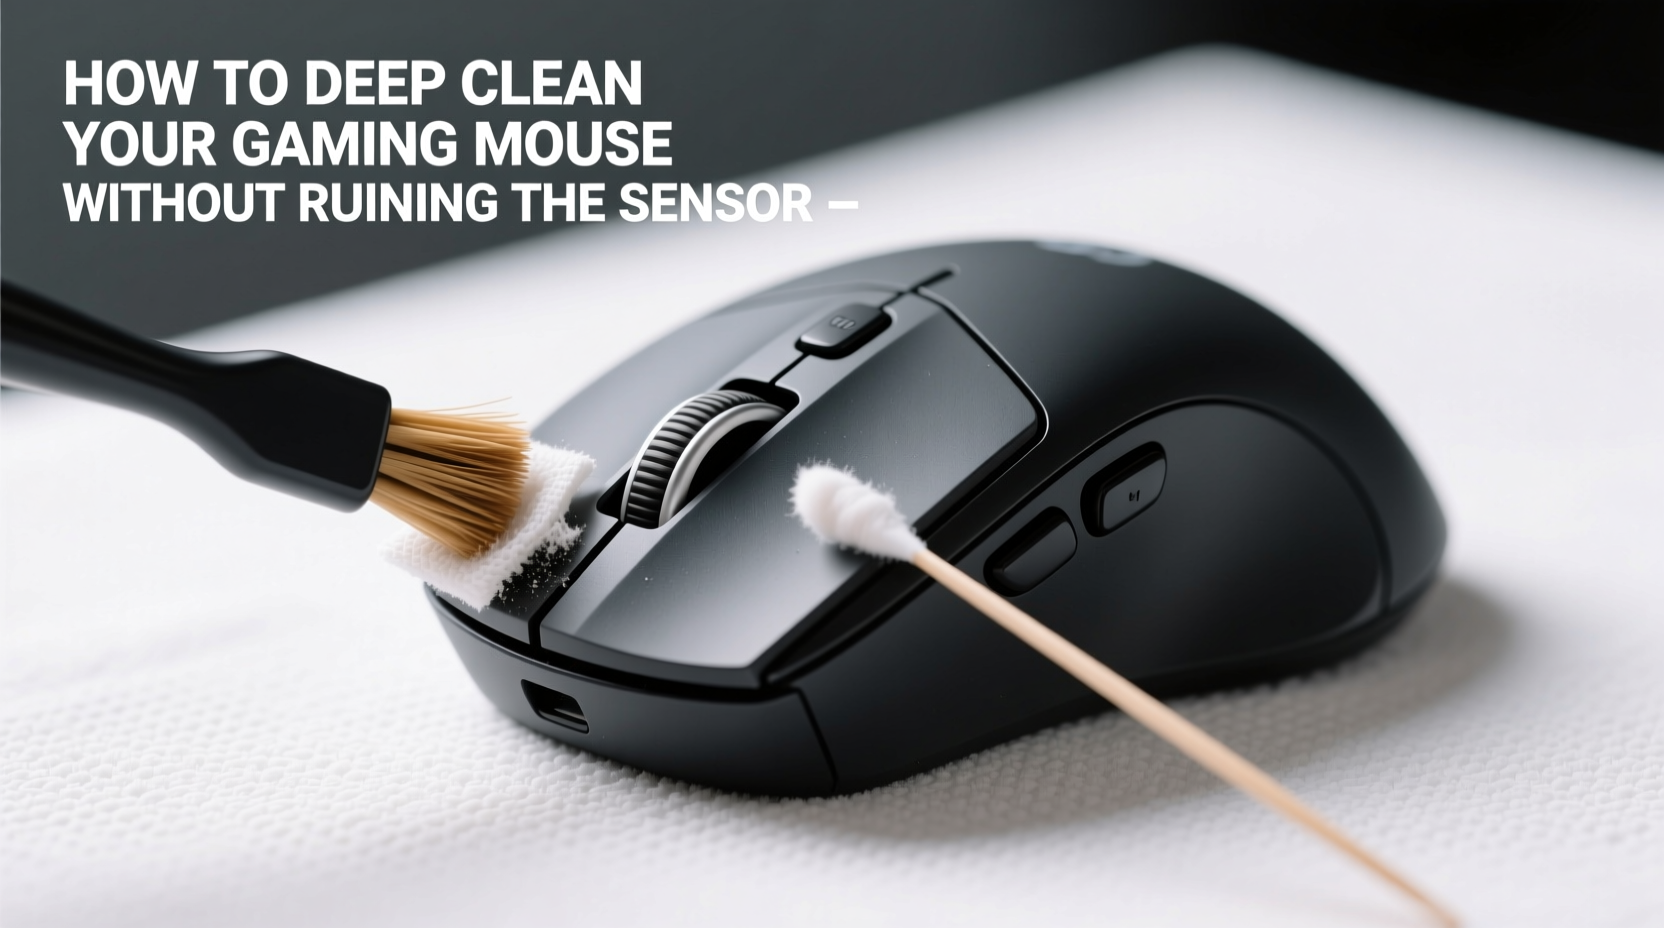
What You’ll Need: Tools and Materials
Before starting, gather the following supplies. Using improper tools—like paper towels or household cleaners—can scratch surfaces or leave residue that interferes with function.
- Isopropyl alcohol (70% concentration) – Effective at breaking down oils without harming plastics.
- Microfiber cloth – Lint-free and gentle on surfaces.
- Cotton swabs (Q-tips) – For tight spaces like button gaps and scroll wheels.
- Compressed air canister – Removes loose dust from crevices without contact.
- Soft-bristle toothbrush (clean, unused) – Helps dislodge grime from textured grips.
- Plastic spudger or guitar pick – Useful for gently prying open side panels if needed.
- Tweezers – For removing stubborn debris.
- Small bowl and water (optional) – Only for non-electronic parts if disassembling.
Avoid using acetone, bleach, ammonia-based cleaners, or abrasive cloths. These can degrade plastic finishes and damage sensor housings.
Step-by-Step Deep Cleaning Process
Follow this sequence to ensure thorough cleaning while protecting sensitive components.
- Power down and disconnect. Unplug the mouse from your PC or turn off the wireless connection. This prevents accidental input or electrical issues during cleaning.
- Remove surface debris with compressed air. Hold the can upright and spray short bursts into button gaps, scroll wheel vents, and around the sensor window. Tilt the mouse to let particles fall out. Do not shake the can, as liquid propellant can spray out and damage components.
- Clean the body with a microfiber cloth. Dampen the cloth slightly with isopropyl alcohol. Wipe down the top, sides, and back of the mouse. Pay attention to thumb rests and grip zones where oils accumulate. Never soak the cloth—excess moisture can seep inside.
- Tackle the scroll wheel. Use a cotton swab dipped in alcohol to clean between rubber ridges. Rotate the wheel manually to access all sides. If it feels gritty, use the soft toothbrush lightly to scrub while spinning.
- Clean around buttons. Dirt collects under left/right click buttons. Gently press the button down and use a dry cotton swab to remove lint. For sticky residue, lightly dampen the swab with alcohol and wipe the gap edges.
- Address the sensor window. This is the most critical step. Use a *dry* microfiber cloth to gently wipe the sensor lens in a circular motion. If visibly dirty, lightly moisten a cotton swab with alcohol, squeeze out excess, and carefully wipe the lens. Do not press hard. Allow 30 seconds to dry completely before powering on.
- Check cable and connector (if wired). Wipe the cable from base to plug with a dry microfiber cloth. Inspect the USB connector for corrosion or bent pins. Clean with a dry swab if needed.
- Let it rest. After cleaning, leave the mouse unplugged for 5–10 minutes to ensure any residual moisture evaporates.
If your mouse has removable side panels or modular switches, consult the manufacturer’s guide before disassembly. Some high-end models (e.g., Logitech G Pro X Superlight, Razer Viper V2) allow partial disassembly for deeper maintenance. However, unless you’re experienced, avoid full teardowns—seals and internal components are easily damaged.
Do’s and Don’ts: What to Avoid During Cleaning
To prevent costly mistakes, follow this simple reference table.
| Do’s | Don’ts |
|---|---|
| Use 70% isopropyl alcohol on a cloth—not directly sprayed | Submerge the mouse in water or cleaning solution |
| Use compressed air to blow out dust from ports | Use a vacuum cleaner nozzle—it can generate static discharge |
| Clean every 4–6 weeks with moderate use | Wait until the mouse is malfunctioning to clean it |
| Store the mouse on a clean mousepad when not in use | Leave it exposed on dusty desks or near drinks |
| Inspect the sensor weekly for visible smudges | Touch the sensor lens with fingers—oils transfer instantly |
Real-World Example: Recovering a High-Sensitivity Mouse
Consider the case of Marcus T., a competitive Valorant player using a lightweight wireless mouse. After three months of daily play, he noticed inconsistent tracking—especially during flick shots. The cursor would occasionally \"stick\" or jump when lifting the mouse. He assumed the sensor was failing and considered buying a replacement.
Instead, he followed a controlled cleaning process: used compressed air around the sensor housing, wiped the lens with a dry microfiber cloth, and cleaned the mousepad surface. After retesting, tracking improved dramatically. The issue wasn’t hardware failure—it was a layer of fine dust on the lens combined with a worn-out mousepad. Cleaning both restored factory-level performance, saving him over $100.
This scenario highlights a common misconception: poor tracking isn’t always a sign of a broken sensor. Often, it’s preventable buildup. Regular maintenance avoids premature replacements and maintains competitive edge.
When to Consider Disassembly (And When Not To)
Some enthusiasts advocate full disassembly for the deepest clean. While possible, this should only be attempted if:
- You own a model designed for user servicing (e.g., some FinalMouse or custom kits).
- You have experience with electronics handling.
- The manufacturer provides official teardown guides.
Most mainstream gaming mice are sealed units. Opening them voids warranties and risks damaging ribbon cables, battery contacts (in wireless models), or the sensor module itself. Even minor misalignment during reassembly can degrade tracking.
If you choose to proceed:
- Use a plastic pry tool—never metal screwdrivers.
- Work in a static-safe environment (use a wrist strap if possible).
- Photograph each step for reassembly reference.
- Never wash internal components—only spot-clean with swabs.
For the vast majority of users, external cleaning and sensor maintenance are sufficient. Internal dust rarely affects performance unless it blocks airflow in ventilated designs (rare in mice).
Frequently Asked Questions
Can I use hand sanitizer to clean my gaming mouse?
No. Hand sanitizers often contain additives like glycerin or fragrances that leave sticky residues. They may also include higher alcohol concentrations that can degrade plastic over time. Stick to pure 70% isopropyl alcohol.
How often should I deep clean my gaming mouse?
Every 4 to 6 weeks for regular users. Heavy gamers or those in dusty environments should clean every 2–3 weeks. Quick surface wipes can be done weekly.
Why does my mouse still act weird after cleaning?
First, ensure the sensor is completely dry. Residual moisture causes temporary tracking issues. Second, test on a different mousepad—grime on the pad can mimic sensor problems. Finally, check driver settings; sometimes sensitivity or polling rate changes get reset accidentally.
Final Checklist: Your Deep Cleaning Routine
Keep this checklist handy for your next session:
- ✅ Disconnect the mouse from power
- ✅ Use compressed air on all openings
- ✅ Wipe body with alcohol-dampened microfiber cloth
- ✅ Clean scroll wheel and button gaps with swabs
- ✅ Gently clean sensor lens with dry or slightly damp swab
- ✅ Inspect cable and connector
- ✅ Allow 5–10 minutes for drying
- ✅ Test tracking on a clean surface
Conclusion: Maintain Performance, Extend Lifespan
Your gaming mouse is an investment in precision and comfort. Treating it with routine care ensures it performs at its best, match after match. Deep cleaning doesn’t require special skills—just patience and the right technique. By avoiding harsh chemicals, respecting the sensor, and cleaning regularly, you preserve both functionality and hygiene. Most importantly, you eliminate guesswork when troubleshooting performance drops. A clean mouse is a reliable mouse.


 浙公网安备
33010002000092号
浙公网安备
33010002000092号 浙B2-20120091-4
Comments
No comments yet. Why don't you start the discussion?