
A dirty microwave isn’t just unsightly—it can affect food quality, create lingering odors, and even become a breeding ground for bacteria. Yet, most people avoid cleaning it because they assume it’s time-consuming or requires harsh chemicals. The truth? You can deep clean your microwave in under five minutes using nothing more than water, lemon (or vinegar), and the power of steam. This method loosens grime, eliminates odors, and leaves surfaces sanitized without scrubbing hard or risking damage to the interior.
The steam-cleaning technique leverages heat and moisture to break down dried-on food particles and grease. It's safe for all microwave-safe interiors, including stainless steel, ceramic, and painted cavities. Whether you’ve spilled soup, overheated popcorn, or simply let daily splatters accumulate, this method works quickly and efficiently. Best of all, no special tools or commercial cleaners are required.
Why Steam Cleaning Works So Well
Microwaves generate heat by agitating water molecules in food. When you apply that same principle to cleaning—by heating water inside the appliance—you create steam that penetrates stuck-on residue. As the steam condenses on the walls and ceiling, it softens and lifts food debris, making it easy to wipe away with minimal effort.
This process is especially effective because:
- Heat enhances cleaning power: Warm moisture breaks molecular bonds between food and surface, reducing the need for abrasive scrubbing.
- No chemicals needed: Lemon juice or white vinegar naturally deodorizes and cuts through light grease, making them ideal for kitchen use.
- Protects the finish: Unlike harsh sprays or scouring pads, steam won’t scratch or degrade the microwave’s interior coating.
- Kills odor-causing bacteria: The high internal temperature during steaming helps sanitize surfaces.
“Steam cleaning is one of the safest and most efficient ways to maintain small appliances. It combines sanitation with minimal environmental impact.” — Dr. Linda Reeves, Household Hygiene Researcher, National Institute of Home Safety
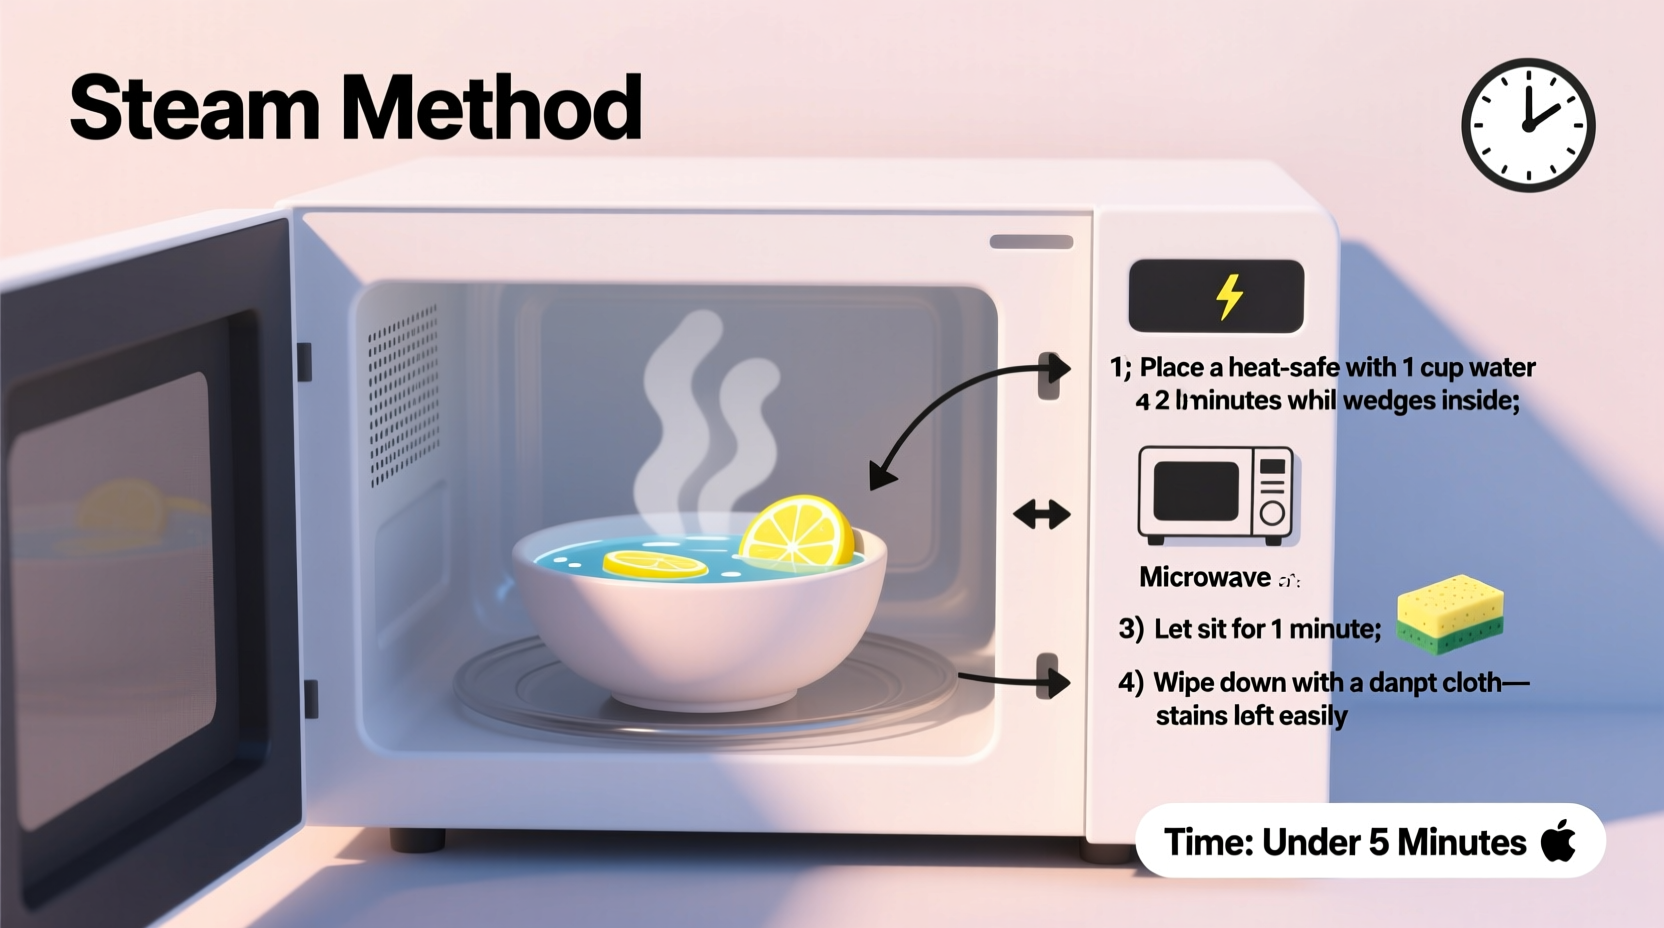
Step-by-Step Guide: Deep Clean Your Microwave in Under 5 Minutes
Follow this precise sequence to achieve a spotless microwave quickly and safely. Total active time: less than five minutes.
- Prepare the cleaning solution: Pour 1 cup (240 ml) of water into a microwave-safe bowl. Add 2 tablespoons of lemon juice (or white vinegar). Alternatively, drop in two halved lemons for extra scent and citric acid boost.
- Place the bowl in the center: Set the bowl on the middle of the turntable. Ensure it’s stable and not too close to the walls.
- Heat on high for 3–4 minutes: Run the microwave at full power until steam begins to fog the window and condensation coats the interior walls. If boiling over occurs, stop immediately and reduce time next attempt.
- Let it sit (do not open yet): After heating, leave the door closed for 2–3 minutes. This allows residual steam to continue loosening grime.
- Wipe down the interior: Carefully remove the bowl (it will be hot). Use a damp microfiber cloth or sponge to wipe all surfaces—ceiling, walls, door, and turntable. Stubborn spots should come off easily; if not, re-steam for another minute.
- Clean the turntable and ring: Remove the glass tray and support ring. Wash with warm soapy water, rinse, and dry before replacing.
- Final polish: Wipe once more with a clean, dry cloth to prevent streaks and ensure no moisture remains.
Do’s and Don’ts of Microwave Cleaning
To maintain performance and safety, follow these guidelines when cleaning your microwave.
| Do’s | Don’ts |
|---|---|
| Use distilled white vinegar or lemon juice as natural degreasers | Never use bleach or ammonia-based cleaners—they can corrode metal and release toxic fumes |
| Always unplug or turn off the microwave before wiping electrical components near the door seal | Avoid steel wool or abrasive pads—they scratch surfaces and expose underlying materials to moisture |
| Cover foods during use to minimize future messes | Don’t immerse the turntable motor or base in water—it’s electrically sensitive |
| Wipe spills immediately after they occur | Never run the microwave empty—even briefly—to avoid damaging the magnetron |
| Inspect seals and hinges monthly for wear or food buildup | Don’t ignore persistent burning smells—they may indicate hidden food trapped behind panels |
Real-Life Example: A Busy Parent’s Quick Fix
Sarah, a working mother of two in Portland, Oregon, used her microwave multiple times daily—for reheating lunches, cooking oatmeal, and defrosting meals. Over six weeks, splattered sauce and melted cheese built up along the ceiling and corners. She dreaded cleaning it, assuming she’d need oven cleaner and 20 minutes of scrubbing.
One evening, while searching for a faster way, she tried the steam method. She combined water and lemon juice in a measuring cup, heated it for four minutes, waited three, then wiped everything down. In under five minutes, her microwave looked brand new. “I was shocked,” she said. “I didn’t have to scrape or press hard at all. Now I do this every Friday night—it takes less time than folding laundry.”
Since adopting the habit, Sarah reports fewer odors, better heating consistency, and increased confidence in her kitchen hygiene. Her kids even help now, wearing oven mitts to remove the bowl safely.
Enhancing Results: Pro Tips for Maximum Effectiveness
While the basic steam method is highly effective, small adjustments can improve results depending on your microwave model and level of dirt.
- Add baking soda for tough stains: Mix 1 tablespoon of baking soda into the water-vinegar solution. Its mild abrasiveness helps lift carbonized residues without scratching.
- Use a toothbrush for crevices: After steaming, gently scrub around vents, seams, and the door latch with an old toothbrush to dislodge trapped particles.
- Rotate the bowl halfway (if no turntable): Some compact microwaves lack rotating trays. To distribute steam evenly, pause halfway and rotate the bowl manually.
- Deodorize afterward with vanilla: Place a cotton ball soaked in pure vanilla extract inside overnight to neutralize any remaining acidic smell from vinegar.
- Prevent future buildup: Keep a microfiber cloth nearby and wipe spills within an hour of occurrence. Even a quick pass prevents layering.
Frequently Asked Questions
Can I use apple cider vinegar instead of white vinegar?
Yes, but white vinegar is preferred due to its higher acetic acid concentration (typically 5–7%) and clearer color. Apple cider vinegar may leave faint stains or require additional rinsing.
Is it safe to use lemon peels in the microwave?
Perfectly safe—as long as they’re placed in a bowl with water. Dry citrus peels can overheat and smoke. Always submerge them to prevent fire risk.
How often should I deep clean my microwave?
For average household use, once every 2–4 weeks is sufficient. High-use kitchens (e.g., restaurants, large families) benefit from weekly cleaning. A visible film or lingering odor indicates it’s time.
Checklist: Your 5-Minute Microwave Deep Clean Routine
Print or save this checklist for quick reference:
- ☐ Gather supplies: microwave-safe bowl, water, lemon juice or vinegar, microfiber cloth
- ☐ Combine 1 cup water + 2 tbsp lemon juice/vinegar in bowl
- ☐ Place bowl in center of microwave
- ☐ Heat on high for 3–4 minutes until steaming
- ☐ Wait 2–3 minutes (door closed)
- ☐ Carefully remove bowl using oven mitts
- ☐ Wipe interior surfaces thoroughly with damp cloth
- ☐ Remove and wash turntable and roller ring
- ☐ Dry all parts before resuming use
- ☐ Store cleaning bowl separately for future use
Conclusion: Make Cleanliness Effortless
Cleaning your microwave doesn’t have to be a chore reserved for spring cleaning. With the steam method, you can restore cleanliness and freshness in under five minutes—no scrubbing, no chemicals, no stress. This simple routine protects your appliance, improves food safety, and keeps your kitchen smelling fresh. The key is consistency: integrating this quick task into your weekly habits prevents buildup and maintains efficiency.
Start tonight. Chances are, you already have everything you need in your pantry. Once you see how fast and effective it is, you’ll wonder why you ever hesitated. A clean microwave isn’t just about appearance—it’s about health, convenience, and taking pride in your space.


 浙公网安备
33010002000092号
浙公网安备
33010002000092号 浙B2-20120091-4
Comments
No comments yet. Why don't you start the discussion?