
A microwave is one of the most frequently used appliances in any kitchen, yet it’s often neglected when it comes to cleaning. Over time, splatters, dried food residues, and lingering odors can turn a convenient tool into a breeding ground for bacteria and grime. While commercial cleaners are available, many contain harsh chemicals that may leave behind fumes or residue on surfaces where food is prepared. A safer, more sustainable alternative? Vinegar and lemon—two pantry staples with powerful degreasing, deodorizing, and disinfecting properties.
Using just these two ingredients, you can achieve a sparkling clean microwave without exposing yourself or your family to synthetic toxins. This guide walks through the science behind why vinegar and lemon work so well, provides a detailed step-by-step method, and shares expert-backed tips for maintaining long-term cleanliness.
The Science Behind Vinegar and Lemon for Cleaning
Vinegar and lemon juice are both acidic, which makes them highly effective at breaking down organic matter such as grease, sugar buildup, and protein-based stains. The active component in white vinegar is acetic acid (typically around 5% concentration), while lemon juice contains citric acid—both of which disrupt the molecular bonds in sticky residues, loosening them from surfaces.
Additionally, the acidity creates an environment hostile to many types of bacteria and mold. According to the American Chemical Society, acetic acid has been shown to possess antimicrobial activity against common household pathogens like *E. coli* and *Salmonella*. Citric acid also contributes mild antibacterial effects and adds a fresh, uplifting scent that neutralizes stale or burnt food odors.
Unlike chemical cleaners, vinegar and lemon leave no toxic residue, making them ideal for use in food preparation areas. They’re biodegradable, inexpensive, and readily available—making this cleaning method not only effective but also eco-conscious.
“Natural acids like those found in vinegar and citrus are excellent for dissolving grime without damaging appliance surfaces. They offer a safe, efficient solution for kitchen sanitation.” — Dr. Lena Patel, Environmental Health Scientist
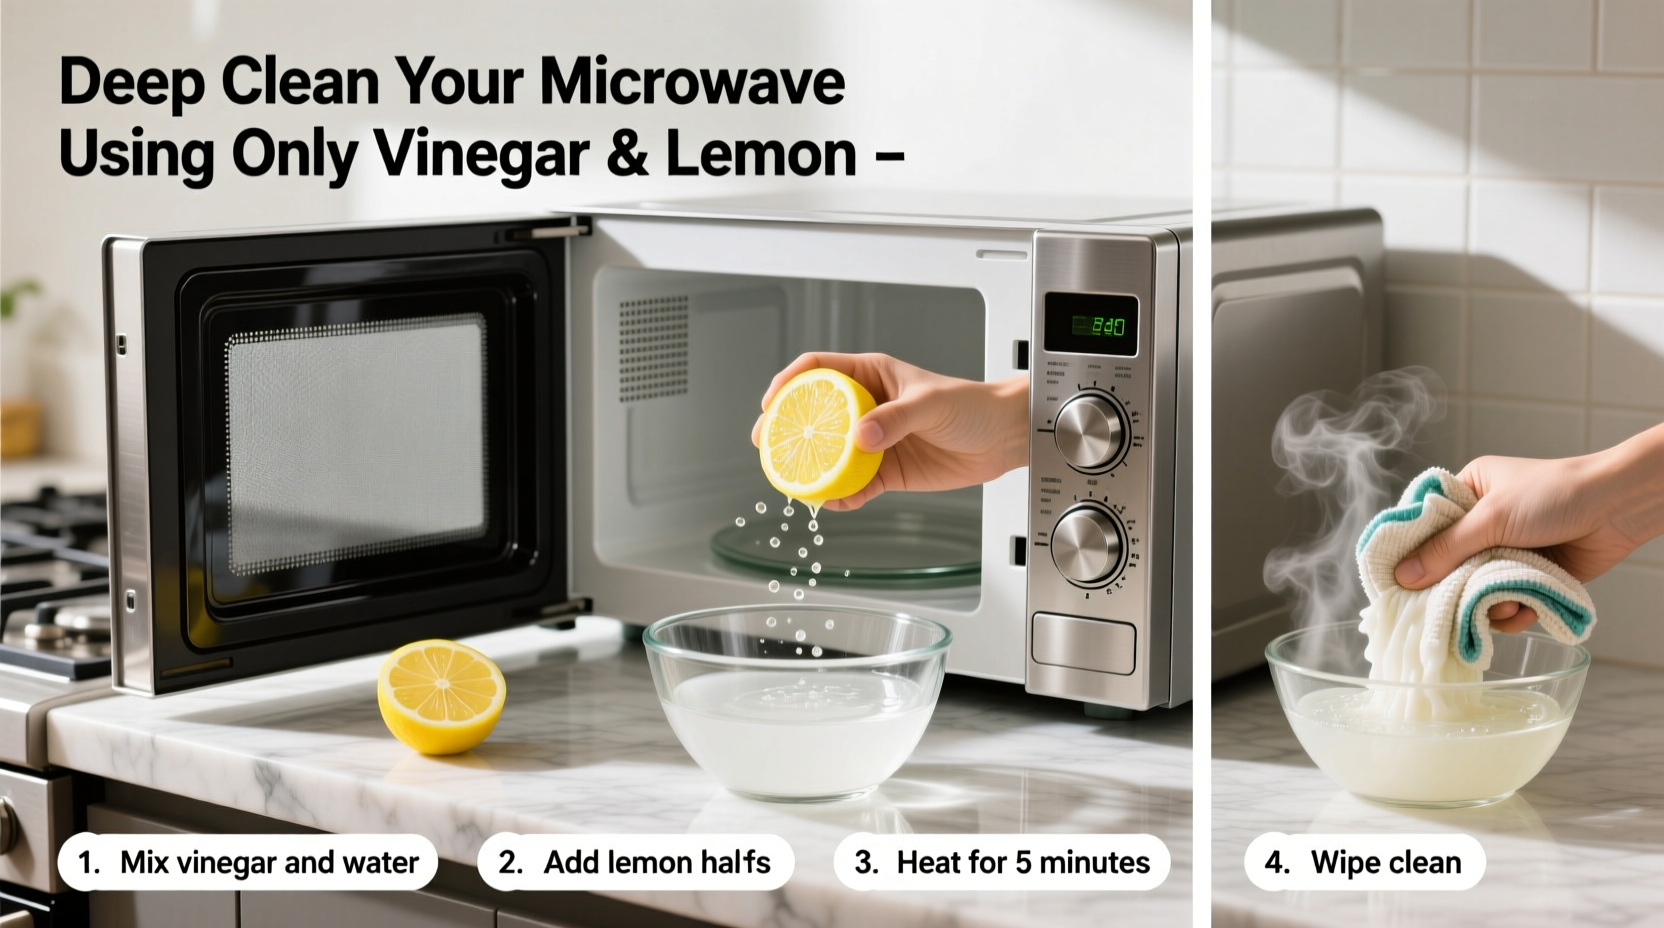
Step-by-Step Guide to Deep Cleaning Your Microwave
This process uses steam to loosen baked-on messes, followed by a wipe-down with a natural cleaning solution made from vinegar and lemon. It requires minimal effort and delivers professional-level results.
- Remove all removable parts: Take out the turntable, roller ring, and any other detachable components. Wash these separately in warm, soapy water. Set aside to dry.
- Prepare the steam solution: In a microwave-safe bowl, combine 1 cup of water, 1/2 cup of white vinegar, and the juice of one lemon (about 3–4 tablespoons). You can also add lemon slices for extra fragrance and visual appeal.
- Heat the mixture: Place the bowl in the center of the microwave. Heat on high for 5 minutes. The solution will boil, creating steam infused with vinegar and lemon vapors. These will condense on the interior walls, softening dried-on food particles.
- Let it sit: After heating, keep the microwave door closed for an additional 5–10 minutes. This allows the steam to continue penetrating tough grime.
- Wipe down the interior: Open the door carefully (watch for hot steam) and use a damp microfiber cloth or sponge to wipe all interior surfaces. Most stains should lift easily. For stubborn spots, reapply pressure or dip the cloth in leftover solution from the bowl.
- Clean the exterior: Mix equal parts vinegar and water in a spray bottle. Spray the outside—including the control panel, handle, and vents—and wipe with a soft cloth. Avoid excessive moisture near electronic components.
- Reassemble and finish: Once all parts are dry, return the turntable and roller ring. Wipe the door seal and edges to remove hidden debris.
Do’s and Don’ts When Cleaning with Vinegar and Lemon
To maximize effectiveness and prevent damage, follow these best practices.
| Do’s | Don’ts |
|---|---|
| Use distilled white vinegar—it’s clear and won’t stain. | Don’t use undiluted vinegar for prolonged periods; its acidity may degrade rubber seals over time. |
| Add lemon peels to enhance odor removal and leave a pleasant scent. | Don’t mix vinegar with bleach or ammonia—even accidentally—as this produces toxic fumes. |
| Allow the steam to work before wiping; patience reduces scrubbing. | Don’t use abrasive pads or steel wool—they scratch plastic interiors and create grooves where bacteria can hide. |
| Wipe regularly after each use to prevent buildup. | Don’t ignore the door gasket; trapped food here can cause leaks and odors. |
| Test on a small area if your microwave has a special coating. | Don’t leave the vinegar-lemon solution in the microwave overnight—it may corrode metal components. |
Maintaining Cleanliness: Real Habits That Work
Deep cleaning once every few weeks is essential, but daily habits make a dramatic difference. Consider this real-world example:
Sarah, a working parent of two, used her microwave multiple times a day—for reheating meals, steaming vegetables, and popping corn. Within months, the interior became stained and emitted a persistent burnt-butter smell. She avoided cleaning it because she assumed it would require heavy scrubbing and strong chemicals. After learning about the vinegar-lemon method, she committed to a monthly deep clean and adopted a simple rule: wipe the inside with a damp cloth immediately after every messy use.
Within six weeks, her microwave looked and smelled better than it had in years. More importantly, maintenance took less than two minutes a day. “It’s not about doing a big job,” Sarah said. “It’s about never letting the mess get ahead of me.”
This illustrates a key principle: consistent light cleaning prevents the need for intensive interventions later. Even a quick post-use wipe significantly extends the time between deep cleans.
Checklist: Your Complete Microwave Cleaning Routine
- ☐ Remove turntable and wash with warm, soapy water
- ☐ Combine 1 cup water, ½ cup vinegar, and lemon juice in a microwave-safe bowl
- ☐ Heat mixture on high for 5 minutes
- ☐ Let sit for 5–10 minutes (door closed)
- ☐ Wipe interior walls, ceiling, and floor with a soft cloth
- ☐ Address stubborn spots with direct application of vinegar or lemon juice
- ☐ Clean door seal and edges thoroughly
- ☐ Wipe exterior with vinegar-water solution
- ☐ Dry all parts completely before reassembling
- ☐ Schedule next cleaning in calendar (recommended: every 3–4 weeks)
Frequently Asked Questions
Can I use apple cider vinegar instead of white vinegar?
Yes, but white vinegar is preferred because it’s colorless and won’t leave stains or discoloration on plastic surfaces. Apple cider vinegar may tint lighter interiors over time due to its amber hue.
Will the vinegar smell linger after cleaning?
No—the sharp odor dissipates quickly once the microwave is wiped and aired out. In fact, combining vinegar with lemon helps neutralize the sour smell during the cleaning process. After 10–15 minutes, only a faint citrus freshness remains.
Is this method safe for stainless steel microwaves?
Generally yes, but avoid prolonged exposure to vinegar on stainless steel. Always rinse or wipe with clean water afterward to prevent potential etching. Do not use on painted or coated stainless finishes without testing first.
Why This Method Outperforms Store-Bought Cleaners
Commercial microwave cleaners often rely on surfactants, solvents, and artificial fragrances to mask odors rather than eliminate them. Many leave behind chemical films that can transfer to food containers. In contrast, vinegar and lemon physically break down grime and kill odor-causing microbes at the source.
A study published in the *Journal of Applied Microbiology* found that vinegar reduced bacterial counts on kitchen surfaces by up to 90%. When combined with the mechanical action of steam and wiping, this natural method rivals even industrial-strength products—without compromising safety.
Moreover, the cost comparison is striking. A single bottle of white vinegar costs less than $3 and lasts for dozens of cleaning sessions. Lemons are seasonal but affordable in bulk. Compare that to branded sprays that cost $5–$8 per bottle and require repeated applications.
Conclusion: A Cleaner Kitchen Starts with One Simple Habit
Deep cleaning your microwave doesn’t require specialty tools or chemical-laden sprays. With just vinegar and lemon, you can restore your appliance to pristine condition—safely, affordably, and effectively. The process takes less than 20 minutes and pays dividends in hygiene, performance, and peace of mind.
What sets apart people who maintain clean kitchens isn’t access to better products—it’s consistency. By integrating this simple routine into your household schedule, you protect your health, extend the life of your appliances, and create a more enjoyable cooking environment.


 浙公网安备
33010002000092号
浙公网安备
33010002000092号 浙B2-20120091-4
Comments
No comments yet. Why don't you start the discussion?