
Reusable water bottles are a sustainable staple in modern life—whether you're hiking, commuting, or just staying hydrated at home. But over time, even the most frequently used bottles can develop an off-putting odor. That lingering sour, musty, or metallic smell isn't just unpleasant; it's a sign of bacteria buildup, residue accumulation, or improper drying. Left unchecked, these conditions can compromise both hygiene and taste. The good news: with the right techniques, you can restore your bottle to a truly clean state—no strange smells, no mystery gunk, just fresh, safe hydration.
Why Your Bottle Develops Weird Smells
Even with regular rinsing, reusable bottles can harbor microbial growth. The primary culprits behind odd odors include:
- Bacterial and mold growth: Moist environments inside narrow necks or crevices around lids create ideal breeding grounds.
- Residue buildup: Sugary drinks, protein shakes, or flavored beverages leave behind organic material that decomposes.
- Mineral deposits: Hard water leaves behind calcium and magnesium traces that trap odors.
- Lid and seal degradation: Rubber or silicone gaskets absorb liquids and degrade over time, becoming odor traps.
According to Dr. Lena Patel, a microbiologist specializing in household hygiene, “A reusable bottle used daily without thorough cleaning can accumulate more bacteria than a kitchen sponge within a week.” This doesn’t mean you should ditch your bottle—it means you need a smarter cleaning routine.
“Consistent deep cleaning—not just rinsing—is essential for preventing biofilm formation in reusable containers.” — Dr. Lena Patel, Microbiologist
A Step-by-Step Guide to Deep Cleaning Any Reusable Bottle
Whether your bottle is stainless steel, glass, or BPA-free plastic, this universal method ensures a deep, odor-free clean. Follow these steps weekly—or immediately if you detect any off smells.
- Disassemble completely: Remove the lid, cap, straw, silicone seal, and any detachable parts. These components often hold the most odor-causing residue.
- Rinse thoroughly: Flush all pieces with warm water to remove loose debris.
- Prepare cleaning solution: Choose one of the following (see table below for guidance based on material).
- Scrub interior: Use a long-handled bottle brush to reach the bottom and sides. Focus on areas with visible film or discoloration.
- Clean all components: Soak lids, straws, and seals separately. Use a small brush (like a clean toothbrush) for crevices.
- Soak for 15–30 minutes: Let the bottle and parts sit in the solution to break down biofilm and mineral deposits.
- Rinse multiple times: Rinse under hot water until no trace of cleaner remains.
- Air-dry completely: Place bottle upside down on a drying rack with all parts separated. Never reassemble while damp.
Best Cleaning Solutions by Bottle Material
Not all cleaners work for all materials. Using vinegar on certain plastics or baking soda on delicate coatings can cause damage. Refer to this guide to match your bottle type with the safest, most effective cleaning agent.
| Bottle Material | Recommended Cleaner | Optional Boosters | Avoid |
|---|---|---|---|
| Stainless Steel | Vinegar + Baking Soda | Hydrogen peroxide soak | Bleach (can corrode over time) |
| Glass | Dish soap + Vinegar | Lemon juice for freshness | Extreme thermal shock (don’t pour boiling water into cold glass) |
| Plastic (BPA-free) | Mild dish soap + Baking Soda | Denture tablets (gentle effervescence) | Undiluted bleach, abrasive pads |
| Copper (lined) | Warm water + gentle soap only | None—copper requires special care | Acidic solutions (vinegar, lemon), abrasives |
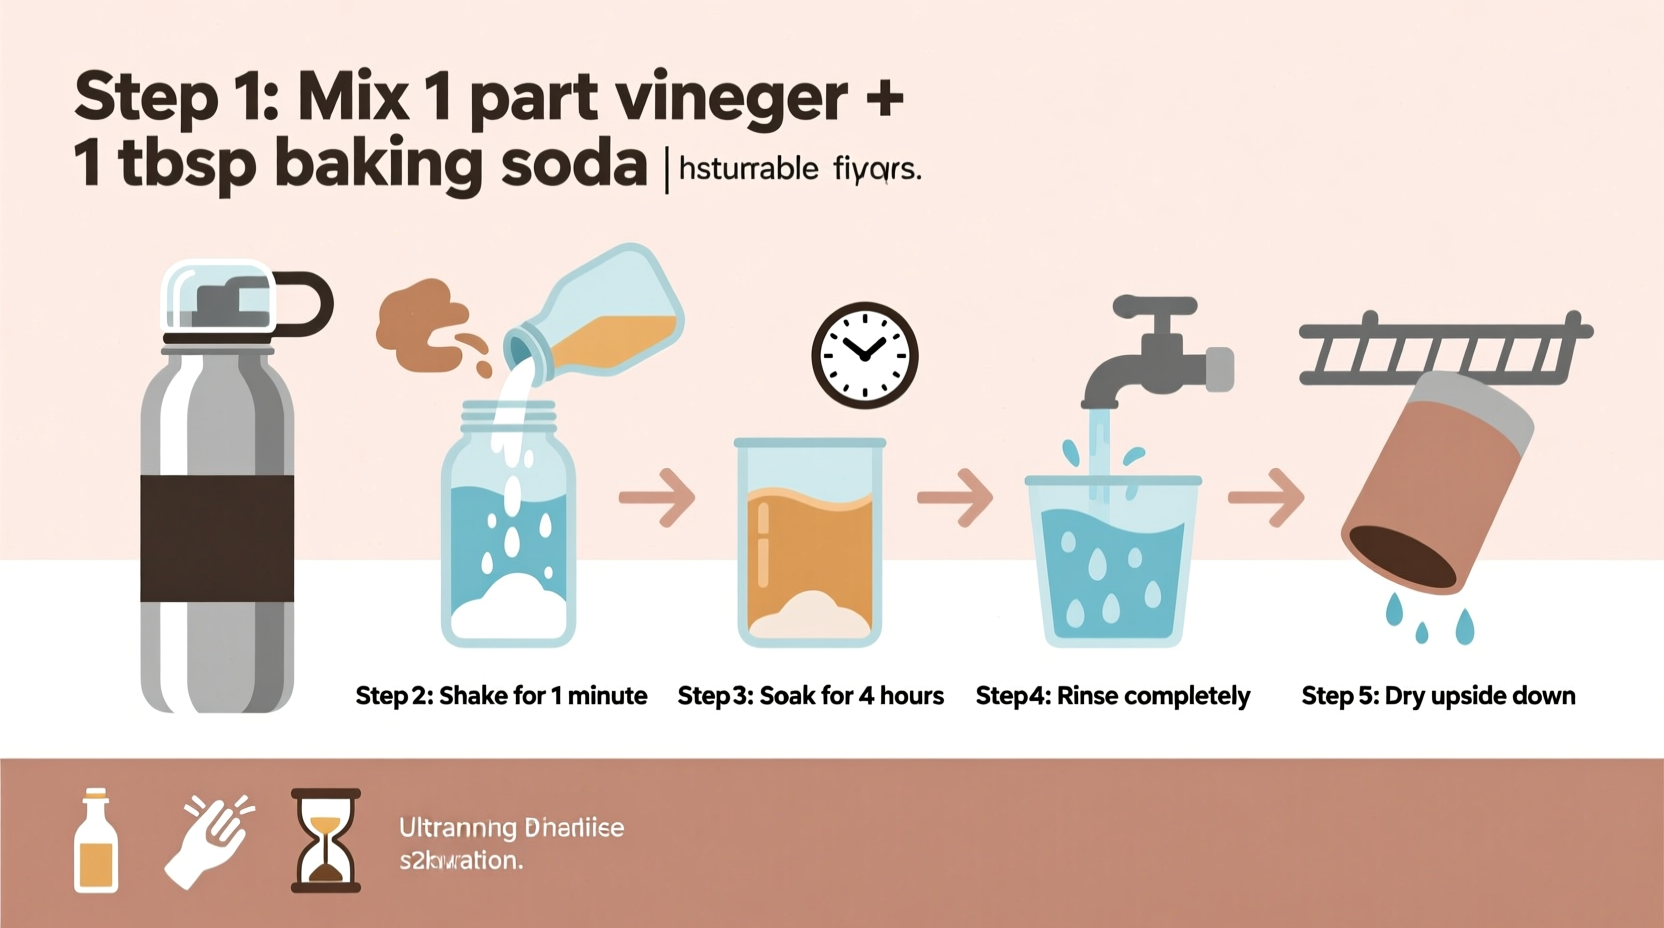
For example, combining one tablespoon of baking soda with one cup of white vinegar creates a bubbling reaction that loosens grime. Pour it into the bottle, cover the top, shake gently, then let it sit for 20 minutes before scrubbing. For bottles with straws, use a pipe cleaner or straw brush dipped in vinegar to flush internal channels.
Real Example: Eliminating Lingering Coffee Odor
Sarah, a remote worker from Portland, noticed her favorite insulated tumbler had started smelling like stale coffee—despite daily rinses. She used it for lattes each morning but never removed the rubber seal beneath the lid. After two weeks, the odor persisted even after washing.
She followed the deep-cleaning protocol: disassembled the lid, soaked the silicone gasket in a mix of baking soda and warm water, scrubbed the interior with a bottle brush, and finished with a vinegar rinse. Within 30 minutes, the smell was gone. More importantly, she now removes and dries the seal every night—a habit that’s kept her bottle fresh for months.
This case illustrates a common oversight: focusing only on the main chamber while neglecting hidden parts where moisture lingers.
Weekly Maintenance Checklist
To prevent odors from returning, adopt this simple weekly routine. It takes less than 10 minutes and significantly extends your bottle’s cleanliness and lifespan.
- ✅ Disassemble all parts (lid, seal, straw, bite valve)
- ✅ Wash with warm, soapy water using a bottle brush
- ✅ Soak in natural cleaner (vinegar, baking soda, or denture tablet) once per week
- ✅ Inspect rubber or silicone seals for cloudiness or stickiness
- ✅ Air-dry fully before reassembling
- ✅ Store open and upright to allow airflow
When to Replace Parts or the Entire Bottle
Cleaning helps, but some wear is irreversible. Knowing when to retire components prevents recurring issues.
Silicone seals and plastic lids typically last 3–6 months with daily use. Signs they need replacing include:
- Foggy or cracked appearance
- Persistent odor despite cleaning
- Difficulty sealing or leaking
- Tactile stickiness or residue that won’t wash off
Full bottles should be replaced if:
- Interior coating is peeling (common in older stainless steel models)
- There’s deep scratching that traps bacteria
- The base has warped or developed stains that won’t lift
Manufacturers like Hydro Flask and S’well recommend replacing lids and seals every four months with frequent use. Keeping spare parts on hand ensures uninterrupted hygiene.
Frequently Asked Questions
Can I put my reusable bottle in the dishwasher?
It depends. Bottles labeled \"dishwasher-safe\" can go on the top rack, but hand-washing is still safer—especially for lids with rubber seals. High heat and harsh detergents can warp plastic and degrade silicone over time. If in doubt, wash by hand.
Is it safe to use bleach to clean my water bottle?
In diluted form, yes—but with caution. Mix one teaspoon of unscented bleach per quart of water, soak for 5 minutes, then rinse *extensively*. Bleach is effective for disinfecting but should be used sparingly and never on porous plastics. Always follow manufacturer guidelines.
Why does my bottle still smell after cleaning?
If odors persist, the issue may be trapped in the lid mechanism or a degraded seal. Try replacing the silicone ring or soaking the entire lid assembly overnight in an enzymatic cleaner (like OxiClean). Also, ensure the bottle is fully dry before capping—moisture breeds odor-causing microbes.
Prevention Tips for Long-Term Freshness
The best way to avoid deep-cleaning emergencies is consistent prevention. Integrate these habits into your daily routine:
- Rinse immediately after use: Don’t let liquid sit for hours, especially sugary or dairy-based drinks.
- Keep it open when not in use: Closed bottles trap humidity. Leave the lid off between uses to promote airflow.
- Avoid leaving filled bottles in hot environments: Cars, gym bags, and direct sunlight accelerate bacterial growth.
- Use a dedicated brush: A long, flexible bottle brush with soft bristles reaches corners better than cloths or sponges.
- Rotate multiple bottles: Having two or three allows each to dry fully between uses, reducing microbial load.
Additionally, consider switching to glass or high-grade stainless steel if you frequently use acidic beverages like lemon water or tea. These materials resist staining and odor absorption far better than plastic.
Conclusion: Clean Today, Hydrate Confidently Tomorrow
A reusable water bottle should enhance your health, not compromise it. Strange smells are not normal—they’re warning signs of neglect. With a structured cleaning approach, the right supplies, and a few minutes each week, you can keep every sip fresh and safe. Don’t wait for mold spots or sour tastes to act. Implement these practices today, inspect your bottle tonight, and reclaim the peace of mind that comes with truly clean hydration.


 浙公网安备
33010002000092号
浙公网安备
33010002000092号 浙B2-20120091-4
Comments
No comments yet. Why don't you start the discussion?