
Faded corners, yellowing pages, and fragile bindings—old photo albums carry decades of memories, but they’re also vulnerable to time, moisture, and neglect. Digitizing them ensures those moments survive for future generations. While professional scanning services exist, most people already have the tools they need: a smartphone and a steady hand. With modern cameras offering high resolution and advanced software capable of correcting distortions, turning physical albums into digital archives is now accessible, affordable, and surprisingly effective.
This guide walks through the entire process—from preparation to long-term storage—using only your smartphone. Whether you're preserving family history or safeguarding personal milestones, these methods deliver crisp, well-organized results without requiring expensive equipment.
Why Digitize Photo Albums?
Physical photos degrade. Light exposure causes fading, humidity leads to mold, and repeated handling can tear delicate pages. Even stored carefully, paper deteriorates over time. Digitization halts this decay by creating permanent digital copies that can be backed up across devices and cloud platforms.
Beyond preservation, digital photos are easier to share. Grandchildren living overseas can view scanned images instantly. You can create digital slideshows, print new copies, or compile online photo books. Organizing becomes simpler too—tagging dates, names, and locations allows powerful searchability impossible with shoeboxes full of prints.
“Digitizing old photos isn’t just about technology—it’s an act of cultural preservation. Every album tells a story worth saving.” — Dr. Linda Park, Archival Historian, University of Toronto
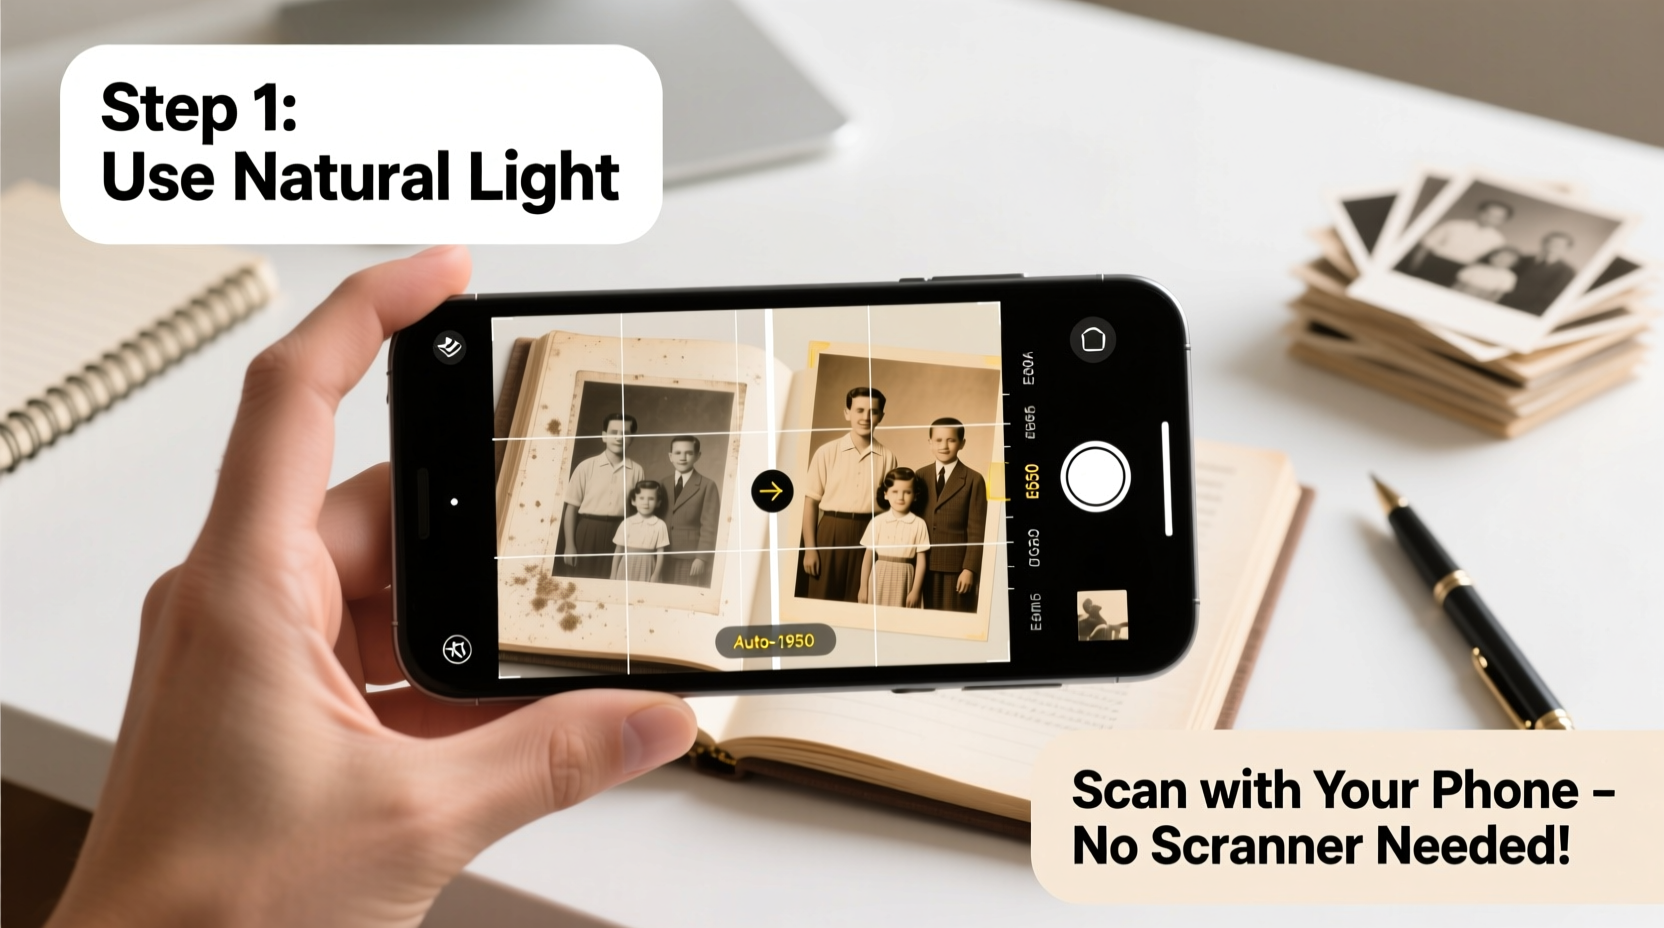
Step-by-Step Guide to Scanning Photos with Your Smartphone
You don't need a flatbed scanner or studio lighting. A smartphone camera, combined with careful technique, produces excellent results. Follow these steps to capture clear, accurate scans:
- Choose a consistent workspace: Pick a well-lit area near a large table. Natural daylight from a north-facing window is ideal—avoid direct sunlight, which creates glare. Ensure the surface is clean and large enough to lay open your album flat.
- Stabilize your phone: Use a small tripod or stack of books to position your phone directly above the photo. Keeping the lens parallel to the page minimizes distortion. If possible, use a phone stand with adjustable height.
- Turn off the flash: Built-in flashes cause harsh reflections on glossy pages. Rely on ambient light instead. If lighting is insufficient, add soft lamps from both sides to reduce shadows.
- Align the frame: Open your camera app and position the phone so the entire photo fills the screen, with minimal border. Make sure all four corners of the image are visible and evenly spaced within the frame.
- Focus and capture: Tap the screen over the photo to set focus. Wait for the image to sharpen, then press the shutter. Take one photo per image—even if multiple pictures appear on a single page, scan them individually for better quality.
- Check for clarity: After each shot, zoom in slightly to confirm text (if any) is legible and facial details are sharp. Blurry or tilted shots should be retaken immediately.
Enhancing Scans with Mobile Apps
Raw smartphone photos often benefit from post-processing. Dedicated apps automatically detect edges, correct perspective, enhance contrast, and convert images into PDFs. Here are top options and what they offer:
| App Name | Key Features | Platform | Cost |
|---|---|---|---|
| Adobe Scan | Auto-crop, perspective correction, OCR, PDF export | iOS, Android | Free (premium features via subscription) |
| Microsoft Lens | Background removal, color enhancement, cloud sync | iOS, Android | Free |
| Scanbot | Batch scanning, filters for old photos, auto-save | iOS, Android | Free (in-app purchases) |
| Google PhotoScan | Glare removal, guided alignment, seamless integration with Google Photos | iOS, Android | Free |
Google PhotoScan stands out for photo-specific digitization. It guides users to take four angled shots around a photo, then stitches them together digitally removing reflections. The result is a flat, glare-free image even from glossy originals.
- Open the app and select “Photo” mode.
- Place your phone over the image; a white dot appears in the center.
- Move your phone slowly until the dot aligns with each corner indicator.
- The app captures fragments and assembles a final optimized image.
Organizing and Storing Your Digital Archive
Scanning hundreds of photos means little if they end up scattered across folders or lost in device storage. A structured system ensures long-term accessibility.
Begin by creating a master folder labeled something like “Family_Photo_Archive_2024.” Inside, build subfolders by year, event, or album title—for example: “1975_Wedding,” “1983_Summer_Vacation,” or “Album_3_Childhood.” Naming files clearly helps too: “1975_John_and_Maria_Wedding_Ceremony_01.jpg” beats “IMG_1234.jpg.”
Backups are non-negotiable. Follow the 3-2-1 rule recommended by digital archivists:
- 3 copies of your data (original + two backups)
- 2 different media types (e.g., phone storage + external drive)
- 1 offsite backup (cloud storage like Google Drive, Dropbox, or iCloud)
Cloud services offer automatic syncing and protection against physical loss (fire, theft). However, avoid relying solely on proprietary ecosystems that may change access terms. Download periodic full backups to an encrypted external hard drive stored separately from your home.
Mini Case Study: Preserving the Thompson Family Album
Susan Thompson inherited her grandmother’s 1950s wedding album—ten fragile pages with brittle adhesive and cracked cellophane covers. Fearing further damage from handling, she used her iPhone 13 and Google PhotoScan to digitize each page over a weekend. She placed the open album on a dining table near a shaded window, stabilized her phone with a mini tripod, and captured every image using the app’s guided scanning feature.
After processing, she enhanced contrast in a few dark images using Adobe Lightroom Mobile. She named files chronologically and uploaded them to a private Google Drive folder shared with immediate family. One photo—a previously unseen backyard rehearsal moment—sparked a family reunion conversation and was later printed for a memorial display. Susan kept the original album in a climate-controlled drawer but now accesses the digital version regularly.
Common Mistakes to Avoid
Even with the right tools, poor habits compromise quality. These pitfalls are easy to miss but simple to fix:
| Mistake | Why It Matters | How to Fix |
|---|---|---|
| Shooting at an angle | Causes trapezoidal distortion; text appears skewed | Use a tripod and align lens perpendicular to the page |
| Skipping dust removal | Smudges and lint show up in high-resolution scans | Gently brush pages with a microfiber cloth before scanning |
| Overwriting original files | Losing unedited versions limits future editing | Keep raw scans separate from edited ones |
| Not checking file format | Some apps default to low-quality JPEGs | Set output to highest quality or use TIFF/PNG when available |
“Amateurs often rush the setup phase. Ten minutes spent positioning lights and stabilizing the phone saves hours of rework.” — Mark Rivera, Digital Archivist at National Memory Project
Dos and Don’ts Checklist
- Work in consistent, diffused lighting
- Clean photo surfaces gently before scanning
- Use a grid overlay in your camera app for alignment
- Name files with descriptive, chronological labels
- Back up to both local and cloud storage
- Use flash or uneven artificial light
- Force open warped or glued-down pages
- Edit or delete original scans immediately
- Store everything only on your phone
- Wait until albums are damaged to start digitizing
FAQ
Can I scan photos still stuck in sticky album pages?
Yes, but with caution. Do not pull or peel photos that are adhered—this often causes irreversible tearing. Instead, scan them in place. Modern apps can correct minor warping and reflections. Focus on capturing the visible image without stressing the bond.
What resolution should I aim for?
Aim for at least 300 pixels per inch (PPI), which allows for high-quality printing. Most modern smartphones exceed this when shooting from 12–18 inches away. Avoid digital zoom, which reduces actual resolution. If your phone has a “pro” mode, set it to maximum resolution and disable compression.
How long does it take to digitize a full album?
With practice, you can scan 20–30 photos per hour. A 100-page album might take 3–4 sessions, depending on condition and layout. Work in short bursts to maintain attention to detail. Factor in extra time for renaming files and backing up data.
Conclusion
Digitizing old photo albums with your smartphone is more than a technical task—it’s an intimate journey through memory. Each photo holds a frozen moment waiting to be rediscovered. By applying thoughtful techniques and consistent organization, you transform fragile keepsakes into enduring digital heirlooms.
The tools are already in your pocket. The memories are already in your heart. There’s no better time to begin. Start with one album, follow the steps outlined here, and gradually build a secure, searchable archive that honors the past and enriches the future.


 浙公网安备
33010002000092号
浙公网安备
33010002000092号 浙B2-20120091-4
Comments
No comments yet. Why don't you start the discussion?