
Drawing anime eyes is often the gateway into character illustration for aspiring artists. These expressive, oversized features are central to conveying emotion, personality, and narrative in anime-style art. While they may appear complex at first glance, breaking them down into structured steps makes them highly approachable—even for complete beginners. Using only a pencil and paper, you can master the fundamentals of drawing anime eyes with realistic shading that brings them to life. This guide walks you through each phase, from basic outlines to nuanced tonal work, ensuring steady progress with every stroke.
Understanding the Anatomy of Anime Eyes
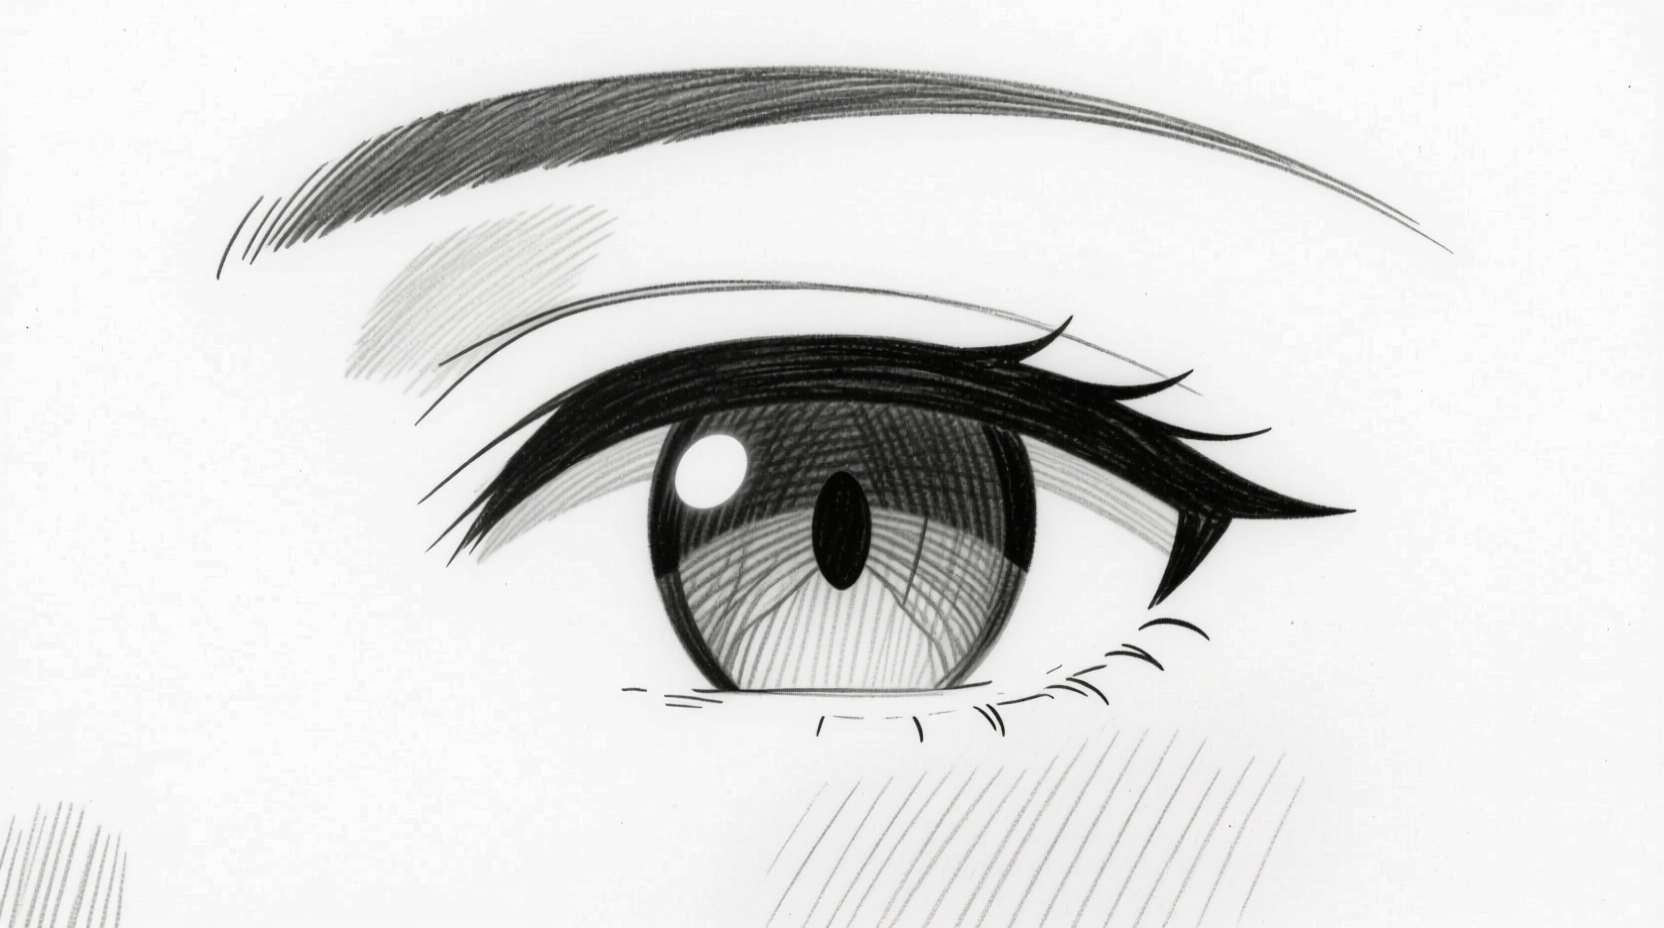
Anime eyes differ significantly from realistic human eyes in proportion, shape, and detail. They are typically larger, more vertically elongated, and feature exaggerated highlights and irises. Despite their stylized nature, understanding real eye anatomy improves accuracy and expressiveness. The core components include:
- Upper and lower eyelids: Define the eye’s overall shape and curvature.
- Iris: The colored part, usually large and detailed in anime.
- Pupil: Centered within the iris, it contracts or expands based on light.
- Highlights: Reflective spots that give the eye a glossy, lifelike appearance.
- Waterline and tear duct: Subtle details that enhance realism.
Unlike Western cartoon styles, anime eyes often incorporate multiple highlight shapes—ovals, crescents, or even stars—to suggest innocence, intensity, or dreaminess. The upper eyelid usually has a soft curve, while the lower lid remains subtle, sometimes barely sketched. Mastery begins not with imitation, but with comprehension: knowing why each element exists allows you to adapt and innovate confidently.
Materials You’ll Need
You don’t need an expensive toolkit to begin. A few essential tools will suffice for clean lines and smooth gradients:
- HB, 2B, and 4B pencils: HB for light sketching, 2B for mid-tones, 4B for deep shadows.
- Eraser (kneaded preferred): Allows lifting graphite without damaging paper.
- Blending stump or tissue: For smoothing transitions between light and dark areas.
- Sketchbook or drawing paper: Medium-textured paper holds graphite well.
- Ruler (optional): Helps align facial features if drawing full faces later.
The choice of pencil hardness affects control and contrast. Beginners should start with HB for initial outlines, then layer darker values using progressively softer leads. Avoid pressing too hard early on—light strokes are easier to correct and blend.
Step-by-Step Guide to Drawing Anime Eyes
Follow this structured process to create a pair of expressive anime eyes with dimension and depth. Each step builds upon the last, focusing on precision and gradual refinement.
- Sketch the Eye Shape
Begin with a light HB pencil. Draw a horizontal guideline to ensure symmetry if drawing both eyes. Anime eyes are almond-shaped but vary by gender and expression. Female eyes tend to be longer and slightly upturned; male eyes are narrower and flatter. Lightly sketch the outline using two gently curving lines meeting at inner and outer corners. - Add the Iris and Pupil
Inside the eye shape, draw a circle for the iris. It should occupy about 60–70% of the vertical space. Position it slightly downward to mimic natural gaze. Within the iris, draw a smaller circle for the pupil. Keep both shapes clean and centered unless aiming for a dynamic look like a sidelong glance. - Define the Upper Eyelid Crease
Above the iris, draw a soft arc tracing the top curve of the eye. This represents the fold of the eyelid and adds volume. Make it thicker toward the outer edge, tapering inward. This line should follow the contour of the eye without touching the iris. - Draw the Lower Eyelid Line
Add a faint curve beneath the iris to suggest the lower lid. Unlike the upper lid, this line is delicate—overemphasizing it can make the eye look heavy. In many anime styles, this line is omitted entirely or implied through shading. - Include the Waterline and Tear Duct
At the inner corner, sketch a small curved line representing the waterline. Add a tiny teardrop shape or notch for the tear duct. These details ground the eye in realism, especially when paired with subtle shading. - Apply Base Shading to the Iris
Use a 2B pencil to lightly shade the entire iris, leaving small white areas for future highlights. Do not shade over the pupil—keep it fully black later. Apply even pressure in circular motions for a smooth base. - Create Depth with Layered Shading
Darken the area around the pupil and along the bottom of the iris to simulate depth. Use concentric circles starting from the pupil outward, gradually lightening as you move toward the edge. This mimics how light falls across a curved surface. - Shade the Pupil and Add Highlights
Fill the pupil completely with a 4B pencil for maximum contrast. Then, erase or leave untouched two key highlights: one large oval near the top-left (assuming a light source from above-left), and a smaller secondary highlight below it. These simulate reflected light and give the eye its signature sparkle. - Render the Upper Eyelid Shadow
Shade under the upper eyelid crease with a 2B pencil, blending downward to create a soft gradient. This shadow grounds the eye and prevents it from looking flat. Use a blending stump to smooth harsh lines. - Finalize Details and Clean Up
Erase unnecessary guidelines. Refine edges, deepen contrasts where needed, and use the kneaded eraser to lift stray marks. Consider adding faint lashes—short, wispy lines at the outer third of the upper lid—for added elegance.
Common Mistakes and How to Avoid Them
Even experienced artists encounter pitfalls when rendering anime eyes. Recognizing these early helps refine technique faster.
| Mistake | Why It Happens | Solution |
|---|---|---|
| Overly round irises | Copying unrealistic proportions | Ensure the iris fits naturally within the eye shape—slightly compressed at top and bottom. |
| Flat, lifeless shading | Applying uniform pressure | Use gradients: darkest near pupil, lighter toward edges. |
| Too many highlights | Trying to mimic complex reflections | Stick to 1–2 main highlights; simplicity enhances clarity. |
| Heavy lower eyelid | Overdrawing the bottom line | Keep it faint or imply it through tone, not line weight. |
| Misaligned eyes | Skipping guidelines | Always use a horizontal center line when drawing both eyes. |
“Anime eyes thrive on contrast and clarity. The magic isn’t in complexity—it’s in controlled simplicity.” — Rina Takahashi, Professional Manga Artist
Real Example: From Sketch to Finished Eye
Consider Maya, a 16-year-old beginner who struggled with flat-looking eyes. Her first attempts used only outlines and solid black pupils, lacking dimension. After learning to layer shading—starting with a light 2B base, then building depth around the pupil with 4B—her work transformed. She began using a blending stump to soften transitions and placed highlights deliberately based on imagined lighting. Within three weeks of daily practice, her characters gained emotional presence. One piece, featuring a character gazing upward with soft eyelid shadows and dual highlights, was shared widely in an online art community. Her breakthrough came not from new tools, but from disciplined application of foundational techniques.
Essential Checklist for Beginners
Use this checklist each time you draw to ensure consistency and quality:
- ✅ Lightly sketch the eye shape with HB pencil
- ✅ Position iris and pupil accurately within the eye
- ✅ Add upper eyelid crease for depth
- ✅ Leave space for 1–2 key highlights in the iris
- ✅ Shade iris with gradient—dark near pupil, lighter at edges
- ✅ Use 4B pencil to fill pupil completely
- ✅ Blend upper eyelid shadow softly into the skin tone
- ✅ Clean up stray lines with a kneaded eraser
- ✅ Compare both eyes for symmetry (if drawing a pair)
- ✅ Step back and assess overall balance of light and dark
Frequently Asked Questions
How do I make anime eyes look more emotional?
Emotion is conveyed through shape and angle. For sadness, tilt the outer corners downward and narrow the eyes slightly. For surprise, widen the eyes and raise the upper lids. Anger can be shown with sharply angled brows and narrowed slits. Pair these changes with pupil size—small pupils suggest intensity, while large ones imply innocence or shock.
Should I always draw both eyes the same way?
Not necessarily. While symmetry is common, slight variations add naturalism. One eye might catch more light, have a different highlight position, or show a subtle difference in lid openness. However, maintain consistent style and lighting direction to avoid confusion.
Can I use this method for other anime features?
Absolutely. The principles of shading, contrast, and form apply to hair, lips, and skin. Understanding how light wraps around curves—like the rounded cheek or the plumpness of lips—uses the same layering and blending techniques developed here.
Mastering the Art Through Practice
Drawing anime eyes well doesn’t require innate talent—it requires repetition, observation, and patience. Start by copying reference images, focusing on how professionals handle transitions between light and shadow. Gradually shift to drawing from imagination, experimenting with different eye shapes, expressions, and lighting conditions. Keep a dedicated sketchbook to track progress. Over time, muscle memory develops, and what once took careful planning becomes intuitive.
Remember, every expert artist was once a beginner holding a pencil uncertainly. The difference lies not in perfection, but in persistence. Each shaded iris, each corrected outline, brings you closer to creating characters that resonate with viewers.


 浙公网安备
33010002000092号
浙公网安备
33010002000092号 浙B2-20120091-4
Comments
No comments yet. Why don't you start the discussion?