
Velcro closures on shoes offer convenience, adjustability, and accessibility—especially for children, individuals with limited dexterity, or those who need quick transitions in sports and therapy settings. While many modern shoes come with built-in Velcro straps, there are countless situations where adding Velcro yourself makes sense: replacing worn strips, modifying regular lace-ups, or customizing footwear for special needs. When done correctly, DIY Velcro attachment can be durable, discreet, and highly functional. This guide walks you through the entire process with precision, offering tested methods, material recommendations, and expert-backed tips to ensure your modification lasts.
Why Add Velcro to Shoes?
There are several practical reasons people choose to add Velcro to their footwear:
- Improved accessibility: For young children learning to dress themselves or adults with arthritis, Velcro is far easier than tying laces.
- Custom fit control: Unlike fixed lacing, Velcro allows micro-adjustments throughout the day for comfort and support.
- Adaptive use: Occupational therapists often recommend Velcro modifications for individuals with physical disabilities.
- Sport-specific needs: Athletes may prefer secure hook-and-loop systems during high-movement activities.
- Cost-effective repair: Instead of discarding shoes with broken straps, you can restore them affordably.
“Adding Velcro properly can transform an otherwise unusable shoe into a reliable, supportive option—especially for neurodivergent individuals or those recovering from injury.” — Dr. Lena Torres, Occupational Therapist & Assistive Technology Specialist
Materials You’ll Need
Before starting, gather the right tools and supplies. Using quality materials ensures longevity and prevents peeling or fraying after just a few uses.
| Item | Purpose | Recommended Type |
|---|---|---|
| Velcro Strip (Hook and Loop) | Main fastening component | Heavy-duty, sew-on or adhesive-backed; ¾” to 1” width |
| Fabric Glue or Shoe Adhesive | Bonding Velcro to shoe surface | E6000, Barge All-Purpose Cement, or Shoe Goo |
| Scissors or Rotary Cutter | Cutting Velcro to size | Sharp, clean edges prevent fraying |
| Sewing Needle & Heavy-Duty Thread | Reinforcement (optional but recommended) | Nylon or waxed thread for durability |
| Ruler or Measuring Tape | Ensuring even placement | Flexible tape for curved surfaces |
| Clamps or Binder Clips | Holding pieces in place while drying | Helps maintain pressure during curing |
| Sandpaper (medium grit) | Roughening smooth surfaces for better adhesion | Use on rubber, plastic, or synthetic uppers |
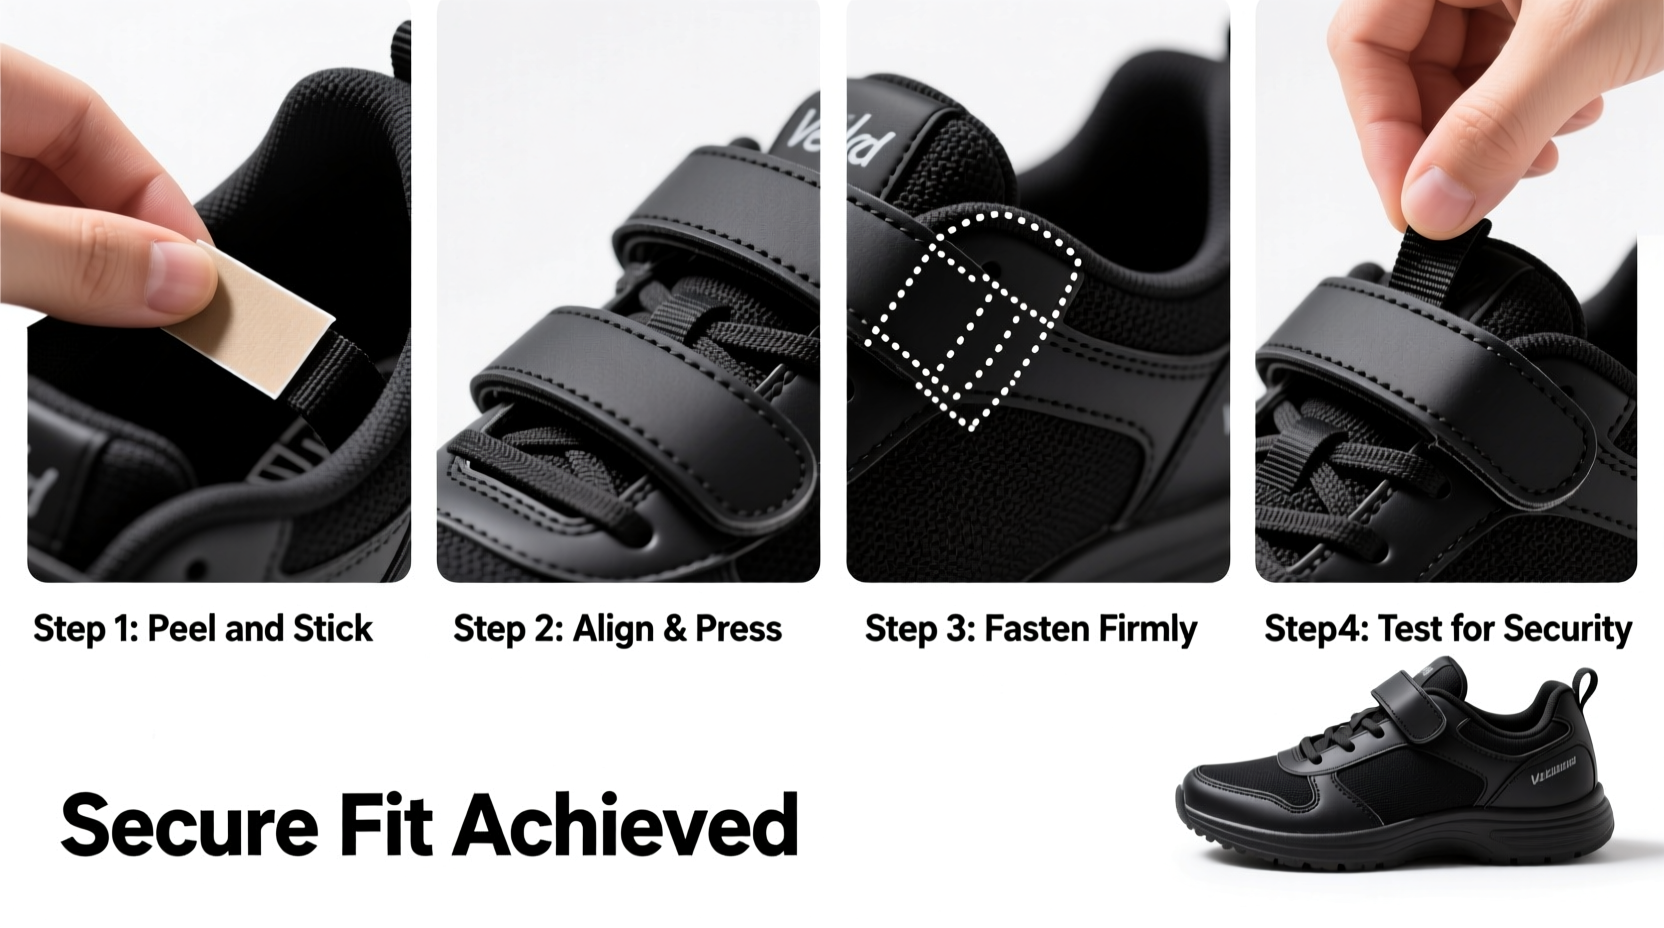
Step-by-Step Guide to Attaching Velcro to Shoes
Follow these steps carefully to achieve a professional-grade result that withstands daily wear.
- Choose Placement: Decide where the Velcro will go. Common locations include over the tongue (replacing laces), along the side panel, or across the heel counter. Mark both sides lightly with a washable pen.
- Measure and Cut: Measure the width of the area and cut the Velcro strip slightly shorter than the space to avoid overhang. Cut two pieces—one loop (soft side) and one hook (rough side)—of equal length.
- Prepare the Surface: Clean the shoe’s surface with rubbing alcohol. If it’s smooth (like rubber or synthetic leather), gently sand it to create texture for better glue grip. Wipe away dust afterward.
- Apply Adhesive: Squeeze a thin, even layer of shoe glue onto the back of the Velcro strip. Avoid excess, which can ooze out when pressed.
- Position and Press: Align the strip precisely and press down firmly. Use clamps or clips to hold it in place for at least 5 minutes. Repeat for the mating piece on the opposite side.
- Cure Time: Let the glue cure fully—minimum 12 hours, ideally 24—for maximum strength. Do not test the bond prematurely.
- Optional Sewing Reinforcement: For heavy-use shoes (e.g., athletic or children’s footwear), stitch around the edges of the Velcro using a saddle stitch for added durability.
- Test Functionality: After curing, gently pull and fasten the Velcro several times to confirm alignment and strength. Adjust if necessary before full use.
Pro Technique: Hybrid Bonding Method
For the most durable results, combine adhesive bonding with stitching. Apply glue first, let it become tacky (about 10–15 minutes), then sew through pre-punched holes in the Velcro backing. This dual-method approach is used in industrial footwear manufacturing and significantly extends lifespan.
Do’s and Don’ts of DIY Velcro Application
| Do’s | Don’ts |
|---|---|
| Use outdoor-rated or shoe-specific adhesives | Use craft glue or hot glue guns—they lack flexibility and durability |
| Sand smooth surfaces before gluing | Apply Velcro to dirty or greasy areas |
| Allow full cure time before wearing | Wear the shoe immediately after application |
| Match Velcro width to shoe structure | Use overly wide strips that crease or fold |
| Reinforce with stitching on high-stress shoes | Ignore fraying edges—trim cleanly if needed |
Real-World Example: Modifying School Shoes for a Child with Autism
Sarah, a mother from Portland, noticed her 6-year-old son struggled daily with tying his shoelaces, leading to frustration and meltdowns before school. His occupational therapist suggested switching to Velcro-fastened shoes, but his preferred sneaker model only came in lace-up versions. Sarah followed this guide to retrofit his favorite shoes. She used E6000 adhesive and reinforced both strips with zig-zag machine stitching. Three months later, the Velcro remains intact despite daily playground use. Her son now dresses independently, boosting his confidence and reducing morning stress.
FAQ: Common Questions About Adding Velcro to Shoes
Can I remove Velcro later without damaging the shoe?
Yes, but carefully. Use a hairdryer to soften the adhesive, then gently peel with a plastic scraper. Residue can be removed with isopropyl alcohol or adhesive remover. Some surface texture may remain, especially on fabric uppers.
Is glued Velcro as strong as factory-installed versions?
When using industrial-grade adhesives and proper technique, yes. Factory applications often use heat-activated bonding, but E6000 or Shoe Goo replicate similar strength in home settings—especially when combined with sewing.
Can I apply Velcro over existing laces?
Absolutely. Many users install a Velcro strap across the tongue to keep laces tight without retying. This “lace lock” method is popular among runners and parents of young children.
Final Checklist Before You Begin
- ☑ Choose the right type of Velcro (heavy-duty, weather-resistant)
- ☑ Clean and prep the shoe surface thoroughly
- ☑ Use a strong, flexible adhesive designed for footwear
- ☑ Allow 12–24 hours of drying time under light pressure
- ☑ Consider sewing for high-impact or frequent-use shoes
- ☑ Test alignment and tension before final cure
Conclusion: Make Every Step More Comfortable
Attaching Velcro to shoes isn’t just a quick fix—it’s a smart customization that enhances usability, independence, and comfort. Whether you’re adapting footwear for a child, an aging parent, or personal convenience, the process is straightforward with the right tools and attention to detail. By following this guide, you’re not just adding a strap; you’re improving functionality and accessibility in a meaningful way. The small investment of time pays off in daily ease and long-term shoe usability.


 浙公网安备
33010002000092号
浙公网安备
33010002000092号 浙B2-20120091-4
Comments
No comments yet. Why don't you start the discussion?