
Wooden tree stands—whether used for Christmas trees, indoor plants, or sculptural centerpieces—can be transformed from functional bases into immersive design elements with the integration of programmable LED lighting. By embedding addressable LED strips beneath or within the structure, you introduce a dynamic layer of ambient glow that enhances mood, complements interior aesthetics, and adds subtle technological sophistication. This guide walks through the technical and creative considerations required to seamlessly integrate LED technology into wood craftsmanship, ensuring durability, safety, and visual impact.
Selecting the Right Components
The foundation of any successful embedded lighting project lies in choosing compatible, high-quality components. Not all LED strips are suited for concealment in wooden enclosures, especially when heat dissipation, flexibility, and long-term performance are concerns.
For ambient base illumination, WS2812B or SK6812-based addressable LED strips are ideal. These offer individually controllable LEDs, RGB color blending, and sufficient brightness without excessive power draw. Opt for 60 LEDs per meter density for even diffusion under translucent materials or around curved edges.
Voltage is another critical factor. Most programmable strips operate at 5V or 12V. While 5V strips are safer and easier to handle, they suffer from voltage drop over longer runs. For larger tree stands exceeding 1.5 meters in perimeter, 12V strips (like SK6812-12V) maintain consistent brightness and reduce the need for frequent power injection.
| Component | Recommended Option | Why It Matters |
|---|---|---|
| LED Strip Type | WS2812B (5V) or SK6812-12V (12V) | Individually addressable, widely supported by controllers |
| Microcontroller | Arduino Nano + FastLED library | Compact, low-cost, excellent community support |
| Power Supply | 12V/3A regulated adapter (for 12V systems) | Prevents flickering and ensures stable operation |
| Diffusion Material | Frosted acrylic or sandblasted polycarbonate | Softens light, prevents hotspots |
| Connection Wire | 22 AWG stranded copper with silicone insulation | Flexible, durable, handles vibration and movement |
Designing the Wooden Structure for Integration
Integrating electronics into wood requires planning before the first cut. The stand must accommodate wiring channels, controller housing, ventilation (if needed), and access points—all while maintaining structural integrity and aesthetic appeal.
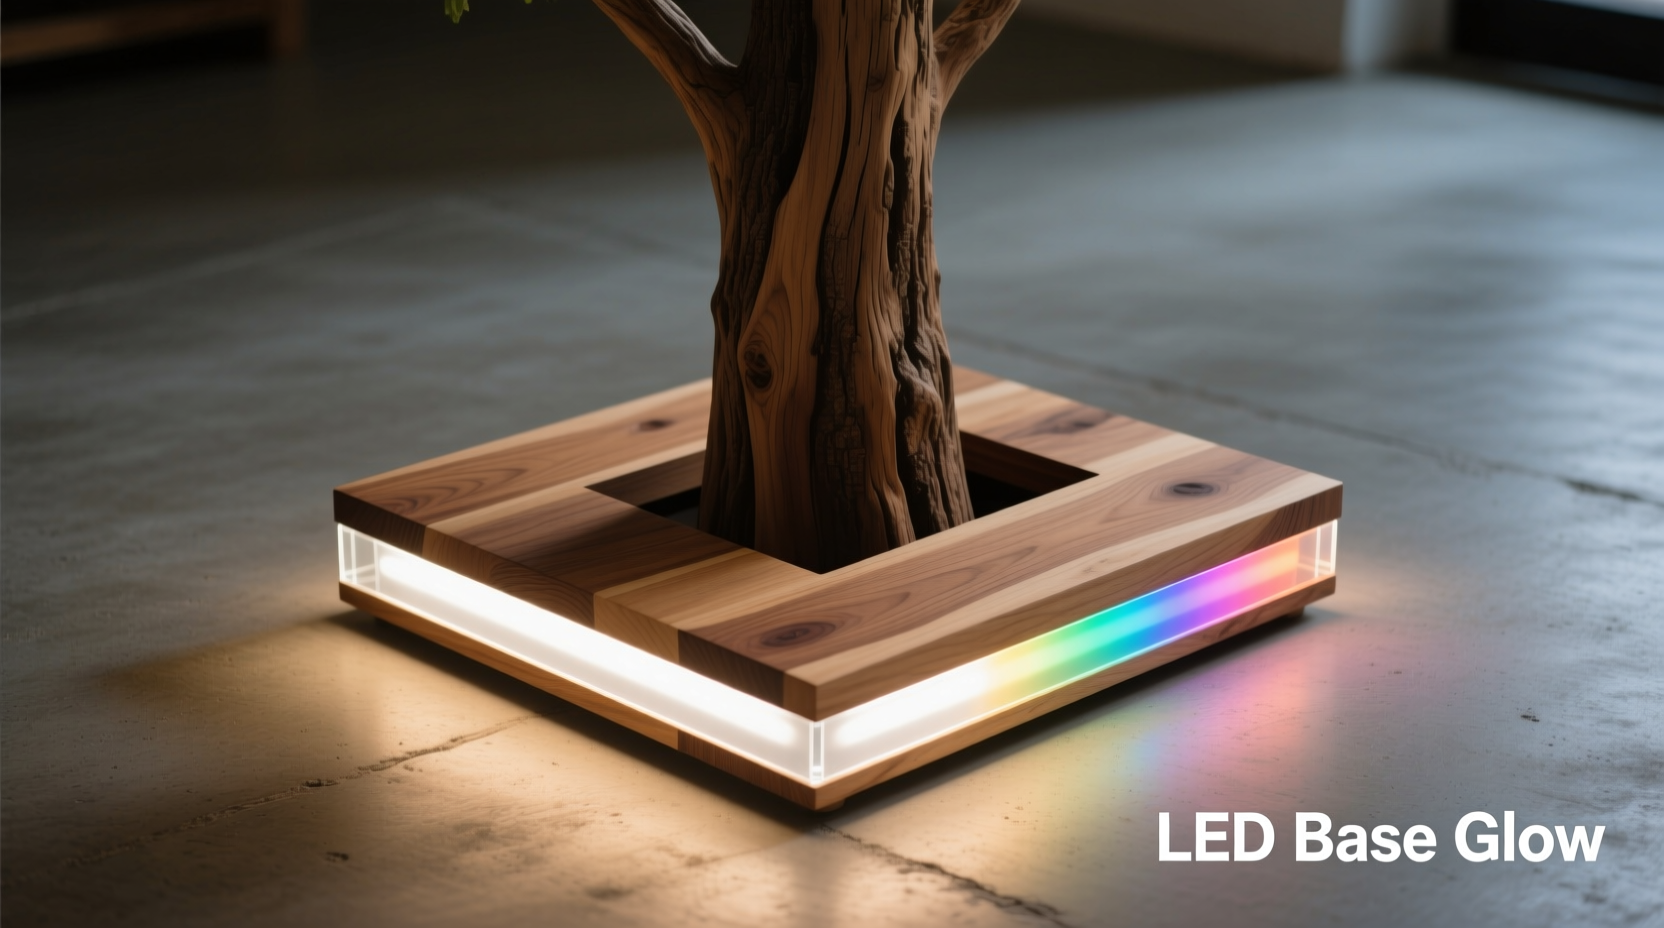
Begin by sketching your tree stand’s cross-section. Identify where the light will emerge: along the outer rim, beneath a recessed ledge, or through laser-cut patterns in side panels. A common and effective approach is routing a shallow groove (5–7mm deep, 8–10mm wide) into the top edge of the base, allowing the LED strip to sit flush and face downward or outward.
If using diffusion material, consider designing a removable cap or insert. This allows future maintenance without disassembling the entire stand. Use dovetail or rabbet joints to secure frosted acrylic pieces, enabling easy access while preserving seamless lines.
Drill small pilot holes from the groove to the interior cavity for wire routing. Keep these hidden near support legs or behind decorative elements. Never run bare wires across load-bearing joints; instead, use internal chambers carved into thicker sections of wood to house microcontrollers and power connections.
“Good integration means the technology disappears. The light should feel like it’s emanating from the wood itself.” — Lena Torres, Interactive Furniture Designer
Step-by-Step Installation Process
Follow this sequence to ensure clean installation and reliable function:
- Prepare the Wood Base: Sand and finish the wooden stand completely before installing electronics. Stains, oils, or varnishes applied after wiring can damage exposed circuitry.
- Route the Channel: Using a plunge router with a straight bit, cut a uniform groove around the perimeter where LEDs will reside. Ensure depth matches LED thickness plus 1mm clearance.
- Test-Fit the Strip: Place the LED strip in the groove without adhesive. Confirm full coverage and check for bends sharper than 30 degrees, which may break solder joints.
- Secure the Strip: Clean the groove with isopropyl alcohol. Apply double-sided silicone tape or epoxy designed for electronics to affix the strip. Avoid super glue—it degrades under thermal cycling.
- Route Wires Internally: Feed data and power wires from the strip end into the internal chamber via pre-drilled holes. Leave 10–15cm of slack for servicing.
- Mount Controller & Power: Secure the Arduino or dedicated driver board inside a dry, ventilated compartment. Use rubber grommets where wires exit wood to prevent abrasion.
- Connect and Test: Solder connections carefully. Use heat-shrink tubing on all joints. Power up and run a simple chase pattern to verify every LED functions.
- Install Diffuser: Attach the frosted cover using non-conductive screws or hidden clips. Ensure no pressure is placed directly on the LEDs.
- Final Seal: If the stand may encounter humidity (e.g., near doors or plants), seal wire entry points with silicone caulk rated for electrical use.
Programming and Customization
Once hardware is installed, the real magic begins: lighting behavior. With programmable LEDs, you’re not limited to static colors or factory presets. You can create responsive, evolving ambience tailored to seasons, events, or time of day.
The FastLED library for Arduino simplifies coding complex effects. Install it via the Arduino IDE Library Manager, then upload patterns such as:
- Gradient Pulse: Slowly shifting hues that mimic sunrise or ocean tides.
- Breathing White: Gentle dimming cycles that emulate candlelight.
- Sound Reactivity: Pair with a microphone module to make lights pulse with music.
- Seasonal Themes: Auto-switch to red/green in December or pastels in spring.
For advanced users, integrate Wi-Fi control using ESP8266 or ESP32 boards. This enables smartphone apps, voice commands via Alexa or Google Assistant, and scheduling through platforms like Home Assistant.
A minimalist code snippet for a smooth rainbow cycle:
#include#define LED_PIN 6 #define NUM_LEDS 30 CRGB leds[NUM_LEDS]; void setup() { FastLED.addLeds<WS2812B, LED_PIN, GRB>(leds, NUM_LEDS); } void loop() { static uint8_t hue = 0; fill_rainbow(leds, NUM_LEDS, hue++, 5); FastLED.show(); delay(20); }
This produces a fluid, cinematic rainbow effect ideal for living rooms or meditation spaces.
Maintenance and Long-Term Reliability
Even well-built installations degrade if neglected. Heat buildup, moisture ingress, and mechanical stress are the primary threats to longevity.
Wood expands and contracts with humidity, potentially loosening adhesive bonds. Inspect the LED strip annually for lifting ends or discoloration. Reapply mounting tape if necessary. Avoid placing the stand near radiators, fireplaces, or exterior doors where temperature swings are extreme.
Keep firmware updated if using smart controllers. Flash new animation sequences seasonally to refresh the ambiance. Store backup code and wiring diagrams in a sealed envelope taped inside the access panel.
Checklist: Post-Installation Verification
- ✅ All LEDs illuminate without dark spots
- ✅ No visible wires or sharp solder points
- ✅ Diffuser sits flat and secure
- ✅ Controller resets cleanly on power cycle
- ✅ Ventilation gaps (if present) remain unobstructed
- ✅ Remote/Wi-Fi control responds reliably
Real-World Example: The Seasonal Pine Stand
In Portland, Oregon, woodworker Daniel Meehan built a Douglas fir tree stand for his family’s holiday display. Measuring 60cm in diameter, it featured a routed inner channel holding 6 meters of 12V SK6812 LEDs connected to an ESP32 controller.
Using a custom web interface, he programmed seasonal themes: warm white in November, animated snowfall effects in December, and soft pink pulses during Valentine’s Day. His children selected “aurora borealis” mode for sleepovers, which cycled through cool greens and purples at low brightness.
After two years, Daniel replaced the original diffuser—warped slightly due to prolonged heat exposure—with a laser-cut polycarbonate ring. He now includes 3mm ventilation slots beneath the LEDs, significantly improving thermal management.
The project received local attention and inspired a small workshop series at his community makerspace, proving that accessible tech can elevate traditional craftsmanship.
Frequently Asked Questions
Can I use battery power for portability?
Yes, but only for smaller installations. A 3.7V lithium-ion pack (e.g., 5000mAh) can power a short 5V strip for several hours. Use a step-up regulator to match voltage requirements. Note that brightness will diminish as the battery drains, and recharge cycles add maintenance overhead.
Is it safe to leave the LEDs on overnight?
When properly installed with adequate heat dissipation and fused power supplies, yes. However, avoid enclosing LEDs in solid wood without airflow. Monitor surface temperature during initial use—if the wood feels warm to the touch, reduce brightness or add vents.
What if one LED fails? Do I need to replace the whole strip?
No. Addressable strips allow bypassing dead pixels. In code, remap the remaining LEDs or use the FastLED Delay() function to shift patterns past the faulty section. Physically, individual LEDs can be desoldered and replaced with spare units using a fine-tip iron.
Conclusion: Illuminate with Intention
Embedding programmable LED strips into wooden tree stands merges artisanship with modern interactivity. Far beyond mere decoration, these illuminated bases become atmospheric anchors in homes, galleries, or public installations. When done thoughtfully—balancing electrical precision, material compatibility, and aesthetic harmony—the result is not just a lit object, but an experience.
Start small: retrofit an existing plant stand with a single color wash. Then expand to addressable control, automation, and environmental responsiveness. Each project refines your understanding of light, wood, and human perception.


 浙公网安备
33010002000092号
浙公网安备
33010002000092号 浙B2-20120091-4
Comments
No comments yet. Why don't you start the discussion?