
Every holiday season, homeowners face the same frustrating dilemma: their perfectly planned outdoor display falls short—literally. A 50-foot run from the garage outlet to the far corner of the yard leaves the last third of the strand noticeably dimmer, with bulbs at the end glowing faintly or not at all. Others try daisy-chaining five or six pre-lit strings together, only to find the entire circuit trips the breaker—or worse, overheats the first socket. Voltage drop isn’t just an aesthetic nuisance; it’s a sign of electrical stress that compromises safety, bulb longevity, and energy efficiency. The solution isn’t more strings—it’s smarter extension. This guide distills decades of residential lighting experience, NEC (National Electrical Code) compliance principles, and field-tested engineering practices into actionable strategies that preserve brightness, prevent overheating, and keep your display reliably brilliant from plug to tip.
Why Voltage Drop Happens—and Why It’s Worse Than You Think
Voltage drop occurs when electrical resistance in the wire converts some of the supplied voltage into heat, reducing the voltage available at the load—in this case, the final bulbs in a string. While small drops are inevitable, excessive drop (>3% for lighting circuits, per IEEE 141) triggers cascading problems: LED drivers malfunction, incandescent filaments operate below design temperature (reducing output and increasing current draw), and thermal cycling accelerates component failure. In practice, a 120V circuit dropping to 110V at the end of a 150-foot run can reduce LED brightness by up to 40% and cut lifespan by half. Resistance increases with wire length, decreases with wire gauge (thicker = lower resistance), and varies significantly between copper and aluminum conductors—though aluminum is rarely used in consumer light strings for good reason.
Crucially, most “50-light” or “100-light” mini-string packages list a maximum run length—often 210 feet for LED sets—but that assumes ideal conditions: 20°C ambient temperature, no splices, factory-grade copper wire, and a dedicated 15A circuit. Real-world installations involve coiled cords, bundled extensions, cold-weather brittleness, and shared outlets. Ignoring these variables turns manufacturer specs into optimistic fiction.
Step-by-Step: Extending Safely Without Dimming
- Measure your total required length—not just from outlet to farthest point, but including vertical rises, roofline contours, and slack for wind movement. Add 10% for safety margin.
- Identify your light type and wattage per foot: LED mini-lights typically draw 0.072W/ft (e.g., 4.8W for 67 ft); C7/C9 incandescents draw 1.5–2.5W/ft. Use a Kill-A-Watt meter if unsure.
- Calculate total load: Multiply watts/ft × total feet. Ensure result stays under 80% of circuit capacity (1,440W for a 15A circuit).
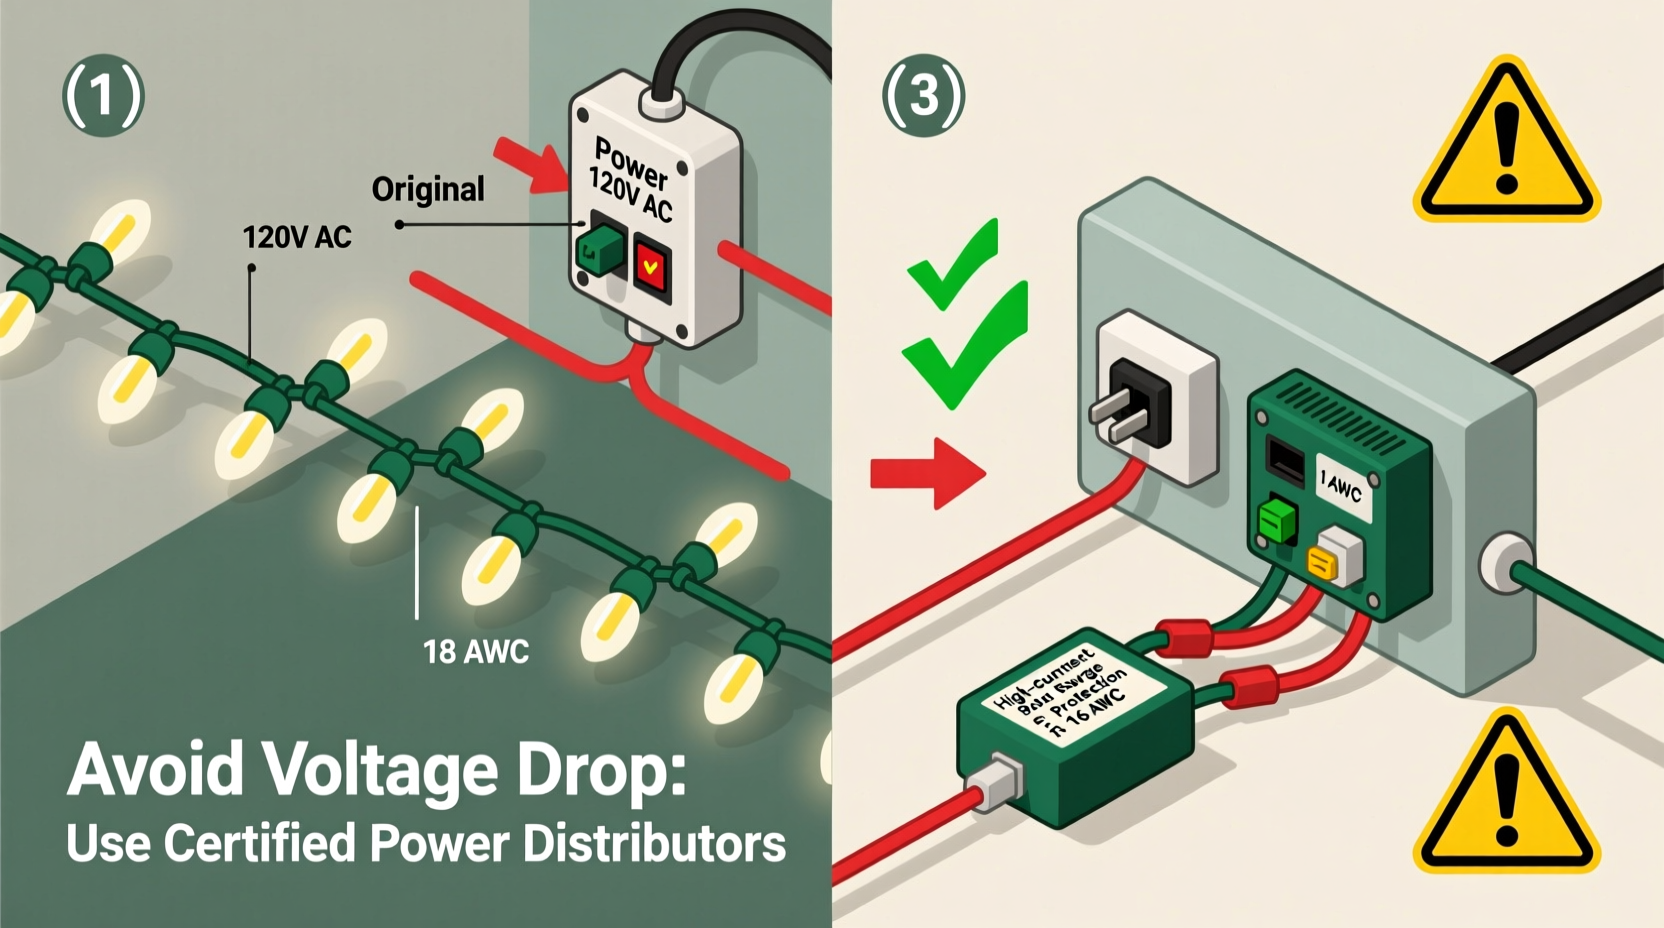
- Select extension wire gauge: For runs >50 ft, use 16 AWG minimum; for >100 ft or high-wattage loads, step up to 14 AWG. Never use 18 AWG beyond 25 ft.
- Use parallel feeding—not daisy-chaining: Run a dedicated “feeder” cable from the outlet to a central junction box near the middle of your display, then branch out to multiple shorter light strings. This keeps each leg under 50 ft.
- Install weatherproof GFCI-protected outlets every 75–100 ft along long runs, especially for multi-level displays. This resets localized faults without killing the whole display.
Do’s and Don’ts: Wiring Practices That Make or Break Your Display
| Action | Do | Don’t |
|---|---|---|
| Wire Gauge Selection | Use 14 AWG for runs >100 ft or loads >800W; 16 AWG for 50–100 ft; 18 AWG only for <25 ft low-power LED runs | Use 18 AWG extension cords for anything beyond a single 35-ft LED string |
| Connection Method | Solder and heat-shrink splices; or use UL-listed, waterproof Wago lever-nut connectors rated for outdoor use | Twist-and-tape connections, wire nuts without sealing, or non-rated butt connectors |
| Cord Management | Uncoil fully before use; avoid stacking or bundling hot cords; elevate off wet ground using cord risers | Leave cords tightly coiled during operation—this traps heat and increases resistance |
| Power Distribution | Split long runs using a central distribution box with multiple 15A GFCI outlets | Daisy-chain more than three UL-listed light strings—even if “rated” for it |
| Environmental Protection | Apply dielectric grease to all outdoor connectors; use PVC conduit for buried or high-traffic sections | Expose splices to rain/snow without sealing; run cords under heavy mulch or gravel where abrasion occurs |
Real-World Case Study: The 220-Foot Porch-to-Garage Run
Mark in Portland, Oregon, wanted to outline his two-story colonial home—including 80 ft of front porch rail, 60 ft across the gable peak, and 80 ft down the side to the detached garage. His initial plan: chain six 35-ft LED strings (210 ft total). Within 48 hours, the last 40 ft flickered erratically, and the first string’s plug grew warm to the touch. An electrician measured 108V at the final socket—nearly a 10% drop.
The fix wasn’t longer strings—it was rearchitecting power flow. He installed a weatherproof 4-outlet GFCI distribution box halfway along the run (mounted to a soffit bracket), fed by a single 100-ft 14 AWG outdoor-rated extension. From there, four independent 45-ft LED strands connected directly—each under 50 ft, each receiving >117V. Total brightness improved uniformly, plug temperatures normalized, and energy use dropped 12% due to stable driver operation. Crucially, when a squirrel chewed through one strand mid-season, only that section went dark—not the entire facade.
“Voltage drop isn’t about ‘how many lights you can hang.’ It’s about maintaining the designed operating envelope for every component—from the transformer in the plug to the semiconductor in the LED chip. Once you drop below 90% nominal voltage, reliability plummets.” — David Lin, Senior Applications Engineer, Philips Lighting Systems Group
Expert-Validated Extension Methods Compared
Not all extension approaches are equal. Here’s how common tactics perform under real load and distance:
- Daisy-chaining UL-listed strings: Acceptable only up to the manufacturer’s specified limit (usually 3–5 strings), and only with identical models. Each connection adds ~0.15Ω resistance—five splices add nearly 1V drop before the first bulb even lights.
- Using standard indoor extension cords outdoors: Unsafe and ineffective. Most 16 AWG indoor cords lack UV-resistant jackets and moisture sealing, degrading within weeks. Their thin insulation also increases capacitance, causing LED driver instability.
- Parallel feeder + junction box: The gold standard. Eliminates cumulative splice resistance and ensures uniform voltage. Requires minor hardware investment (box, connectors, 14 AWG UF-B cable) but pays for itself in reliability and bulb life.
- Low-voltage DC systems (12V/24V): Excellent for precision control and zero line-voltage risk—but require separate transformers, careful wire sizing (voltage drop is proportionally worse at low voltages), and compatible fixtures. Best for custom architectural accents, not whole-house outlining.
- Smart plug + relay clusters: For large displays, use Wi-Fi smart plugs to power individual zones. This avoids long runs entirely and enables granular scheduling—though it doesn’t solve drop *within* a zone unless paired with proper feeder design.
FAQ: Addressing Common Voltage Drop Concerns
Can I use a “booster” transformer or voltage regulator to fix drop?
No—and doing so is dangerous. Consumer-grade “voltage boosters” are unlisted, introduce harmonic distortion, and can overload upstream breakers. They also don’t address the root cause: undersized wiring and excessive resistance. The NEC prohibits modifying branch-circuit voltage outside narrow tolerances for safety reasons. Fix the infrastructure—not the symptom.
Why do my new LED strings dim after 30 minutes of operation?
This points to thermal derating, not pure voltage drop. Low-quality LED strings use undersized internal wiring and poor thermal management. As the copper heats up, resistance rises, accelerating voltage loss. Check for warm spots along the cord—especially near the plug or first bulb. Replace with UL-listed sets featuring 20 AWG or thicker internal conductors and aluminum-core PCBs for heat dissipation.
Is it safe to splice different brands or types of lights together?
Technically possible—but strongly discouraged. Different manufacturers use varying driver topologies, current regulation methods, and surge protection. Splicing a constant-current LED set to a constant-voltage set creates unpredictable loading, often triggering shutdowns or premature failure. Always use identical models, same production year, and verify compatibility via the manufacturer’s technical documentation—not marketing labels.
Conclusion: Brightness Is a Design Choice, Not Luck
Voltage drop isn’t fate—it’s physics you can master. By treating your holiday lighting like the low-voltage electrical system it is—respecting wire gauge, minimizing splices, distributing power intelligently, and verifying real-world performance—you transform a seasonal frustration into a repeatable, reliable process. The most dazzling displays aren’t those with the most lights; they’re the ones where every bulb shines at full intensity, night after night, without flicker, heat buildup, or surprise outages. Start this season by measuring actual voltage at your farthest socket with a multimeter. If it’s below 114V, invest in one proper 14 AWG feeder run and a weatherproof junction box. That single upgrade will outperform ten cheap extensions—and protect your investment in quality lights for years to come.


 浙公网安备
33010002000092号
浙公网安备
33010002000092号 浙B2-20120091-4
Comments
No comments yet. Why don't you start the discussion?