
Mechanical keyboards are prized for their tactile feedback, durability, and customizability. However, even the most robust switches degrade over time if not properly maintained. Dust, debris, oils from fingertips, and environmental factors can compromise switch performance, leading to inconsistent keystrokes, increased friction, or premature failure. The good news? A consistent and thoughtful cleaning routine can dramatically extend the lifespan of your switches—often doubling or tripling their functional longevity. This guide walks through practical, evidence-based methods to keep your mechanical switches operating like new for years.
Understanding Mechanical Switch Wear and Tear
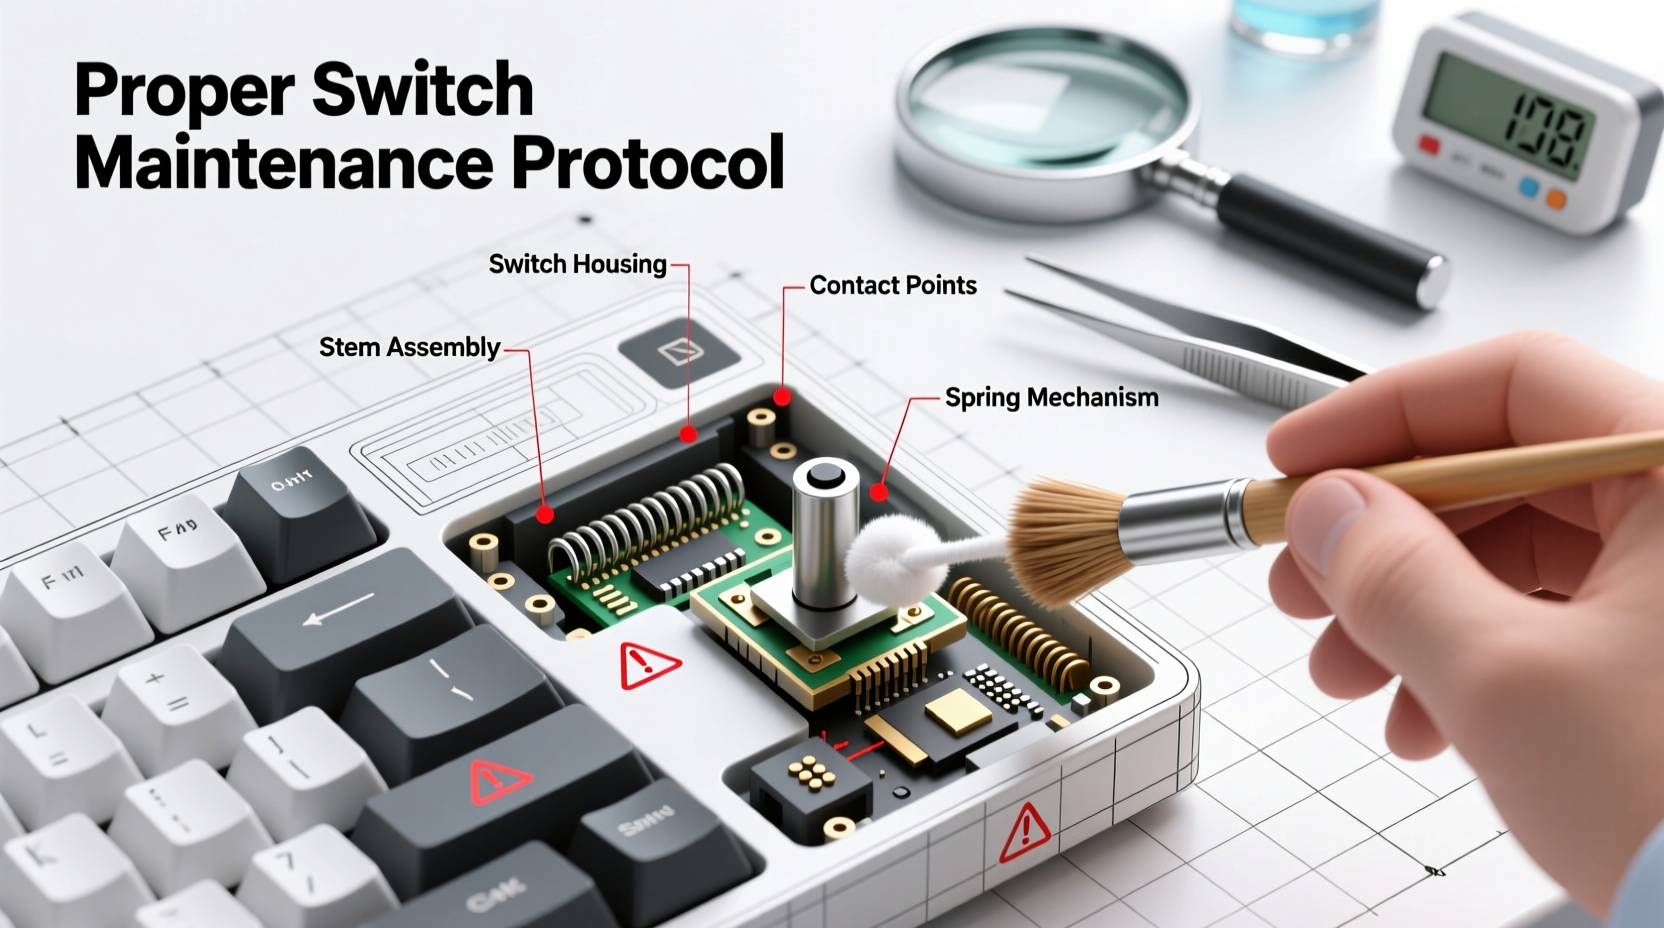
Mechanical switches are engineered for tens of millions of actuations—Cherry MX Reds, for example, are rated for 50 million keystrokes. But real-world conditions often fall short of lab-tested durability. The internal components—a spring, stem, housing, and metal contacts—are sensitive to contamination. Over time, dust particles infiltrate the switch housing, while skin oils and moisture accumulate on contact points. These contaminants increase resistance, cause double-actuation, or lead to sticky stems.
The stem's movement within the switch housing is precise. Any foreign material disrupts this motion, accelerating wear on plastic parts. Additionally, oxidation on metal contacts due to humidity can degrade electrical conductivity. While switches are sealed better than membrane keys, they're not immune to environmental exposure—especially when used daily in non-ideal conditions.
“Switch longevity isn’t just about build quality—it’s about usage environment and maintenance frequency. A well-cleaned switch outperforms a neglected one, even if both are identical models.” — Daniel Ruiz, Keyboard Hardware Engineer at Input Labs
Step-by-Step Guide to Effective Switch Cleaning
Cleaning mechanical switches doesn’t require professional tools, but it does demand care and consistency. Follow this detailed timeline to ensure thorough yet safe maintenance.
- Power Down and Disconnect: Always unplug the keyboard or turn off the device. For wireless models, remove batteries or disable Bluetooth.
- Remove Keycaps: Use a keycap puller to gently lift each cap. Avoid using sharp tools that could scratch legends or damage stabilizers.
- Dry Clean Debris: Tilt the keyboard and use compressed air to blow out loose dust and hair from switch housings. Hold cans upright to prevent propellant discharge.
- Deep Clean Keycaps: Soak keycaps in warm, soapy water (mild dish soap) for 30 minutes. Scrub gently with a soft brush, rinse, and air-dry completely before reattaching.
- Target Switch Interiors: For deeper cleaning, use a cotton swab lightly dampened with >90% isopropyl alcohol. Gently rotate around the switch stem without forcing it downward.
- Address Stabilizers: On larger keys (spacebar, enter), apply a small drop of switch lubricant inside the stabilizer wire housing if rattling occurs after cleaning.
- Reassemble and Test: Once dry, replace keycaps and test each key for smoothness and registration. Listen for any scratching or sticking sounds.
Recommended Cleaning Frequency by Usage Level
How often you clean depends on your typing habits and environment. Frequent typists or those in dusty spaces need more aggressive upkeep.
| Usage Level | Environment | Keycap Cleaning | Switch Cleaning | Full Maintenance |
|---|---|---|---|---|
| Light (1–2 hrs/day) | Clean, climate-controlled | Every 3 months | Every 6 months | Yearly |
| Moderate (3–5 hrs/day) | Indoor, average dust | Every 6 weeks | Every 3–4 months | Biannually |
| Heavy (6+ hrs/day) | Pet-friendly, high traffic | Monthly | Every 6–8 weeks | Quarterly |
This schedule prevents buildup before it affects performance. Skipping cleanings leads to cumulative grime that’s harder to remove later.
Common Mistakes That Shorten Switch Life
Even well-intentioned users make errors that accelerate wear. Avoid these pitfalls:
- Using household cleaners: Windex, bleach, or wipes with alcohol below 90% leave residues that gum up switches.
- Forcing keycaps back on: Misaligned caps stress switch stems, potentially cracking the housing.
- Blowing with mouth air: Saliva and moisture introduce organic matter that promotes mold and corrosion.
- Ignoring stabilizers: Unlubricated or dirty stabilizers transfer vibration to switches, increasing mechanical fatigue.
- Skipping drying time: Reassembling wet keycaps traps moisture, encouraging oxidation on PCB contacts.
“Most switch failures I’ve seen weren’t due to manufacturing defects—they were caused by improper cleaning or neglect.” — Lin Zhao, Senior Technician at MechKey Repairs
Mini Case Study: Reviving a Three-Year-Old Keyboard
A software developer in Seattle used a stock mechanical keyboard daily for coding—8 to 10 hours, five days a week. By year three, several keys (notably 'E', 'T', and 'Backspace') began registering inconsistently. He initially assumed switch failure and considered replacement. Instead, he followed a full cleaning protocol: removed all keycaps, soaked them overnight, used compressed air, and cleaned each switch with isopropyl-soaked swabs.
After reassembly, every key responded crisply. He also noticed reduced finger fatigue, likely due to smoother stem travel. He now cleans every eight weeks and reports no further issues after an additional 18 months of heavy use. This case underscores that perceived hardware failure is often just accumulated grime.
Expert Tips for Long-Term Switch Preservation
Beyond cleaning, several habits amplify switch longevity:
- Use a keyboard cover: When not in use, especially in shared or dusty environments, a silicone dust cover blocks particulates.
- Type with moderate force: Hammering keys increases impact stress on springs and housings. Most switches require only 45–60g of force.
- Control humidity: Store and use keyboards in areas with 40–60% relative humidity. Excess moisture invites corrosion; too little increases static discharge risk.
- Rotate keyboards: If you own multiple boards, alternating usage distributes wear and allows rest periods for internal settling.
Checklist: Monthly Switch Maintenance Routine
Stay proactive with this quick monthly checklist:
- ✅ Remove keycaps and shake out loose debris
- ✅ Blow compressed air between switches at 45-degree angles
- ✅ Wipe tops of switches with a dry microfiber cloth
- ✅ Inspect for wobble or unusual noise in frequently used keys
- ✅ Check cable and USB port for dust or bent pins
- ✅ Run a keypress test using online tools (e.g., keyboardtester.com)
This takes less than 10 minutes and prevents minor issues from escalating.
FAQ
Can I clean switches without removing keycaps?
Yes, but effectiveness is limited. Compressed air and surface wiping help, but deep debris remains trapped. For optimal results, remove keycaps every few sessions.
Is isopropyl alcohol safe for all switch types?
Yes, 90% or higher isopropyl alcohol is non-conductive and evaporates quickly without residue. Avoid lower concentrations, which contain water and additives that may corrode contacts.
Should I lube my switches to extend life?
Lubing reduces friction and wear, especially on linear switches. However, it’s optional for most users. If done, use dielectric grease sparingly and only after thorough cleaning. Over-lubing attracts dust.
Conclusion
Extending the life of mechanical keyboard switches isn’t about buying premium gear—it’s about consistent, intelligent care. Cleaning routines tailored to your usage level protect internal mechanisms from the invisible enemies: dust, oil, and moisture. By adopting regular maintenance, avoiding common mistakes, and treating your keyboard as a precision instrument, you preserve both performance and investment value.


 浙公网安备
33010002000092号
浙公网安备
33010002000092号 浙B2-20120091-4
Comments
No comments yet. Why don't you start the discussion?