
A running toilet isn't just an annoyance—it's a silent water waster that can add dozens of gallons to your daily water usage and inflate your utility bills. One of the most common culprits behind a continuously running toilet is a worn or faulty flapper. The good news? Replacing a toilet flapper is one of the simplest and most cost-effective plumbing repairs you can do yourself. With basic tools and about 20 minutes, you can stop the constant sound of running water and restore your toilet’s efficiency.
This comprehensive guide walks you through every step of diagnosing a bad flapper, selecting the right replacement, and completing the installation correctly. Whether you're a first-time DIYer or just need a refresher, this article provides clear, actionable advice backed by plumbing experts.
Understanding the Toilet Flapper: What It Does and Why It Fails
The flapper is a rubber seal located at the bottom of the toilet tank. When you flush, it lifts to allow water to flow from the tank into the bowl. After the flush, it closes again to reseal the flush valve and allow the tank to refill. Over time, the flapper degrades due to mineral buildup, exposure to harsh chemicals in cleaning tablets, or simple wear and tear. A compromised flapper won’t create a proper seal, causing water to leak continuously into the bowl—a condition known as a “phantom flush.”
Signs of a failing flapper include:
- A hissing or trickling sound coming from the toilet long after flushing
- Water level dropping in the tank without use
- Visible warping, cracking, or brittleness in the flapper itself
- Frequent need to jiggle the handle to stop the flush
“Over 70% of running toilets are caused by flapper issues. Most homeowners can fix this themselves with minimal tools and under $10.” — James Reynolds, Master Plumber and Home Efficiency Consultant
Step-by-Step Guide to Replacing a Toilet Flapper
Replacing a flapper is straightforward, but doing it methodically ensures success. Follow these steps carefully for a lasting repair.
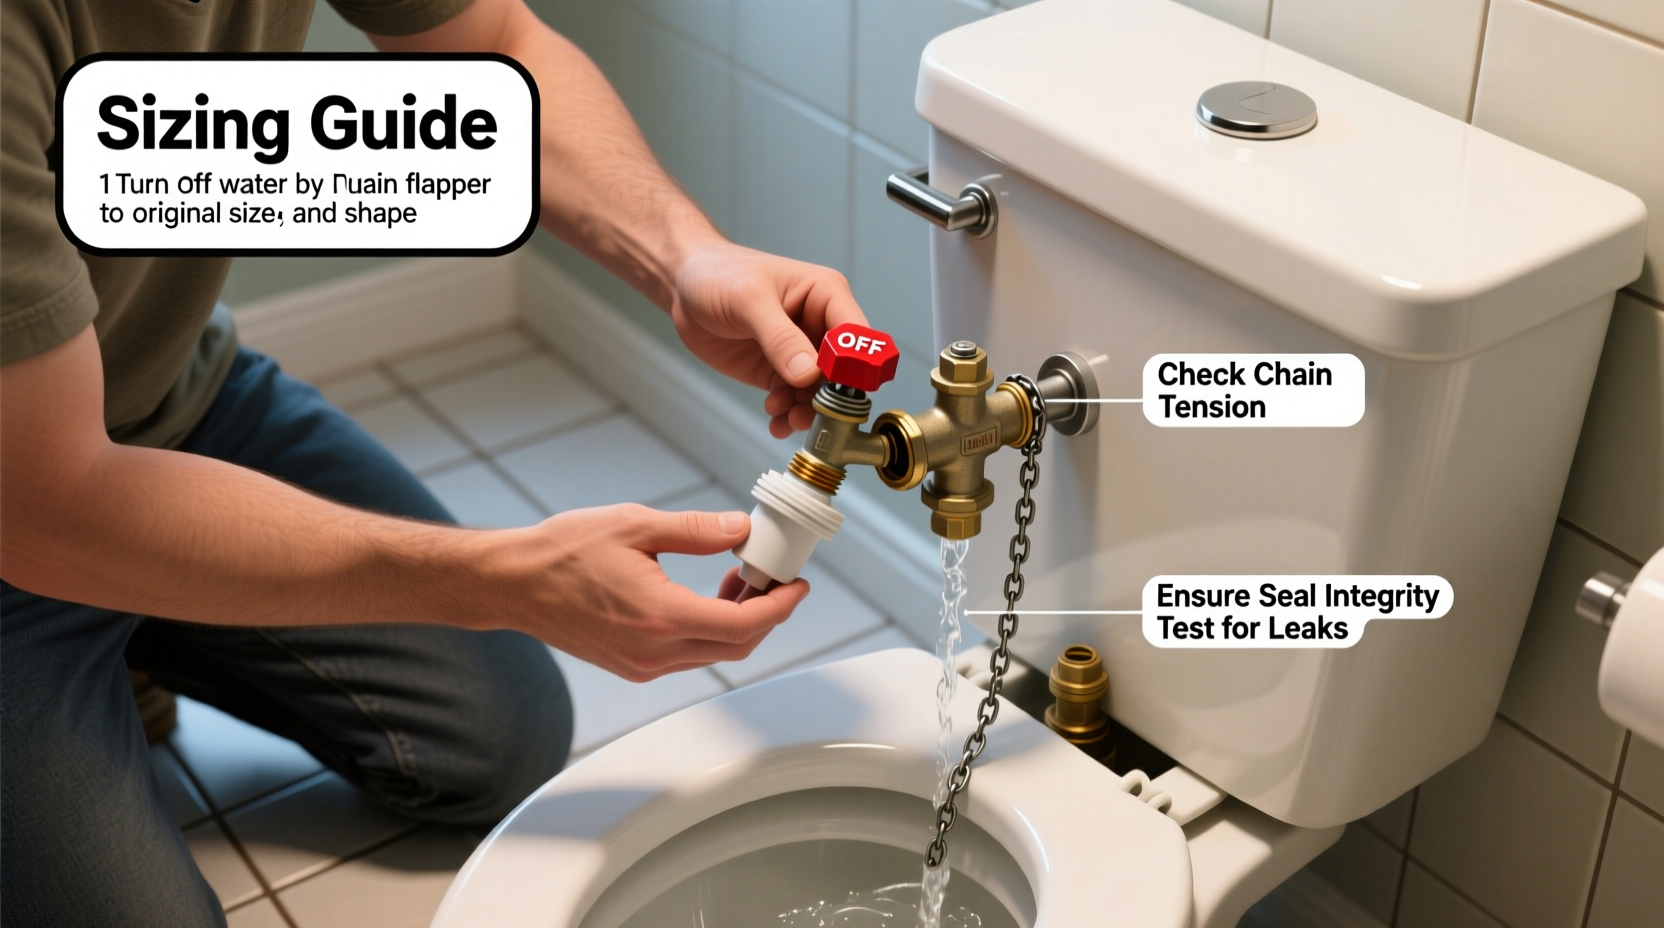
- Turn off the water supply. Locate the shut-off valve on the wall behind the toilet and turn it clockwise until tight. Flush the toilet to drain most of the water from the tank. Use a sponge to remove any remaining water at the bottom.
- Inspect the current flapper. Note how it’s connected—both to the overflow tube and the flush chain. Take mental note (or a photo) of the chain length and attachment point. This helps during reinstallation.
- Disconnect the old flapper. Unhook the ears of the flapper from the pegs on the flush valve. Detach the metal or plastic ring on the chain from the flush lever arm. Set the old flapper aside.
- Select the correct replacement. Most toilets use universal flappers, but some models require specific sizes or brands. Check the manufacturer label inside the tank or take the old flapper to a hardware store for matching. Common sizes are 2-inch and 3-inch.
- Install the new flapper. Hook the ears of the new flapper onto the pegs of the flush valve. Reattach the chain to the flush lever arm, ensuring there’s only about 1/4 inch of slack when the flapper is closed. Too much slack delays flushing; too little prevents full closure.
- Turn the water back on. Slowly open the shut-off valve and let the tank refill. Watch the flapper seat itself. Once full, check for leaks around the base of the flapper.
- Test the flush mechanism. Flush the toilet several times. Observe whether the flapper lifts smoothly and reseals completely. Listen for any residual running sounds.
Adjusting Chain Tension: A Critical Detail Often Overlooked
The chain connecting the flapper to the flush handle plays a vital role in performance. If it’s too loose, the flapper may not lift fully, resulting in a weak flush. If it’s too tight, the flapper won’t seat properly, leading to leaks. The ideal tension allows the flapper to close completely while still lifting freely when the handle is pressed.
Choosing the Right Flapper: Compatibility and Longevity
Not all flappers are created equal. While generic replacements work for many standard toilets, newer high-efficiency models often require specific designs. Here’s a breakdown of common types:
| Flapper Type | Best For | Lifespan | Notes |
|---|---|---|---|
| 2-Inch Rubber Flapper | Older toilets (pre-2005) | 3–5 years | Inexpensive and widely available; prone to warping if exposed to chemical cleaners |
| 3-Inch Flapper | Modern high-efficiency toilets | 4–6 years | Larger surface area improves sealing; required for faster, more powerful flushes |
| Fully Adjustable Flapper | Mixed-model households | 3–4 years | Allows fine-tuning of chain and seal; slightly higher cost |
| Universal Silicone Flapper | All models, especially hard water areas | 5+ years | Resists mineral buildup and chlorine; more flexible and durable than rubber |
When shopping, look for flappers labeled “chlorine-resistant” or “built for tank tablets” if you use automatic bowl cleaners. These formulations break down standard rubber flappers within months.
Common Mistakes to Avoid During Flapper Replacement
Even simple repairs can go wrong if key details are ignored. Below are frequent errors and how to prevent them:
- Skipping the water shutoff. Always turn off the water before starting. Accidentally turning on the supply with the tank open can cause flooding.
- Reusing an old, stretched chain. Chains can corrode or stretch over time. Replace them if they appear stiff or elongated.
- Ignoring the flush valve seat. If the flapper looks fine but still leaks, the issue might be a cracked or pitted flush valve seat—the surface the flapper seals against. Clean it gently with a soft cloth; replace the entire flush valve if damaged.
- Installing the wrong size. Using a 2-inch flapper on a 3-inch valve causes poor sealing and inefficiency. Measure the flush valve opening or match the old flapper exactly.
- Over-tightening connections. The flapper attaches by snapping on—no force needed. Excessive pressure can crack plastic components.
“Most DIYers focus only on the flapper, but the flush valve seat and chain alignment are equally important for a long-term fix.” — Luis Mendez, Plumbing Instructor at Northern Trade Institute
Mini Case Study: How Sarah Fixed Her Running Toilet in 18 Minutes
Sarah noticed her upstairs bathroom toilet was making a faint gurgling noise every few minutes. She checked online and learned about phantom flushes. Using the food coloring test, she confirmed a leak from the tank into the bowl. She turned off the water, removed the old flapper (a discolored 2-inch rubber model), and brought it to her local hardware store. The staff helped her pick a universal 3-inch silicone flapper compatible with her newer Kohler toilet.
Back home, she followed the installation steps, paying special attention to chain slack. After turning the water back on, she waited. No sound. She flushed five times—each one completed cleanly, and the tank refilled without issue. The next morning, her water meter showed no unexpected usage. Total cost: $9.49. Total time: 18 minutes.
Sarah’s experience shows that with basic guidance, even those with minimal plumbing knowledge can resolve common household issues efficiently.
Essential Checklist for Flapper Replacement Success
Use this checklist before, during, and after your repair to ensure nothing is missed:
- ✅ Shut off the water supply valve
- ✅ Flush the toilet to empty the tank
- ✅ Remove and inspect the old flapper
- ✅ Match the replacement flapper to your toilet model
- ✅ Attach the new flapper to the flush valve pegs
- ✅ Connect the chain with proper slack (1/4 inch)
- ✅ Restore water supply and refill tank
- ✅ Test multiple flushes for smooth operation
- ✅ Perform a dye test to confirm no leaks
- ✅ Clean up tools and dispose of the old flapper
Frequently Asked Questions
How often should I replace my toilet flapper?
Most flappers last between 4 and 5 years. However, if you use in-tank cleaning tablets, they may degrade in as little as 1–2 years due to chemical exposure. Inspect your flapper annually for signs of warping, cracking, or mineral deposits.
Can I replace a flapper without turning off the water?
It’s not recommended. While you might manage it quickly, any slip could cause uncontrolled water flow into the bowl, potentially leading to overflow or water damage. Always shut off the supply valve for safety and control.
Why does my new flapper still leak?
If a new flapper leaks, the problem may lie with the flush valve seat. Minerals or cracks on this surface prevent a proper seal. Clean it gently with vinegar and a soft cloth. If the surface is uneven or damaged, consider replacing the entire flush valve assembly.
Final Tips for Long-Term Toilet Health
Replacing the flapper fixes the immediate issue, but ongoing maintenance prevents future problems. Avoid placing chemical cleaning tablets directly in the tank—they accelerate flapper deterioration. Instead, use bowl-drop cleaners or manual scrubbing. Periodically clean the inside of the tank with a soft brush and vinegar solution to prevent buildup.
Also, listen to your toilet. Occasional minor sounds during refill are normal, but persistent running or gurgling indicates a problem. Addressing small issues early saves money and conserves water over time.
Conclusion: Take Control of Your Home’s Efficiency
A running toilet is more than a nuisance—it’s a waste of water and money. By understanding how the flapper works and mastering its replacement, you gain control over one of the most common household inefficiencies. The process is quick, inexpensive, and entirely manageable with basic tools and attention to detail.
Don’t wait for the drip to become a flood. Inspect your toilet today, replace the flapper if needed, and enjoy the quiet, efficient operation of a well-maintained fixture. Share your experience or ask questions in the comments—your insight could help another homeowner save time, water, and stress.


 浙公网安备
33010002000092号
浙公网安备
33010002000092号 浙B2-20120091-4
Comments
No comments yet. Why don't you start the discussion?