
A zipper that keeps coming undone is more than just an annoyance—it undermines the reliability of your favorite backpack. Whether you're commuting through city streets, hiking remote trails, or simply running errands, a split zipper can expose your belongings, damage contents, and leave you scrambling for quick fixes. The good news? Most zipper issues don’t require professional repair or replacement. With basic tools and a little patience, you can stabilize a slipping zipper and restore full function in under 30 minutes.
This guide walks through the root causes of zipper separation, offers step-by-step repairs, and shares preventive strategies to extend the life of your gear. These methods are field-tested, cost-effective, and accessible to anyone, regardless of technical skill.
Why Zippers Split: Understanding the Mechanism
Zippers work by interlocking two rows of teeth or coils via a slider. When functioning properly, the slider moves smoothly along the track, pulling both sides together with consistent tension. But over time, wear, misalignment, or mechanical stress can cause the slider to lose grip, leading to spontaneous separation.
The most common reasons for a splitting zipper include:
- Worn or loose slider: The internal spring weakens, reducing clamping force.
- Misaligned zipper tape: Fabric around the zipper stretches or shifts, preventing proper engagement.
- Damaged or missing teeth/coils: Physical gaps prevent the slider from closing completely.
- Slider pulled at an angle: Repeated sideways tugging damages the mechanism.
- Dirt or debris buildup: Grime inside the slider interferes with smooth operation.
Identifying the specific issue determines which repair method will be most effective. A loose slider can often be tightened; a torn tooth may need reinforcement; a misaligned track might require repositioning.
Step-by-Step Fix: Tightening the Slider
If your zipper closes but pops open under slight pressure, the culprit is likely a loose slider. This is the most common failure point and one of the easiest to address without tools beyond pliers.
- Close the zipper completely. Ensure all teeth are engaged before starting.
- Locate the slider base. This is the flat bottom part where the two tracks meet beneath the pull tab.
- Use needle-nose pliers to gently compress the slider. Apply light, even pressure from both sides. Focus on the base, not the top where the pull tab attaches.
- Test frequently. After each squeeze, slide the zipper up and down. It should feel tighter and resist opening when tugged.
- Stop when resistance increases. Over-compressing can jam the slider or break the teeth. Aim for firm but smooth movement.
This method works best on metal sliders, which respond well to minor deformation. Nylon coil zippers may not benefit as much, but a slight adjustment can still improve performance.
“Tightening the slider is like tuning an instrument—you’re restoring lost tension. Done correctly, it can revive a zipper that seems beyond repair.” — Diego Mendez, Outdoor Gear Technician
Alternative Fixes for Persistent Separation
If tightening doesn’t hold, or if the zipper fails immediately under load, consider these alternative solutions based on severity and materials available.
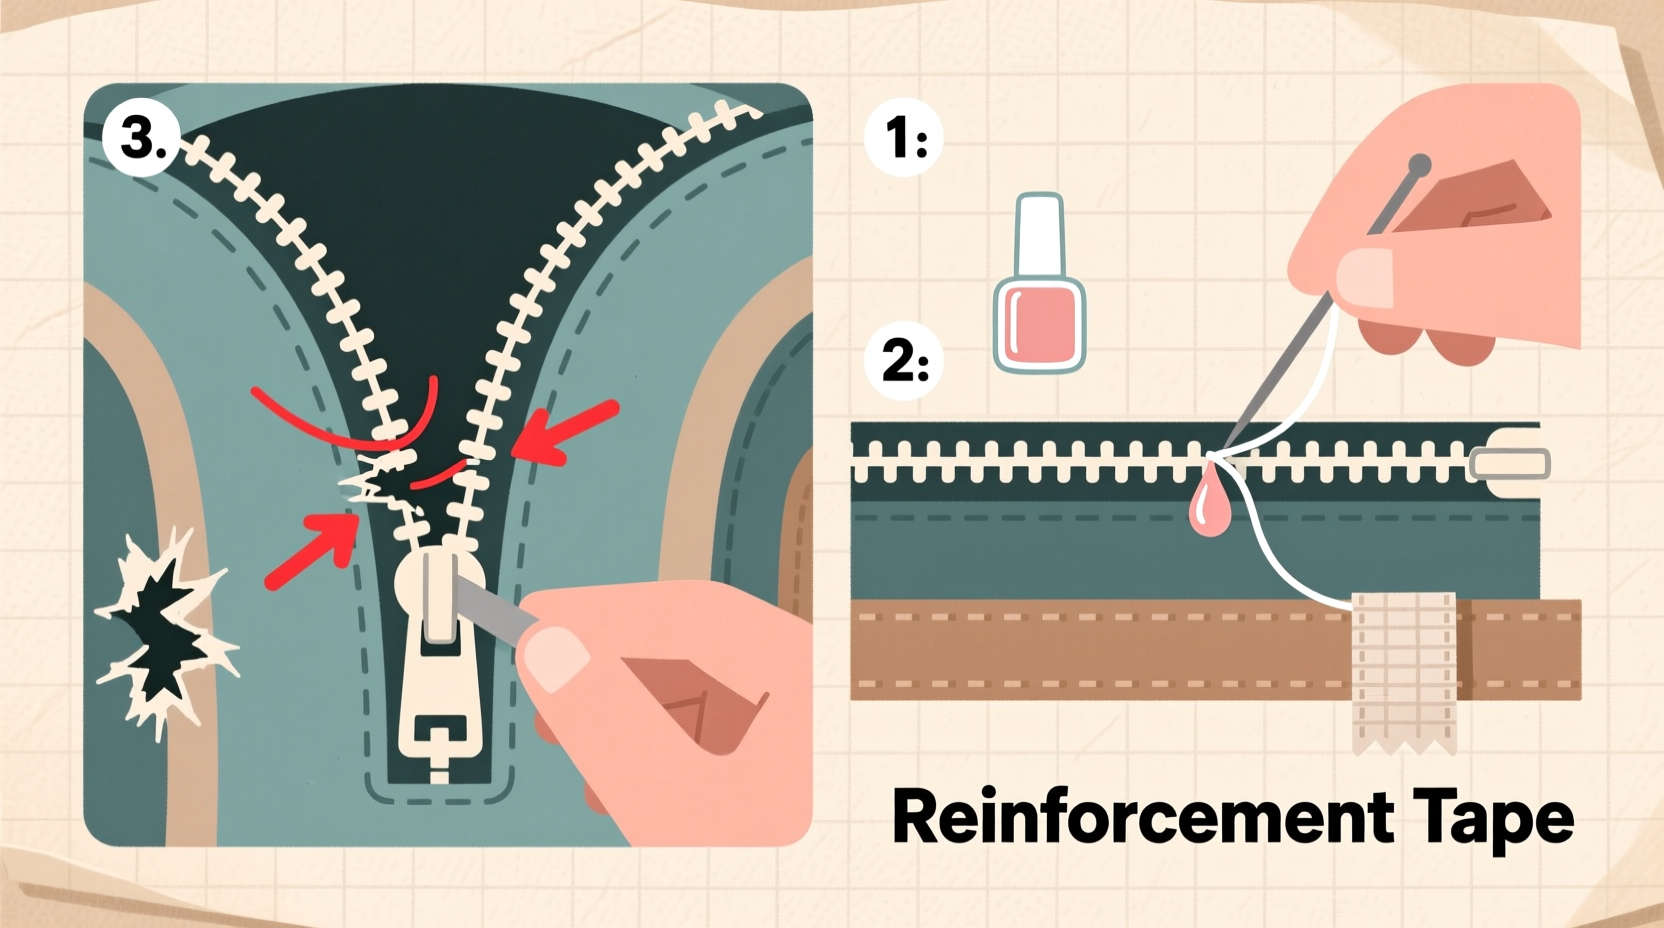
Add a Temporary Zipper Stop
When the slider has lost its lower stop (the small metal or plastic piece that prevents it from sliding off), it can drift too far and disengage. You can create a new stop using household items.
- Thread and needle method: Sew two or three tight stitches across the zipper tape just below the slider. Knot securely. Trim excess thread.
- Bead or crimp tube method: Slide a small bead or heat-shrink crimp tube onto both zipper tapes from the end. Position it below the slider and secure with glue if needed.
This acts as a physical barrier, keeping the slider aligned and preventing complete separation.
Realign Misaligned Teeth
Sometimes the zipper appears broken because one side is slightly offset. To correct this:
- Unzip fully.
- Hold both ends of the zipper tape firmly and straighten them.
- Starting at the bottom, manually zip the first inch by pressing teeth together with your fingers.
- Once aligned, slowly pull the slider upward. It should now engage properly.
If the fabric near the zipper has stretched, reinforcing it with a few hand stitches above and below the track can prevent future misalignment.
Lubricate for Smooth Operation
A stiff zipper puts extra strain on the slider, accelerating wear. Lubrication reduces friction and helps maintain alignment.
Suitable lubricants include:
- Paraffin wax (best for nylon and metal)
- Pencil graphite (clean and non-staining)
- Specialized zipper lubricant (available at outdoor retailers)
Avoid oil-based products like WD-40—they attract dirt and degrade fabric over time.
To apply, rub wax or graphite along the teeth, then run the slider up and down several times to distribute evenly.
DIY Repair Checklist
Follow this checklist to systematically diagnose and fix a splitting zipper:
- Inspect the zipper for visible damage or debris.
- Clean the teeth and slider with a soft brush or cloth.
- Lubricate the track with wax or graphite.
- Check alignment—ensure both sides meet evenly at the bottom.
- Tighten the slider with pliers if it feels loose.
- Add a temporary stop if the slider slips off.
- Test under tension—simulate pack weight by pressing on the fabric behind the zipper.
- Reinforce surrounding fabric if stretching is evident.
Complete all steps in order. Skipping ahead may mask symptoms without solving the underlying issue.
Do’s and Don’ts of Zipper Maintenance
| Do | Don’t |
|---|---|
| Close zippers before washing the backpack | Force a stuck zipper without checking for obstructions |
| Use wax or graphite to reduce friction | Apply oil-based lubricants that attract grime |
| Store the backpack with zippers closed | Yank the pull tab at an angle |
| Inspect zippers monthly for wear | Overstuff the bag, straining seams and closures |
| Replace worn pull tabs with keyring-style upgrades | Ignore small tears near the zipper tape |
Consistent habits prevent most failures. A zipper maintained this way can last the lifetime of the backpack.
Real Example: Reviving a Hiking Pack’s Main Compartment
Mark, a weekend hiker from Colorado, noticed his trusted backpack’s main zipper kept popping open halfway through trail hikes. At first, he used a carabiner to clip the two pull tabs together—a makeshift solution that worked until the slider eventually detached entirely.
He tried replacing the slider but lacked the right tools. Instead, he followed the tightening method using needle-nose pliers. After realigning the teeth and applying paraffin wax from a candle, he added hand-sewn stitches below the slider as a new stop.
The fix took 20 minutes and cost nothing. Six months later, the zipper remains secure, even under full load. “I was ready to buy a new pack,” he said. “But this old one still performs better than the replacements I’ve tried.”
His experience underscores a key truth: many zipper issues stem from small mechanical flaws, not overall product failure.
When to Replace the Zipper Entirely
Not every zipper can be saved. Consider full replacement if you observe:
- Multiple missing or melted teeth (common in coil zippers after friction heat)
- Ripped or frayed zipper tape that no longer holds stitches
- A slider that jams, cracks, or refuses to move despite cleaning
- Visible corrosion on metal zippers, especially near saltwater exposure
Replacement requires sewing skills or access to a repair shop. However, high-quality aftermarket zippers (such as YKK) are widely available and often outperform original equipment.
For the DIY-inclined, replacement involves:
- Removing the old zipper with a seam ripper.
- Measuring length and tooth type (coil vs. molded).
- Pin-basting the new zipper into place.
- Sewing with a heavy-duty needle and polyester thread.
While more involved, this option restores like-new performance and can add years to your backpack’s usability.
Frequently Asked Questions
Can I fix a split zipper without tools?
Yes. If the issue is minor separation, try realigning the teeth by hand and sewing a temporary stop using a needle and thread. Even dental floss can act as strong thread in a pinch. Lubricating with a graphite pencil also requires no tools and often improves function.
Why does my zipper only split when I walk or move?
Movement creates dynamic pressure on the backpack. If the slider is loose or the fabric sags, repeated motion can gradually pull the zipper apart. Tightening the slider and reinforcing the surrounding area usually resolves this.
Is it worth fixing an old backpack’s zipper?
In most cases, yes. Quality backpacks are built to last, while zippers are replaceable components. Unless the fabric is severely degraded, repairing the closure is more sustainable and economical than buying new.
Final Thoughts: Small Repairs, Big Impact
A splitting zipper doesn’t mean the end of your favorite backpack. Often, the fix is simpler than expected—requiring only minutes and minimal supplies. By understanding how zippers fail and applying targeted solutions, you preserve not just functionality but also the value and sentiment tied to reliable gear.
These repairs reflect a larger mindset: caring for what you own, rather than discarding it at the first sign of wear. In a world of disposable products, maintaining your equipment is an act of sustainability, resourcefulness, and personal responsibility.


 浙公网安备
33010002000092号
浙公网安备
33010002000092号 浙B2-20120091-4
Comments
No comments yet. Why don't you start the discussion?