
Uploading a stunning photo only to see it appear pixelated or blurry on Instagram is frustrating—especially when the original looks crisp on your phone. Despite capturing high-resolution images, many users unknowingly trigger Instagram’s compression algorithms due to incorrect settings or poor upload practices. The good news? Most blurriness isn’t caused by your camera—it’s rooted in how Instagram processes and compresses media during upload. By making a few strategic adjustments to your device settings, file formats, and posting methods, you can preserve image quality and ensure your photos look sharp and professional every time.
Why Instagram Makes Photos Blurry
Instagram automatically compresses all uploaded images to save bandwidth and storage space across its platform. While this improves load times for users worldwide, it often comes at the cost of visual fidelity. Compression reduces file size by eliminating data deemed “redundant,” but aggressive compression can degrade fine details, textures, and color gradients—resulting in soft, fuzzy, or blocky images.
The degree of compression depends on several factors: image resolution, aspect ratio, file format, and even network conditions during upload. For example, Instagram applies heavier compression to non-standard dimensions (like 4:5 or 1:1) if they fall outside recommended ranges. Additionally, low-light images with high ISO noise are more vulnerable to artifacts after compression.
“Instagram’s image pipeline prioritizes speed and scalability over pixel-perfect reproduction. That means even great photos can suffer unless optimized before upload.” — Dana Liu, Digital Imaging Specialist
Optimal Image Specifications for Instagram
To avoid unnecessary compression, align your photos with Instagram’s preferred technical standards. While the app accepts various sizes and formats, straying from these guidelines increases the likelihood of quality loss.
| Metric | Recommended Value | Notes |
|---|---|---|
| Resolution (Width) | 1080 pixels | Avoid going below 1080px width to prevent upscaling. |
| Aspect Ratio | 1:1 (Square), 4:5 (Portrait), 1.91:1 (Landscape) | Sticking to standard ratios prevents cropping and extra compression. |
| File Format | JPEG (RGB color mode) | PNG files may be converted and compressed more aggressively. |
| File Size | Under 10MB | Larger files may be compressed more heavily or fail to upload. |
| DPI | 72 DPI | Higher DPI doesn’t improve screen quality; stick to web standard. |
Photos that match these specs are processed with minimal alterations. If your image is 2000px wide, Instagram will downscale it smoothly to 1080px. But if it’s only 700px wide, the platform must stretch it, resulting in visible blur.
Step-by-Step Guide to Prevent Blurry Uploads
Follow this sequence of actions to maximize clarity from capture to post. Each step targets a common cause of blurriness, ensuring your final upload reflects the true quality of your original.
- Capture in High Resolution: Use your phone’s native camera app in full resolution mode. Avoid digital zoom, which degrades image quality. On iPhones, go to Settings > Camera > Formats > Apple ProRAW (if available). On Android, use HDR+ or Professional mode for maximum detail.
- Edit Before Exporting: Apply filters, crop, and adjust exposure using apps like Lightroom or Snapseed. Avoid over-sharpening, which creates halos that worsen compression artifacts.
- Resize to 1080px Width: If your photo exceeds 1080px wide, resize it. Tools like Adobe Express, Canva, or free desktop software (e.g., GIMP) allow precise resizing. Maintain aspect ratio based on intended post type (e.g., 1080x1350px for 4:5 portrait).
- Save as High-Quality JPEG: Export with 90–100% quality. Avoid PNG unless transparency is needed, as Instagram converts it to JPEG anyway, sometimes with suboptimal results.
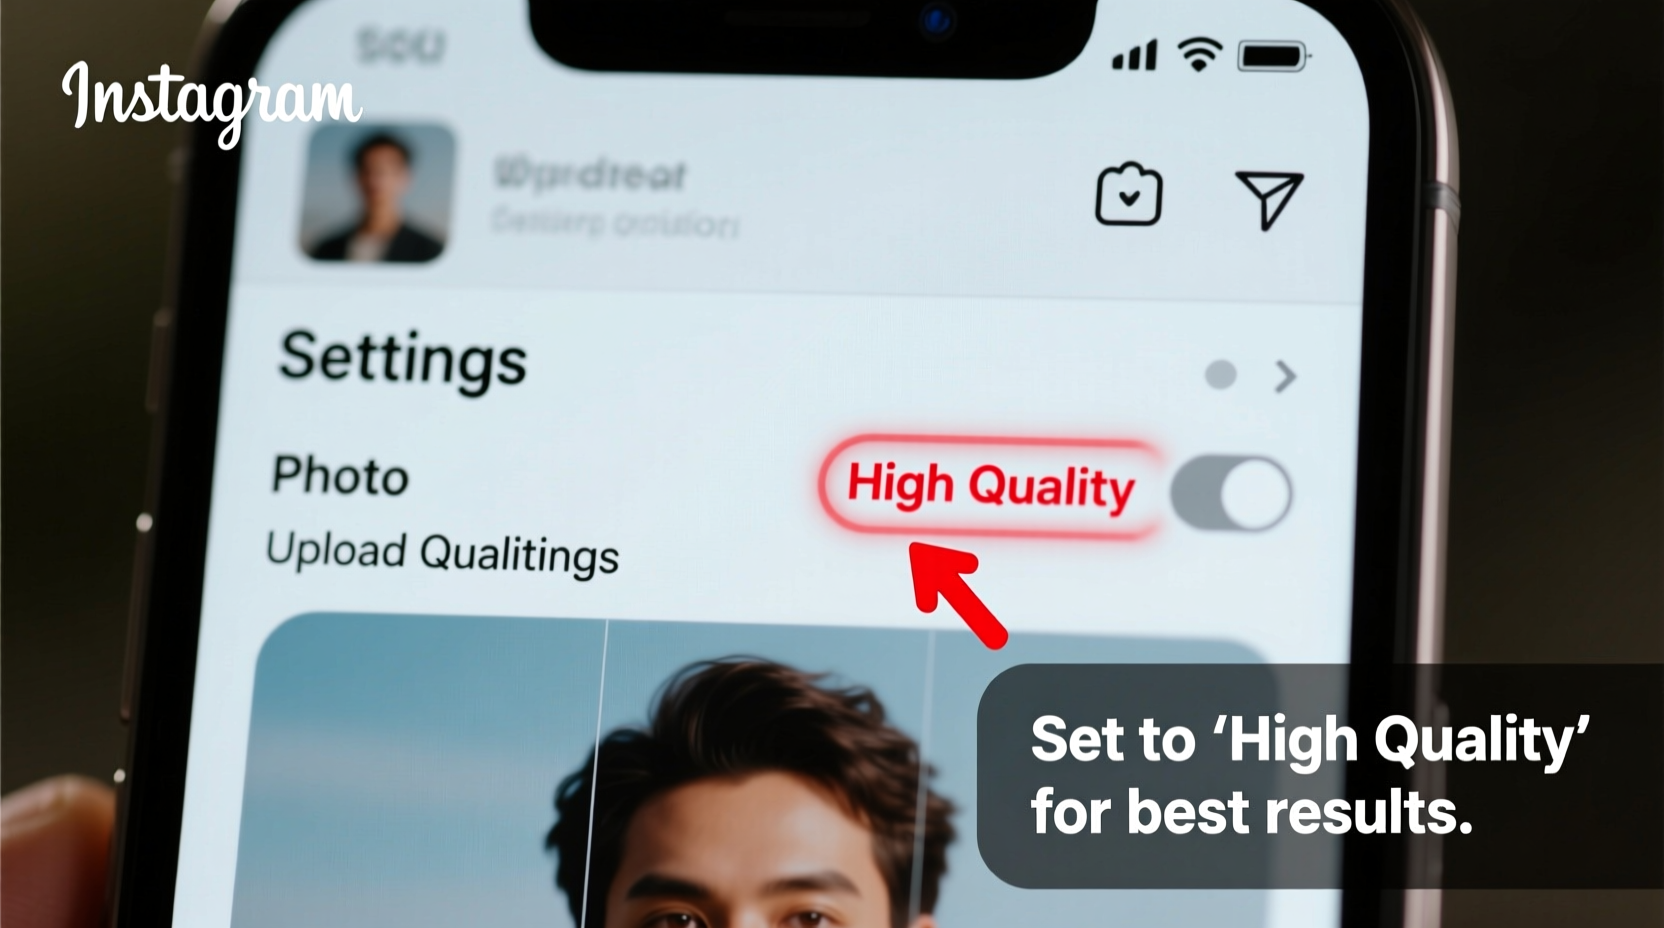
- Disable Instagram’s Data Saver Mode: Go to Instagram Settings > Account > Data Usage > Disable “Data Saver Mode.” This ensures full-resolution uploads instead of compressed previews.
- Use Wi-Fi for Uploading: A stable, fast connection prevents partial uploads and re-compression attempts. Cellular data or weak Wi-Fi can force lower-quality encoding.
- Upload via Mobile App (Not Web): The Instagram mobile app handles image processing better than the desktop version. Always post from iOS or Android for consistent results.
Common Mistakes That Cause Blurriness
Even with high-quality source images, certain behaviors sabotage clarity. Recognizing these pitfalls helps you maintain control over output quality.
- Posting screenshots: Screenshots often have inconsistent DPI and non-standard resolutions. Instagram treats them as low-priority media and applies heavier compression.
- Using third-party scheduling tools: Some platforms compress images before sending them to Instagram. Only use trusted services like Later or Hootsuite that support 1080px uploads.
- Double-posting through Stories or Reels first: Uploading the same image across multiple formats can lead to repeated compression cycles, degrading quality each time.
- Ignoring orientation settings: Vertical images taller than 1350px get cropped or compressed disproportionately. Stick to max 1350px height for 4:5 posts.
- Enabling “Reduce Motion” or “Low Quality Mode” in phone settings: These accessibility features can affect how apps render and export media.
“Every additional layer between your camera and Instagram—editing apps, schedulers, cloud sync—adds risk. Streamline your workflow to protect image integrity.” — Marcus Tran, Social Media Technologist
Mini Case Study: From Blurry to Sharp in One Week
Sophie, a lifestyle photographer and influencer, noticed her feed looked increasingly unprofessional. Her iPhone 15 shots appeared detailed in her gallery but came out muddy on Instagram. She tested three variables over seven days:
- Day 1–2: Posted directly from phone without resizing. Result: Moderate blur, especially in shadow areas.
- Day 3–4: Edited in Lightroom, exported at 1080px wide JPEG (95% quality), disabled Data Saver. Result: Noticeably sharper, better color retention.
- Day 5–7: Used Wi-Fi, posted within one hour of editing, avoided cross-posting. Result: Consistently crisp images with no visible degradation.
The difference was confirmed by audience feedback—engagement increased by 22%, and comments like “Your photos look so much clearer now!” became frequent. Sophie concluded that small technical changes had outsized visual impact.
Checklist: How to Ensure Sharp Instagram Photos
Use this checklist before every post to guarantee optimal quality:
- ✅ Photo width is exactly 1080 pixels
- ✅ Aspect ratio matches intended format (1:1, 4:5, or 1.91:1)
- ✅ Saved as JPEG in RGB color mode
- ✅ File size under 10MB
- ✅ Instagram’s Data Saver Mode is turned off
- ✅ Uploading via mobile app on stable Wi-Fi
- ✅ No prior compression (e.g., not a screenshot or downloaded repost)
- ✅ Image is well-lit and focused (sharpness starts at capture)
Frequently Asked Questions
Does Instagram compress every photo I upload?
Yes, Instagram compresses all images to optimize performance. However, photos that meet recommended specs (1080px wide, standard ratios, high quality) experience minimal visible loss. Poorly sized or low-resolution images suffer the most degradation.
Can I upload HD or 4K photos to Instagram?
While you can capture in 4K, Instagram does not display images at that resolution. The platform resizes everything to a maximum of 1080 pixels wide. Uploading ultra-high-res files won’t improve quality and may increase compression artifacts due to larger file size.
Why do my edited photos look worse on Instagram than in editing apps?
This usually happens when the exported file doesn’t match Instagram’s ideal dimensions or when “Data Saver Mode” is enabled. Also, some editing apps export in wide color gamuts (like DCI-P3), which Instagram may not fully support, leading to washed-out or oversaturated results. Stick to sRGB/standard color profiles when exporting.
Final Thoughts: Clarity Starts With Control
Blurry Instagram photos aren’t inevitable—they’re usually the result of overlooked settings and mismatched expectations. By understanding how Instagram processes images and taking deliberate steps to align your workflow with its technical framework, you regain control over how your content appears. It’s not about buying better equipment; it’s about optimizing what you already have.
Consistency matters. Once you establish a reliable upload routine—resizing to 1080px, disabling data-saving features, and posting over Wi-Fi—you’ll notice an immediate improvement in visual quality. Over time, sharp, professional-looking images build credibility, boost engagement, and reflect your attention to detail.


 浙公网安备
33010002000092号
浙公网安备
33010002000092号 浙B2-20120091-4
Comments
No comments yet. Why don't you start the discussion?