
Controller drift—where the analog stick moves on its own despite no input—is a common frustration among Nintendo Switch owners. The Joy-Con’s compact design and frequent use make it susceptible to wear, especially in the thumbsticks. While Nintendo has faced criticism over this issue, replacing the entire controller isn’t always necessary or cost-effective. With some basic tools, patience, and technical insight, most cases of Joy-Con drift can be addressed at home. This guide walks through practical, tested solutions to restore your Joy-Con’s functionality without spending money on new hardware.
Understanding Analog Stick Drift
Analog stick drift occurs when the internal sensor of the joystick reports movement even when the stick is centered. In Joy-Con units, this typically stems from one of three causes: debris accumulation under the stick cap, degradation of the potentiometer (the component that tracks stick position), or physical wear on the rubber cup beneath the stick. Over time, tiny particles from hands, dust, or pocket lint enter the mechanism, interfering with accurate tracking. Additionally, repeated use wears down conductive materials inside the sensor, leading to false inputs.
The left Joy-Con is particularly prone to drift due to its frequent use for camera control and movement in games like The Legend of Zelda: Breath of the Wild. However, both sticks are equally vulnerable if used intensively. Recognizing the root cause helps determine whether cleaning will suffice or if deeper disassembly and recalibration are required.
“Most Joy-Con drift cases aren’t terminal failures—they’re recoverable with proper maintenance.” — Michael Tran, Electronics Repair Technician
Step-by-Step Guide to Cleaning Your Joy-Con
Cleaning is the first and least invasive method to address drift. Often, surface-level contamination is enough to throw off calibration. A thorough cleaning can resolve minor drift without opening the device.
- Power off the Switch and detach the Joy-Con. Ensure the console is powered down to avoid accidental inputs or electrical issues.
- Use compressed air around the base of the analog stick. Hold the can upright and spray short bursts in a circular motion. Avoid shaking the can, as moisture can leak out and damage components.
- Apply isopropyl alcohol (70% or higher) using a microfiber cloth. Dampen the edge of the cloth slightly and gently rub around the stick’s housing. Do not pour liquid directly onto the controller.
- Rotate the stick in full circles for 20–30 seconds. This helps dislodge particles caught beneath the rim.
- Test responsiveness in System Settings. Navigate to Controllers and Sensors > Test Input Devices to monitor real-time stick behavior.
If the dot in the test screen still drifts after cleaning, proceed to deeper troubleshooting. Repeat this process weekly to maintain performance, especially if you play daily.
Disassembling and Deep-Cleaning the Analog Module
When surface cleaning fails, internal buildup may be the culprit. Opening the Joy-Con allows access to the analog stick assembly for a more comprehensive fix. This requires precision and care but does not require soldering for basic cleaning.
Tools You’ll Need
- Small Phillips #00 screwdriver
- Plastic pry tool or spudger
- Isopropyl alcohol (90% or higher recommended)
- Cotton swabs and microfiber cloth
- Tweezers (optional)
- Clean workspace with good lighting
Disassembly Process
- Remove the four screws on the back of the Joy-Con. These are standard Phillips-head screws, not tri-wing, despite earlier models requiring special bits.
- Insert the plastic pry tool along the seam between the top and bottom halves. Gently twist to separate the casing. Be cautious near the trigger area, which contains delicate connectors.
- Lift the back cover off to expose the internal board. The analog stick is mounted on the front-facing side of the PCB.
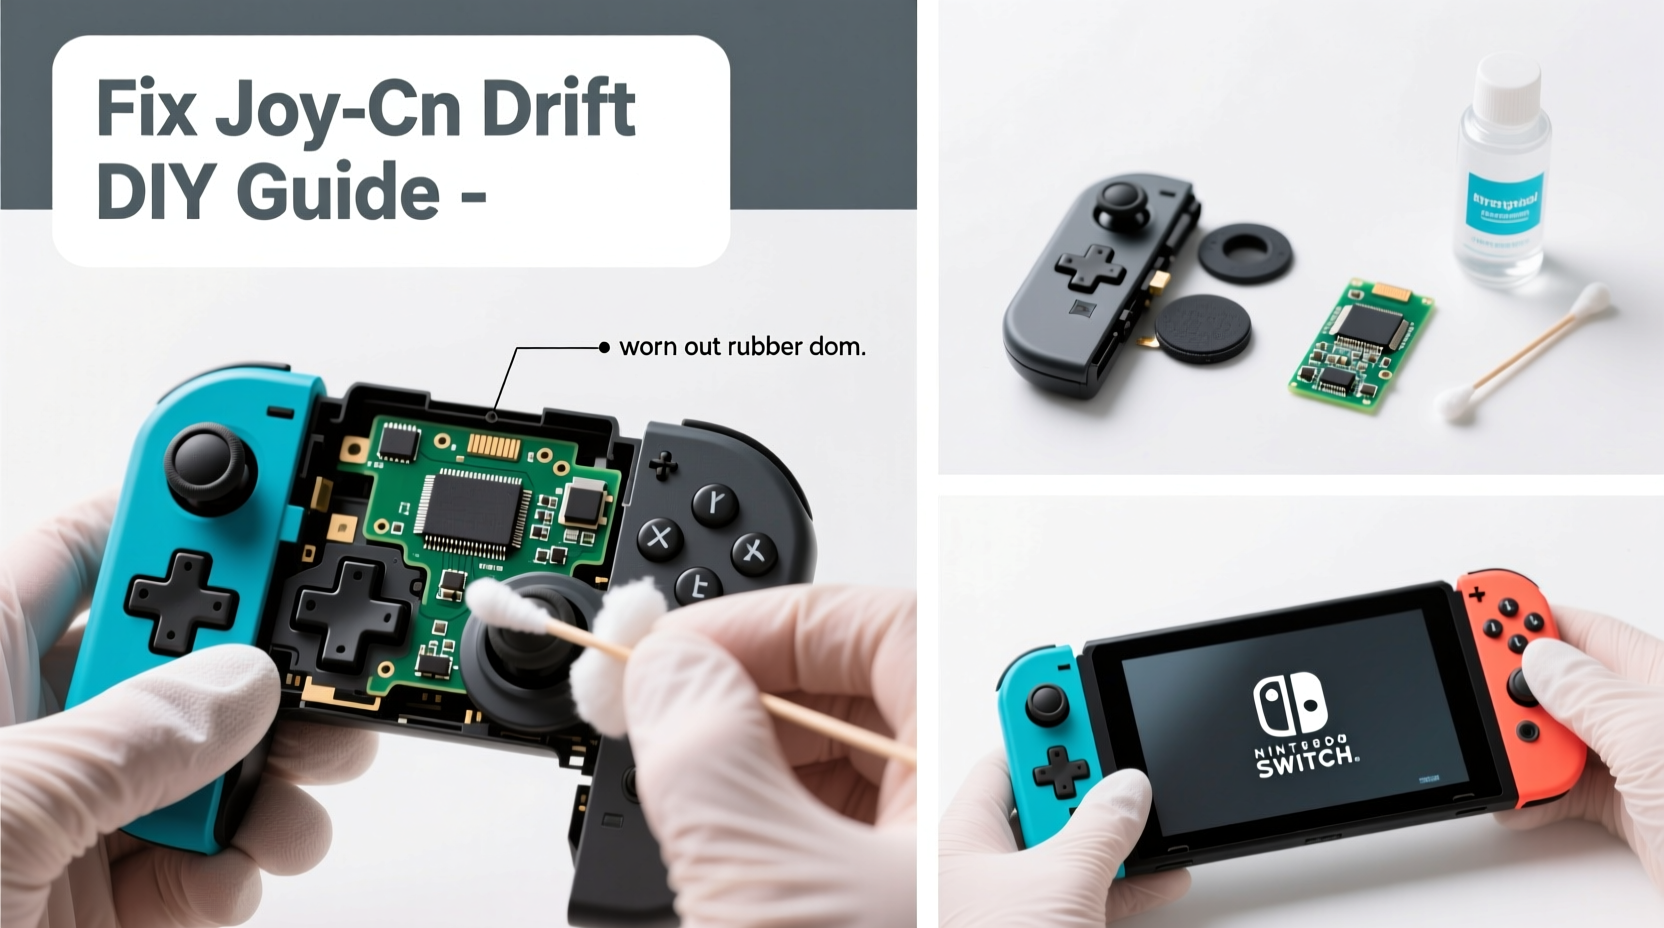
- Locate the rubber dome under the stick shaft. Carefully lift it to inspect for grime or wear. Use a cotton swab dipped in alcohol to clean the contact points underneath.
- Clean the metal wiper contacts on the potentiometer. These are small copper strips that slide over resistive film; dirt here causes erratic readings.
- Reassemble the unit in reverse order, ensuring all clips snap securely.
After reassembly, recalibrate the stick via System Settings. If drift persists, consider recalibrating the sensor data or replacing the stick module.
| Symptom | Probable Cause | Solution |
|---|---|---|
| Stick drifts only when moved | Dust on potentiometer | Deep clean with alcohol |
| Constant drift at rest | Worn rubber cup or damaged sensor | Replace analog stick module |
| No response or jittery input | Loose connection or cracked solder | Inspect ribbon cables; seek professional repair if needed |
Replacing the Analog Stick Module
If cleaning doesn’t resolve the issue, the analog stick itself may be degraded beyond recovery. Fortunately, replacement modules are available online for $5–$10 per unit. Swapping the part restores precise control and often eliminates drift permanently.
To replace the module:
- After opening the Joy-Con, locate the two small screws securing the analog stick to the PCB.
- Unscrew and gently lift the old stick. It’s connected via a short flex cable—do not force it.
- Disconnect the cable from the motherboard socket by gently lifting the retention flap with tweezers.
- Plug in the new module, secure the flap, and reattach the stick assembly.
- Reassemble the Joy-Con and test immediately.
This procedure takes about 20 minutes for beginners. Replacement parts are widely available from retailers like Amazon, eBay, or iFixit. Look for “Joy-Con analog stick replacement kit” to ensure compatibility.
Mini Case Study: Recovering a Drifting Left Joy-Con
Alex, a college student and avid *Splatoon 3* player, noticed his left Joy-Con drifting upward during matches, causing his character to move unintentionally. He tried recalibrating through system settings, but the problem returned within hours. After reading online forums, he decided to open the controller himself.
Using a repair kit purchased for $8, Alex disassembled the Joy-Con and found dark residue on the potentiometer contacts. He cleaned the area thoroughly with 90% isopropyl alcohol and a cotton swab. Upon reassembly, the drift was significantly reduced—but not fully gone. Suspecting partial wear, he ordered a replacement stick module and completed the swap two days later.
The result: a fully functional Joy-Con with zero drift. Total cost: under $15. Alex now cleans his controllers monthly and avoids playing while eating to minimize debris buildup.
Preventive Maintenance Checklist
Regular upkeep dramatically extends the life of your Joy-Con. Follow this checklist to prevent future drift:
- ✅ Clean analog sticks every 2–4 weeks with compressed air
- ✅ Wash hands before gaming to reduce oil transfer
- ✅ Store Joy-Con in a protective case when not in use
- ✅ Avoid exposing controllers to high humidity or extreme temperatures
- ✅ Recalibrate sticks monthly via System Settings
- ✅ Limit aggressive thumbstick movements during gameplay
Consistent care reduces mechanical stress and prevents premature wear. Think of it like maintaining a keyboard or mouse—the cleaner and gentler the use, the longer it lasts.
Frequently Asked Questions
Can I fix Joy-Con drift without opening the controller?
Yes, in early-stage drift, compressed air and external cleaning may resolve the issue. However, if the problem persists, internal cleaning or part replacement is usually necessary.
Will opening my Joy-Con void the warranty?
Technically, yes—if the warranty is still active. Nintendo may deny service if tampering is evident. However, most Joy-Con units exceed their one-year warranty period before drift becomes severe, making DIY repair a practical choice.
Are third-party replacement sticks reliable?
Most generic analog modules perform well for basic functionality. Higher-quality kits from reputable brands like iFixit or Adafruit offer better longevity. Avoid the cheapest options, as they may fail within months.
Expert Insight: When to Seek Professional Help
While many repairs are manageable at home, certain issues go beyond simple fixes. If you notice:
- No response from the stick after replacement
- Visible corrosion on the PCB
- Cracked solder joints near the sensor
…professional micro-soldering or board-level repair may be required. Local repair shops specializing in game consoles can often recover seemingly dead Joy-Con units for less than half the price of a new one.
“About 60% of Joy-Con repairs we see involve fixable drift. Only 15% require full replacements.” — Luis Mendez, Owner of GameFix Pro Repair Shop
Conclusion: Take Control of Your Controllers
Drift doesn’t have to mean the end of your Joy-Con’s life. With accessible tools and clear steps, most users can restore full functionality without purchasing new hardware. Cleaning, recalibration, and component replacement are all viable paths to recovery. Beyond immediate fixes, adopting preventive habits ensures your controllers remain responsive for years.
Addressing drift early increases the chances of success. Waiting too long can lead to irreversible sensor wear, turning a simple cleanup into a complex repair. By understanding how the analog stick works and taking proactive measures, you retain control—not just in-game, but over your gear’s lifespan.


 浙公网安备
33010002000092号
浙公网安备
33010002000092号 浙B2-20120091-4
Comments
No comments yet. Why don't you start the discussion?