
Flickering LED lights are more than just a nuisance—they can signal underlying electrical issues, reduce bulb lifespan, or even affect your comfort and concentration at home. While it’s tempting to call an electrician immediately, many causes of flickering are simple to diagnose and resolve with basic tools and knowledge. Understanding the root cause saves time, money, and unnecessary service calls. This guide walks you through common reasons for flickering LEDs and offers practical, safe solutions you can implement today.
Understanding Why LED Lights Flicker
Unlike incandescent bulbs, which use a heated filament that glows steadily, LEDs rely on electronic drivers to convert AC power into low-voltage DC current. Because of this design, they’re more sensitive to voltage fluctuations, incompatible components, and circuit inconsistencies. Most flickering occurs due to one of these factors:
- Incompatible dimmer switches
- Loose bulb connections
- Poor-quality LED drivers
- Voltage fluctuations in the home’s electrical system
- Overloaded circuits
- Interaction with smart switches or timers
Before assuming a serious electrical fault, consider that many flickering problems stem from mismatched hardware rather than dangerous wiring. The key is systematic troubleshooting.
Step-by-Step Guide to Diagnosing and Fixing Flickering
Follow this logical sequence to identify and eliminate the cause of flickering LED lights:
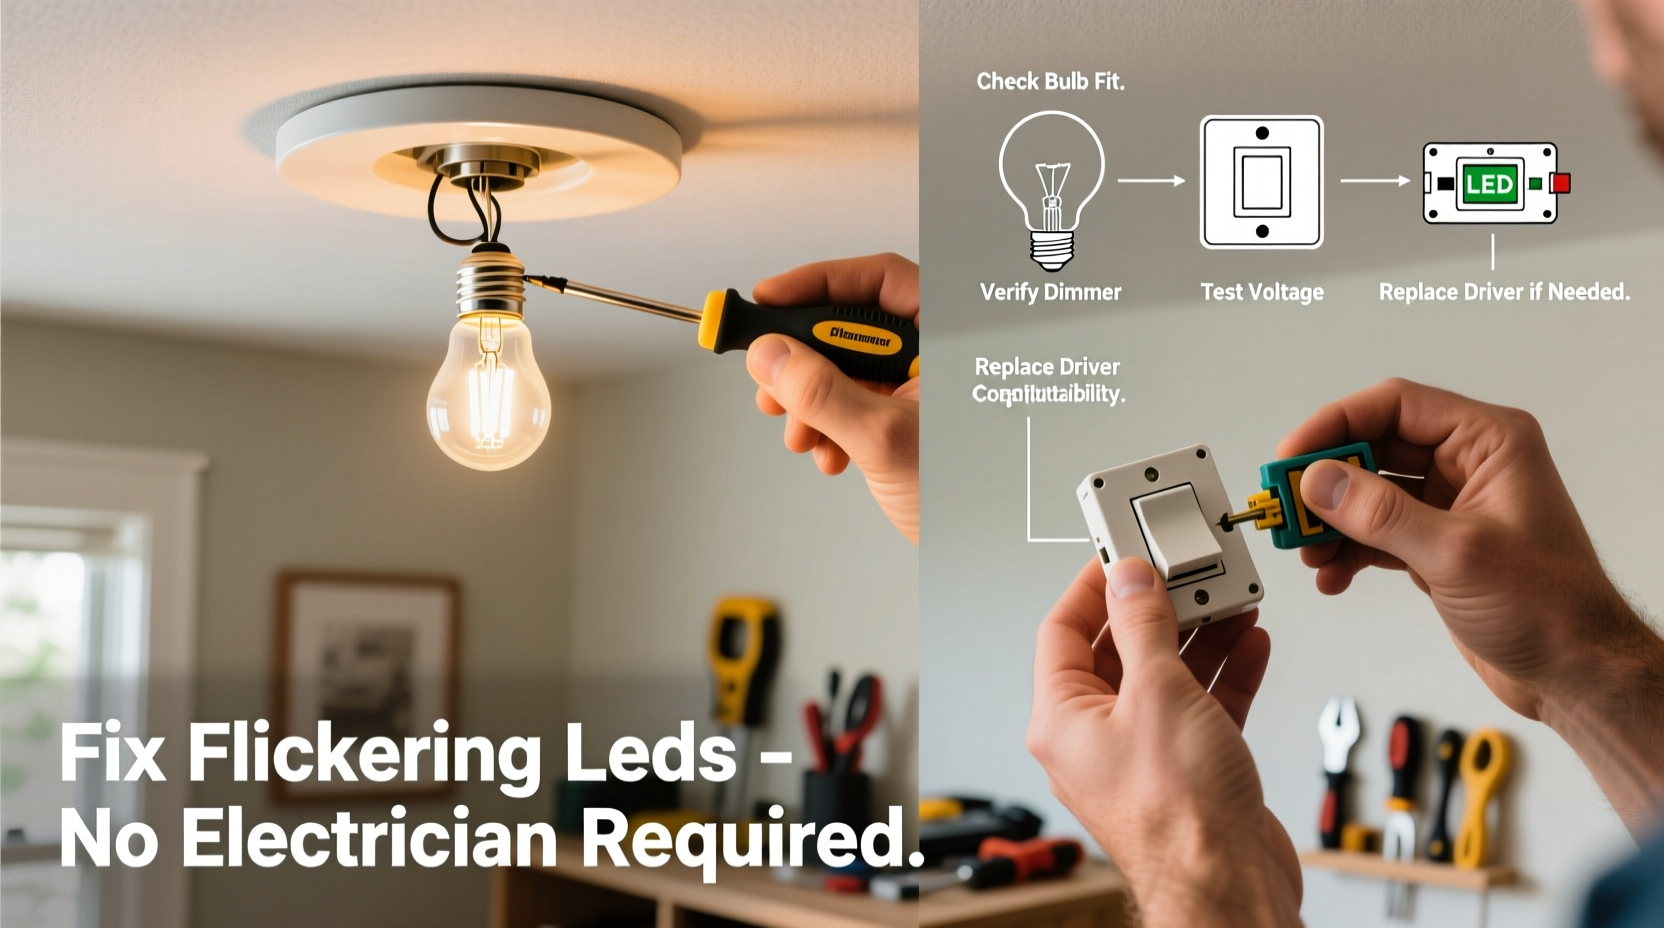
- Check the Bulb First: Unscrew the flickering LED and inspect for dark spots or visible damage. Try the bulb in a different fixture. If it works normally elsewhere, the issue lies in the original fixture or circuit.
- Tighten the Connection: A loose bulb can cause intermittent contact. Turn off the power, let the bulb cool, then reseat it firmly in the socket.
- Verify Compatibility with Dimmers: Many older dimmer switches are designed for high-wattage incandescent bulbs. When used with low-wattage LEDs, they often cause flickering. Check if the dimmer switch is labeled as “LED-compatible.”
- Test Without the Dimmer: Temporarily bypass the dimmer by installing a standard on/off switch (or use a non-dimming fixture). If flickering stops, the dimmer is the culprit.
- Inspect the Fixture and Wiring: Look for signs of overheating, such as discolored sockets or melting insulation. Ensure all wire connections inside the fixture are tight and secure.
- Check Other Lights on the Same Circuit: If multiple lights flicker simultaneously, especially when large appliances cycle on (like HVAC or refrigerator), the issue may be voltage fluctuation due to circuit overload.
- Try a Different Brand or Model of LED: Some LEDs have better internal drivers and are less prone to flicker under marginal conditions.
This process helps isolate whether the problem is localized (one bulb) or systemic (entire circuit).
Common Fixes for Specific Scenarios
Different situations call for different approaches. Here are targeted solutions based on real-world scenarios.
Flickering with Dimmer Switches
The most frequent cause of LED flickering is using non-LED-rated dimmers. Traditional dimmers reduce voltage by “chopping” the AC waveform, which works well with incandescents but confuses LED drivers.
Solution: Replace the dimmer with an LED-compatible model. Look for switches labeled “Trailing Edge” or “ELV (Electronic Low Voltage)” dimmers, which provide smoother control for LEDs.
Flickering After Turning Off
Some LEDs emit a brief flash or glow after being switched off. This “ghosting” effect happens when small amounts of residual current leak through the circuit, often due to illuminated switches or shared neutrals.
Solution: Install a bypass capacitor or resistor across the fixture (available at electronics stores) to absorb stray current. Alternatively, replace illuminated switches with standard ones, as their pilot lights can induce phantom voltage.
Flickering Only in Cold Temperatures
Outdoor or garage LEDs may flicker in winter. Cold affects driver performance and can cause temporary instability until the bulb warms up.
Solution: Use LEDs rated for outdoor or cold-weather use. These contain drivers designed to handle temperature extremes. Also, ensure fixtures are properly sealed against moisture.
“Many flickering complaints we see are due to retrofitting old dimming systems with modern LEDs without checking compatibility. It’s not a defect—it’s a mismatch.” — Carlos Mendez, Residential Lighting Technician with 18 years of experience
Do’s and Don’ts: What to Avoid When Fixing LED Flicker
| Do | Don’t |
|---|---|
| Use LED-rated dimmer switches | Assume flickering always means faulty wiring |
| Check bulb compatibility with your fixture | Overload a circuit with too many LEDs |
| Replace flickering bulbs one at a time to test | Ignore buzzing sounds from switches or fixtures |
| Install surge protectors on sensitive lighting circuits | Use indoor-rated LEDs in damp or outdoor locations |
| Consult manufacturer specs for dimming compatibility | Work on live circuits without turning off the breaker |
Mini Case Study: Solving Kitchen Under-Cabinet Flicker
A homeowner in Portland reported persistent flickering in newly installed under-cabinet LED strips. The lights would strobe slightly, especially when the microwave was running. Initial suspicion pointed to electromagnetic interference.
Upon inspection, it was discovered that the LED driver was located near the microwave’s power cord, and both were on the same circuit. The microwave’s compressor caused minor voltage drops each time it cycled on, affecting the sensitive LED driver.
The solution involved relocating the LED driver to a separate circuit and adding a small line conditioner to stabilize input voltage. After the fix, the flickering stopped completely. This case highlights how appliance-induced voltage fluctuations can impact LED performance—even without faulty wiring.
Essential Checklist for DIY LED Troubleshooting
Use this checklist to methodically address flickering issues:
- ✅ Turn off power before handling fixtures or switches
- ✅ Inspect bulb for physical damage or darkening
- ✅ Tighten bulb in socket securely
- ✅ Verify dimmer switch is LED-compatible
- ✅ Check minimum load requirement of the dimmer
- ✅ Test bulb in another fixture to rule out bulb failure
- ✅ Examine fixture for loose wires or signs of overheating
- ✅ Determine if flickering coincides with appliance operation
- ✅ Try a high-quality, name-brand LED bulb known for stable drivers
- ✅ Consider installing a dedicated circuit for sensitive lighting
When to Call a Professional
While most flickering issues are fixable at home, certain warning signs indicate a need for licensed electrician intervention:
- Flickering affects multiple rooms or the entire house
- You notice burning smells, discoloration, or buzzing from outlets or switches
- Circuit breakers trip frequently when lights are on
- There’s visible damage to wiring, insulation, or junction boxes
- Voltage tests show inconsistent readings (below 110V or above 125V)
These symptoms could point to overloaded circuits, faulty breakers, or degraded wiring—issues that require professional diagnosis and repair.
FAQ: Common Questions About Flickering LED Lights
Why do my LED lights flicker when I turn them off?
This is often due to \"ghost voltage\" from illuminated switches or capacitive coupling in long cable runs. The tiny current trickle charges the LED driver enough to cause a brief flash. Installing a bypass resistor or switching to a non-illuminated switch usually resolves it.
Can voltage fluctuations damage LED bulbs?
Yes. While LEDs are energy-efficient, they’re sensitive to unstable voltage. Frequent surges or sags can degrade the internal driver over time, leading to premature failure. Using surge protectors or dedicated voltage regulators helps extend bulb life.
Are all LED bulbs compatible with dimmer switches?
No. Only bulbs labeled as \"dimmable\" will work with dimmers—and even then, compatibility depends on the dimmer type. Always check both the bulb and dimmer specifications for matching compatibility lists.
Final Thoughts: Take Control of Your Home Lighting
Flickering LED lights don’t have to mean an expensive service call. With a clear understanding of how LEDs operate and what causes instability, most homeowners can diagnose and correct the issue safely. Start with the simplest fixes—tightening bulbs, checking compatibility, and testing components—and work your way toward more complex solutions like upgrading dimmers or isolating circuits.
By investing a little time and attention, you’ll not only restore steady, comfortable lighting but also extend the life of your bulbs and enhance the safety of your home’s electrical system. Smart troubleshooting today prevents bigger problems tomorrow.


 浙公网安备
33010002000092号
浙公网安备
33010002000092号 浙B2-20120091-4
Comments
No comments yet. Why don't you start the discussion?