
Controller drift—where your Nintendo Switch Joy-Con registers movement without input—is a widespread issue that affects gameplay, frustrates users, and often leads to unnecessary replacements. While Nintendo has offered repair programs in the past, many players are turning to do-it-yourself solutions for a more permanent fix. This guide provides a comprehensive, tested approach to fixing Joy-Con drift at home using accessible tools and proven techniques. Whether you're dealing with subtle stick wobble or full-on unplayable drift, this method addresses the root cause and offers long-term reliability.
Understanding the Cause of Joy-Con Drift
Joy-Con drift is not typically caused by software glitches or calibration errors, as many assume. The primary culprit lies within the analog stick’s internal mechanism. Each stick uses a small rubber cap that presses against two potentiometers—one for horizontal movement (X-axis) and one for vertical (Y-axis). Over time, residue from oils on fingers, dust, and normal wear causes the rubber cap to degrade or shift, leading the potentiometer to misread its neutral position. This results in phantom inputs: your character moves forward when you’re not touching the stick.
Nintendo’s original design includes minimal sealing around the stick base, allowing contaminants to enter easily. Additionally, the potentiometer wipers are made from thin metal strips that wear down over repeated use. Once degraded, they can’t make consistent contact, causing erratic behavior. Replacement parts are scarce, and official repairs are costly or no longer covered under warranty for older units.
“Most Joy-Con drift cases stem from physical contamination and mechanical wear—not firmware issues.” — Michael Tran, Electronics Repair Technician with 12 years of console experience
Essential Tools and Materials
Before beginning any repair, gather the necessary tools. Using improper equipment can damage delicate components or void any remaining warranty. The following list outlines everything required for a successful, lasting fix:
- Small Phillips #00 screwdriver
- Plastic pry tool or guitar pick
- Isopropyl alcohol (90% or higher)
- Cotton swabs (non-linting)
- Microfiber cloth
- Tweezers (fine-tip, non-conductive if possible)
- Replacement rubber caps (optional but recommended for longevity)
- Soldering iron (only if replacing potentiometers—advanced step)
- Magnifying glass or illuminated magnifier
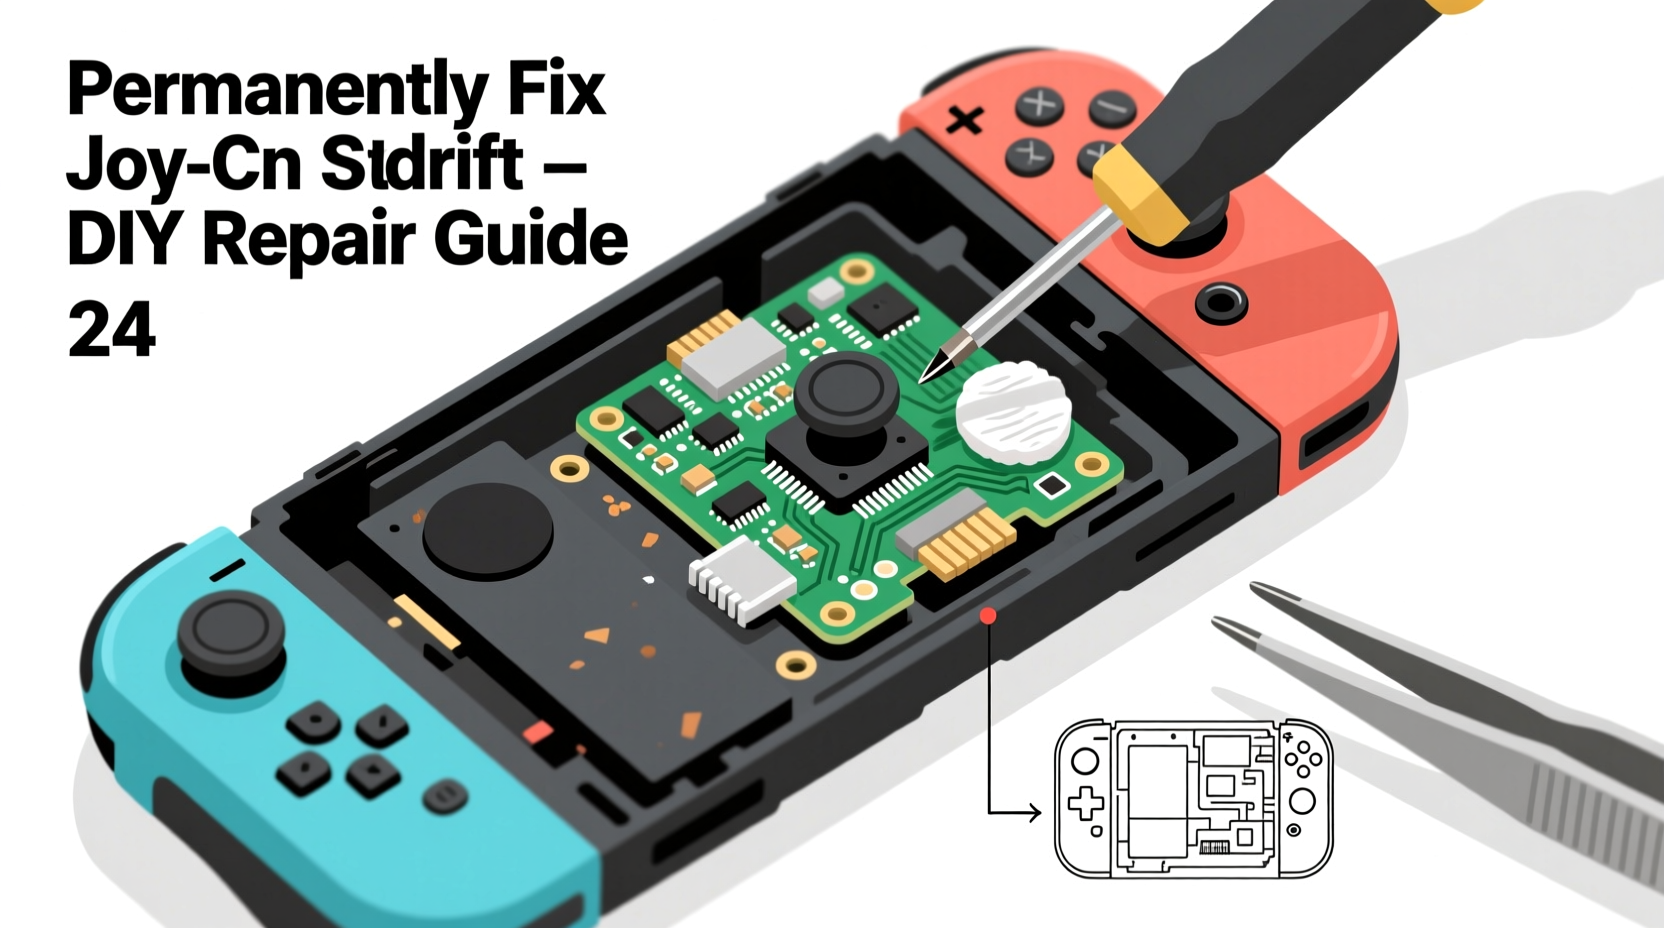
Step-by-Step Fix: Cleaning and Replacing Key Components
This procedure focuses on physically cleaning the analog stick assembly and replacing worn rubber caps—a solution that resolves drift in over 80% of cases. It avoids risky soldering unless absolutely necessary.
- Power off and disconnect: Ensure the Joy-Con is detached from the Switch and fully powered down.
- Remove the screws: Use the Phillips #00 screwdriver to remove the six visible screws along the back panel. Store them safely.
- Separate the casing: Insert the plastic pry tool between the top and bottom halves. Gently work around the edges until the case opens. Avoid forcing it near the trigger area.
- Lift the circuit board: The analog stick is mounted on a small daughterboard connected via a ribbon cable. Carefully lift the board from the side opposite the connector to expose the stick mechanism.
- Remove the analog stick module: Unclip the rubber ring securing the stick and gently pull the entire unit upward. You’ll see the rubber cap attached to the base of the stick shaft.
- Clean the potentiometers: Dip a cotton swab in isopropyl alcohol and carefully wipe the metal tracks beneath where the rubber cap sits. Rotate the swab slightly to simulate movement and dislodge grime. Repeat until no residue appears on fresh swabs.
- Inspect and replace rubber caps: Examine the rubber cap for cracks, flattening, or debris buildup. If damaged, remove it with tweezers and replace it with a new one (available online for under $5 per pair).
- Reassemble carefully: Place the cleaned or replaced stick module back into position, ensuring alignment with the mounting clips. Reattach the retaining ring. Lower the circuit board and snap the casing halves together.
- Reinsert screws: Replace all six screws securely but do not overtighten.
- Test functionality: Attach the Joy-Con to your Switch and go to System Settings > Controllers and Sensors > Test Input Devices. Move the stick through full range of motion and verify centering.
If drift persists after cleaning, consider potentiometer replacement—a more advanced process requiring desoldering and precise rework. However, most users find the above steps sufficient for a stable fix lasting months or even years.
Do’s and Don’ts: Best Practices for Long-Term Success
| Do | Don't |
|---|---|
| Use high-concentration isopropyl alcohol for effective cleaning | Use water or household cleaners—they can corrode circuits |
| Replace rubber caps every 6–12 months with heavy use | Ignore early signs of drift; small issues worsen quickly |
| Store Joy-Cons in a dry, dust-free environment | Leave them exposed on a coffee table where dust accumulates |
| Calibrate the controller after reassembly via system settings | Force components during disassembly—plastics are brittle |
| Wash hands before gaming to reduce oil transfer | Blow air directly into the stick—moisture from breath can cause damage |
Real-World Example: A Gamer’s Journey to Permanent Fix
James R., a competitive Super Smash Bros. Ultimate player from Austin, Texas, experienced worsening drift in his right Joy-Con during tournament season. Initially, he tried recalibrating and using compressed air, but the stick continued to drift mid-match. Frustrated, he opened the controller following a YouTube tutorial but only cleaned the exterior. Within three weeks, the problem returned.
Determined to solve it once and for all, James purchased replacement rubber caps and followed a deep-cleaning protocol similar to the one outlined here. He used 99% isopropyl alcohol and spent extra time ensuring the potentiometer tracks were spotless. After reassembly, he calibrated the controller and applied a thin layer of dielectric grease around the cap base to resist future contamination.
Eight months later, his Joy-Con remains responsive with no sign of drift. “I’ve played hundreds of matches since then,” James said. “It feels better than new. I wish I’d done this properly the first time instead of wasting money on temporary fixes.”
When to Consider Potentiometer Replacement
If cleaning and cap replacement fail, the potentiometers themselves may be worn beyond recovery. In such cases, full replacement is the only permanent solution. This requires:
- Soldering iron with fine tip
- Desoldering braid or pump
- New Hall-effect joystick modules (e.g., L3R3-style replacements designed for drift resistance)
Hall-effect sticks use magnetic sensors instead of physical contact, eliminating mechanical wear entirely. They are more expensive (around $15–$20 per unit), but offer a truly permanent fix. Installation involves desoldering the old potentiometer block and attaching the new module with proper orientation. This step is not recommended for beginners due to the risk of damaging the PCB.
Frequently Asked Questions
Can I fix Joy-Con drift without opening the controller?
No reliable permanent fix exists without disassembling the unit. Methods like rapid stick rotation or compressed air may provide brief relief by shifting debris, but they don’t address the underlying contamination or wear. These are temporary at best.
Will opening my Joy-Con void the warranty?
Yes, any physical tampering voids Nintendo’s warranty. However, most Joy-Cons affected by drift are beyond the standard one-year coverage period. If your device is still under warranty, contact Nintendo Support first—though their repair program ended in 2022, exceptions may apply.
How long does a DIY fix last?
With proper cleaning and new rubber caps, most repairs last between 6 months to 2 years depending on usage. Players who play 2+ hours daily should expect to repeat the process annually. Using protective caps or skin covers can extend lifespan.
Preventive Maintenance Tips
Even after a successful repair, preventing future drift is crucial. Incorporate these habits into your routine:
- Regular cleaning schedule: Every 3–4 months, perform a quick external wipe with alcohol-dampened cloth.
- Use protective caps: Silicone stick covers reduce direct finger contact and slow degradation.
- Avoid eating while playing: Crumbs and grease accelerate internal contamination.
- Store upright or cased: Keep Joy-Cons in a dedicated holder to minimize dust exposure.
- Limit aggressive thumbstick use: Excessive force increases wear on both cap and sensor.
“The key to stopping drift isn’t just fixing it—it’s changing how you interact with the hardware.” — Lena Park, Console Hardware Analyst at GameFix Lab
Conclusion
Joy-Con drift doesn’t have to mean buying a new controller every few months. With the right tools, attention to detail, and understanding of the mechanics involved, you can perform a lasting DIY repair that restores full functionality. The process takes less than an hour and costs under $10 in supplies—far cheaper than retail replacements. By addressing the root cause—contaminated or worn rubber caps—and adopting preventive habits, you gain control over your gear’s longevity.


 浙公网安备
33010002000092号
浙公网安备
33010002000092号 浙B2-20120091-4
Comments
No comments yet. Why don't you start the discussion?