
Sticky laptop keys are a common annoyance that can disrupt typing, slow down productivity, and even lead to long-term damage if ignored. Whether caused by spilled liquids, accumulated dust, or food debris, the problem often feels like it requires professional repair or internal disassembly. The good news? In most cases, you don’t need to open up your laptop to restore smooth key function. With careful cleaning techniques and everyday household tools, you can resolve sticky keys safely and effectively—without voiding your warranty or risking further damage.
This guide walks through proven, non-invasive methods to clean and restore your keyboard’s responsiveness. From identifying the root cause to executing precise cleaning steps, these solutions prioritize safety, simplicity, and effectiveness for all laptop models—MacBooks, ThinkPads, Dell Latitudes, HP Spectres, and more.
Identify the Cause of Sticky Keys
Before attempting any fix, determine what’s causing the stickiness. Misdiagnosis can lead to ineffective or harmful interventions. Common culprits include:
- Liquid residue: Coffee, soda, or water spills leave behind sugars or minerals that gum up key mechanisms.
- Food particles: Crumbs from snacking over the keyboard settle beneath keys and interfere with movement.
- Dust and lint: Everyday buildup from pockets, bags, or dry environments accumulates over time.
- Oily residue: Skin oils transferred from fingers can attract grime and create a tacky film.
- Wear and tear: Older laptops may experience mechanical fatigue, but this usually affects multiple keys uniformly.
If only one or two adjacent keys are sticky, localized contamination is likely the issue. If many keys feel stiff or unresponsive, consider environmental factors or age-related degradation. For isolated stickiness, targeted cleaning should suffice.
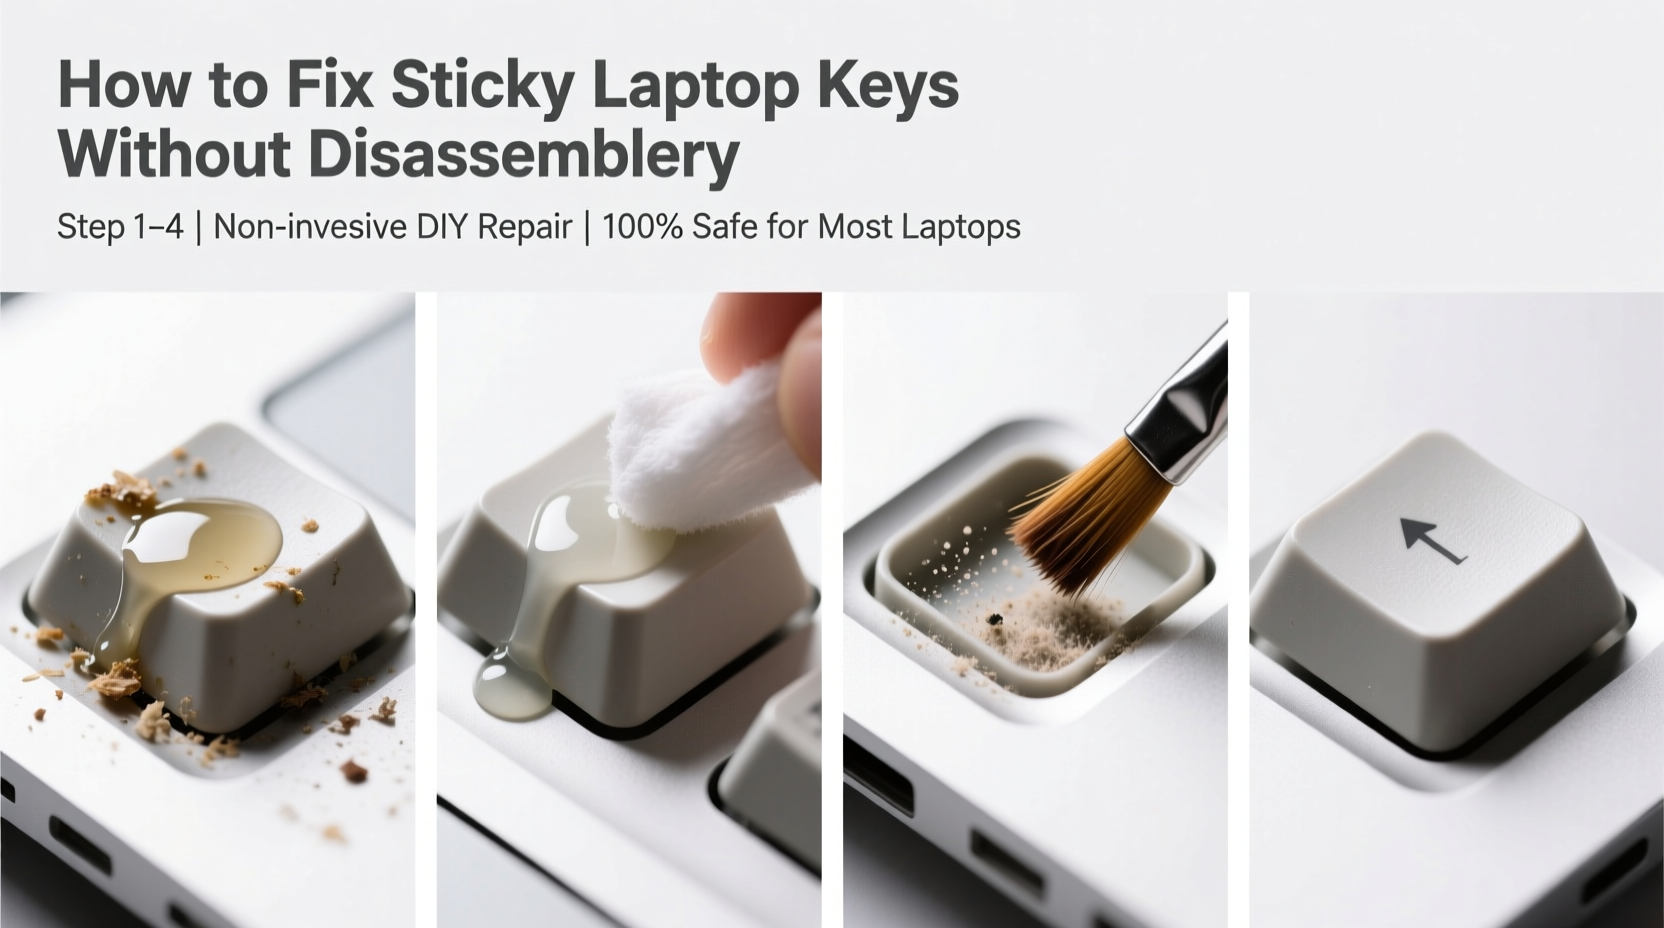
Step-by-Step Guide to Cleaning Sticky Keys Safely
Follow this systematic approach to clean sticky keys without removing them or opening your laptop. Each step minimizes risk while maximizing cleaning efficiency.
- Power down and unplug: Shut your laptop completely and disconnect the charger. This prevents electrical shorts during cleaning.
- Tilt the laptop: Hold it at a 75-degree angle, with the hinge higher than the keyboard. This helps debris fall out instead of being pushed deeper.
- Use compressed air: Spray short bursts between and under the keys. Hold the can upright and use quick pulses to avoid moisture discharge. Focus on gaps around sticky keys.
- Remove surface debris: Use a soft-bristled brush (like a clean toothbrush or makeup brush) to sweep away loose particles. Brush in one direction to avoid grinding dirt into crevices.
- Apply isopropyl alcohol solution: Dampen a cotton swab or microfiber cloth with 70% isopropyl alcohol. Wring it thoroughly—only slight dampness is needed. Gently rub around the base of the sticky key and along its travel path.
- Work the key mechanism: Press the key repeatedly while cleaning to help dislodge residue internally. Do this for 10–15 seconds per key.
- Allow drying time: Wait at least 15–30 minutes before powering on. Alcohol evaporates quickly, but residual moisture must dissipate fully.
- Test functionality: Turn on the laptop and type normally. Repeat cleaning if stickiness persists.
Avoid using water, household cleaners, or excessive liquid. These can seep into circuits and cause corrosion or short circuits. Isopropyl alcohol is preferred because it evaporates cleanly and disinfects without leaving residue.
Alternative Methods and Household Solutions
Not everyone has compressed air or isopropyl alcohol on hand. Fortunately, several alternative approaches can still yield results when used carefully.
Using Adhesive Tape for Debris Removal
Clear packing tape or duct tape (non-sticky side first) can lift surface particles. Fold a small piece sticky-side out, press it against the keyboard, and peel gently. Repeat until no more debris adheres. This works best for visible crumbs or fibers.
Blu-Tack or Poster Putty for Precision Cleaning
Mold a small piece of putty into a point and press it between keys. Lift slowly—the putty will grab fine dust and hair. Ideal for tight spaces where brushes can’t reach.
Dry Rice or Oatmeal Absorption (For Recent Liquid Spills)
If you suspect a recent spill, place uncooked rice or oatmeal in a breathable cloth bag and rest it over the affected area overnight. These grains absorb moisture passively. Note: This does not replace proper drying and should never be poured directly into the laptop.
Do’s and Don’ts: Best Practices Table
| Do’s | Don’ts |
|---|---|
| Use 70% isopropyl alcohol on a cloth or swab | Never pour liquids directly onto the keyboard |
| Clean in a well-ventilated area | Avoid ammonia-based cleaners like Windex |
| Let the laptop dry completely before use | Don’t use metal tools to pry keys |
| Store your laptop in a clean, covered space | Avoid eating over the keyboard regularly |
| Use compressed air cans upright in short bursts | Never invert the compressed air can—it sprays freezing liquid |
Mini Case Study: Resolving a Coffee Spill on a MacBook Pro
Sarah, a freelance writer, accidentally knocked over her morning latte near the left side of her MacBook Pro. After wiping the surface, she noticed the ‘A’, ‘S’, and ‘D’ keys became increasingly sticky over two days. Alarmed, she searched for solutions but feared damaging her machine.
She followed the non-invasive method outlined here: powered off the laptop, tilted it sideways, used compressed air, then cleaned around each key with an alcohol-dampened cotton swab. After letting it sit for 20 minutes, she restarted and found full key responsiveness restored. No disassembly was needed, and her warranty remained intact.
Sarah now keeps a microfiber cloth and mini alcohol wipes in her work bag as part of her routine maintenance kit.
“Most keyboard issues stem from preventable contamination. A few minutes of regular care can save hundreds in repair costs.” — Raj Mehta, Senior Technician at Urban Tech Repair
When to Consider Professional Help
While most sticky keys respond well to external cleaning, some situations require expert intervention:
- The key feels physically damaged or wobbly.
- There’s visible discoloration or corrosion under the keycap.
- You’ve had a major liquid spill involving sugary drinks or alcohol.
- Cleaning attempts have failed after two thorough rounds.
In such cases, professionals can safely remove keycaps, inspect scissor mechanisms, and replace damaged parts. On most modern laptops, individual keys can be repaired without replacing the entire keyboard assembly.
Apple’s Butterfly and Magic Keyboard designs, for example, are known for sensitivity to debris. Apple Stores and authorized service providers offer specialized tools to address these models without unnecessary disassembly.
Prevention Checklist: Keep Your Keyboard Clean Long-Term
Preventing sticky keys is easier than fixing them. Incorporate these habits into your daily routine:
- ✅ Wash hands before extended typing sessions to reduce oil transfer.
- ✅ Avoid eating or drinking near the laptop.
- ✅ Clean the keyboard weekly with a dry microfiber cloth.
- ✅ Use compressed air every 2–3 weeks, especially in dusty environments.
- ✅ Cover the laptop when not in use (a silicone skin or protective case helps).
- ✅ Store in a cool, dry place away from pets and children.
For shared devices or high-use environments (offices, classrooms), schedule monthly deep cleans using alcohol swabs and air blasts.
Frequently Asked Questions
Can I use hand sanitizer to clean sticky keys?
No. While hand sanitizers contain alcohol, they also include gelling agents, fragrances, and moisturizers that leave behind sticky residues. Stick to pure isopropyl alcohol (70%) for safe cleaning.
Is it safe to remove laptop keys myself?
It depends on your model. Many ultrabooks have fragile scissor-switch mechanisms that can snap if pried incorrectly. Unless you have the right tool (a plastic spudger) and instructions for your specific laptop, it’s safer to avoid removal. External cleaning is almost always sufficient for minor stickiness.
How long should I wait after cleaning before turning the laptop back on?
Wait at least 15 minutes. If you used a slightly damp cloth or live in a humid environment, extend to 30 minutes. Ensure no moisture remains by checking the keyboard surface and gaps between keys.
Final Thoughts: Act Early, Save Time and Money
Sticky keys are rarely a sign of terminal failure. More often, they’re a simple call for maintenance—a small warning that neglect could lead to bigger problems. By addressing the issue early with smart, non-invasive techniques, you preserve both functionality and longevity.
The methods described here are trusted by technicians and users alike because they balance effectiveness with safety. You don’t need special skills or expensive tools. What matters is consistency, caution, and knowing when to stop and seek help.


 浙公网安备
33010002000092号
浙公网安备
33010002000092号 浙B2-20120091-4
Comments
No comments yet. Why don't you start the discussion?