
Green onions are a staple in kitchens around the world. They add a crisp bite to stir-fries, soups, salads, and dips. But instead of buying them fresh every week, what if you could grow your own—right on your windowsill—using nothing more than the root ends you'd normally toss? It’s not only possible, it’s remarkably simple. With just water, light, and a few days, you can regenerate full-sized green onions from kitchen scraps. This method requires no soil, no special tools, and delivers usable greens in under 10 days. Whether you're new to indoor gardening or looking for sustainable ways to reduce food waste, this guide walks you through every step to success.
The Science Behind Regrowing Green Onions
Green onions (also known as scallions) belong to the Allium family, which includes garlic, leeks, and chives. What makes them ideal for regrowth is their active meristem tissue—the growth center located at the base of the bulb. When cut properly, leaving about 1–2 inches of white root end intact, this tissue remains alive and capable of producing new shoots when given moisture and light.
Unlike many vegetables that require seeds or complex propagation, green onions regenerate via vegetative growth. This means they don’t need pollination or seed development. The plant uses stored energy in the bulb to push out new green stalks within days. While this method won’t produce mature bulbs long-term, it consistently yields fresh, edible greens with minimal effort.
“Regrowing kitchen scraps like green onions is one of the most effective ways to introduce urban dwellers to food production.” — Dr. Lena Torres, Urban Horticulturist, Brooklyn Botanic Garden
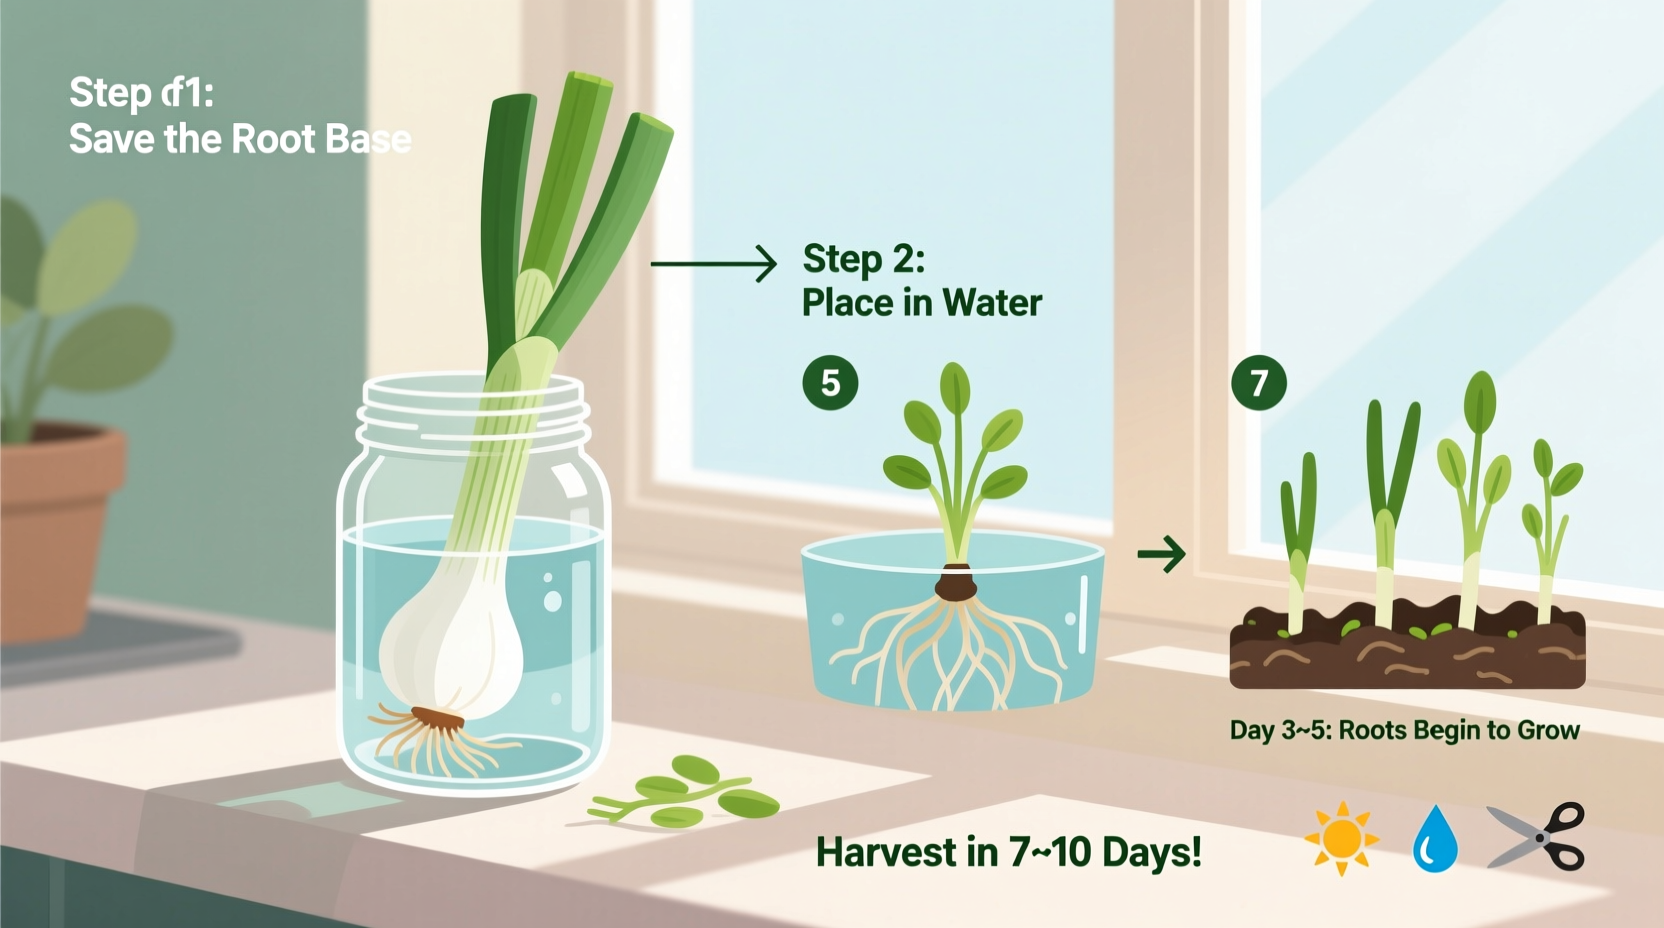
Step-by-Step Guide to Growing Green Onions in Water
This process takes less than five minutes to set up and requires only household items. Follow these steps to begin harvesting fresh green onions within a week.
- Select healthy green onion scraps: After using the green parts for cooking, save the white root ends. Ensure each piece has at least 1 inch of the white base and intact roots. Discard any mushy or discolored ends.
- Cut cleanly: Use a sharp knife to make a straight cut across the top of the white section (where the green part was removed). A clean cut minimizes rot and promotes even growth.
- Prepare a container: Use a small glass, jar, or cup. Clear containers work best so you can monitor root development and water levels.
- Add water: Pour fresh tap water into the container until it reaches just below the cut surface of the green onion. The roots should be submerged, but the top of the bulb should stay dry to prevent rot.
- Place in sunlight: Position the container on a sunny windowsill where it receives at least 4–6 hours of indirect sunlight daily. South- or east-facing windows are ideal.
- Maintain water levels: Check daily and refill as needed to maintain the same water level. Change the water completely every 2–3 days to prevent bacterial buildup.
- Harvest when ready: In 7–10 days, green shoots will reach 6–8 inches tall. Snip what you need with scissors, leaving at least 1 inch above the bulb to encourage further growth.
Maximizing Growth: Best Practices and Common Pitfalls
While regrowing green onions is straightforward, small adjustments can significantly improve results. Here’s what works—and what doesn’t.
| Do’s | Don’ts |
|---|---|
| Change water every 2–3 days to prevent algae and mold. | Let the bulb sit fully submerged—this causes rot. |
| Place near natural light; supplement with LED grow lights if needed. | Expose to direct afternoon sun, which can overheat the water and damage roots. |
| Use multiple scraps in one container for higher yield. | Crowd the stems too tightly—allow space for air circulation. |
| Snip outer stalks first to allow inner ones to continue growing. | Pull entire stems out—this damages the root system. |
| Trim brown tips promptly to keep plants healthy. | Ignore slimy or foul-smelling roots—discard immediately. |
One common mistake is impatience. Some people expect visible growth within 24 hours. While roots may appear in 1–2 days, leaf emergence typically begins on day 3–4. Consistent care over the full 7–10 day cycle ensures strong, flavorful greens.
Transitioning to Soil for Long-Term Growth
If you’d like to extend the life of your green onions beyond a few harvests, transplanting them into soil is the next step. While water regeneration produces excellent short-term results, soil provides essential nutrients for sustained growth.
To transition successfully:
- Fill a small pot (6–8 inches deep) with well-draining potting mix.
- Plant each root end about 1 inch deep, spacing them 2 inches apart.
- Water thoroughly after planting and keep the soil consistently moist (not soggy).
- Continue placing in bright, indirect light.
Within 5–7 days of transplanting, new growth resumes. You can harvest the same way—cutting the green tops while preserving the base. In soil, green onions can last for months and even flower if left unharvested.
Real-Life Example: Maria’s Kitchen Scrap Garden
Maria, a teacher living in a Chicago apartment with no outdoor space, started regrowing green onions after seeing a social media post. Skeptical but curious, she placed four root ends in a recycled jelly jar on her kitchen windowsill.
By day three, tiny roots began to lengthen. By day six, pale green shoots emerged. On day eight, she harvested enough for her omelet. Encouraged, she added leeks and celery scraps to the same setup. Within two weeks, her small container garden produced more fresh herbs than her previous grocery runs.
“It felt like magic,” she said. “I’m saving money, reducing waste, and my kids love watching the changes every morning.” Today, Maria maintains two rotating jars—one always growing, one ready to harvest—ensuring a constant supply.
How Often Can You Harvest?
You can harvest green onions grown in water every 7–10 days, depending on light and temperature. Each root end typically produces 2–3 viable harvests before energy reserves deplete. Signs it’s time to replace include:
- Slowed or stunted growth
- Browning or softening of the bulb
- Foul odor or cloudy water that persists after changing
For continuous supply, maintain a rotation: start new scraps every 3–4 days. This staggered approach ensures you always have mature greens ready while others are still growing.
Benefits Beyond Convenience
Regrowing green onions isn’t just practical—it supports broader lifestyle goals:
- Reduces food waste: An estimated 30% of household vegetable waste comes from edible trimmings. Using root ends turns scraps into resources.
- Lowers grocery costs: Frequent users can save $100+ annually by eliminating weekly green onion purchases.
- Improves indoor air quality: Like all plants, green onions absorb carbon dioxide and release oxygen.
- Encourages mindfulness: Tending to growing plants fosters presence and reduces stress.
- Educational value: Kids learn biology, sustainability, and responsibility through hands-on observation.
“Every time we reuse a scrap, we reconnect with the cycle of growth. It’s small-scale resilience.” — Ben Carter, Sustainable Living Advocate
FAQ: Your Questions Answered
Can I regrow store-bought organic vs. non-organic green onions?
Yes, both can be regrown. However, organic onions may perform slightly better due to fewer chemical treatments that could affect cell regeneration. Regardless, most supermarket green onions respond well to water propagation.
Why are my green onions turning yellow?
Yellowing usually indicates insufficient light or poor water quality. Move the container to a brighter location and change the water. If the base is soft or smells bad, the bulb may be rotting—replace it immediately.
Can I eat the roots?
No, the thin white roots are not palatable and are best left intact to support growth. Only the green and white shafts above the root ball are meant for consumption.
Essential Checklist for Success
Follow this quick-reference checklist to ensure your green onion project thrives:
- ☑ Save root ends with at least 1 inch of white base and roots attached
- ☑ Cut tops cleanly with a sharp knife
- ☑ Use a clear container with fresh water (roots submerged, bulb dry)
- ☑ Place in bright, indirect sunlight (4–6 hours daily)
- ☑ Change water every 2–3 days
- ☑ Harvest after 7–10 days by snipping green tops
- ☑ Start new batches every few days for continuous supply
- ☑ Consider transplanting to soil after 2–3 harvests
Conclusion: Start Small, Grow Confident
Growing green onions indoors from kitchen scraps is one of the simplest, most rewarding acts of everyday sustainability. It proves that self-sufficiency doesn’t require acres of land or expensive equipment—just attention, consistency, and a willingness to see waste as potential. In under 10 days, you can transform what would’ve been compost into vibrant, flavorful food. And once you master green onions, the same principles apply to leeks, fennel, bok choy, and celery. The journey to a zero-waste kitchen begins with a single scrap. Pick up those root ends tonight. Fill a glass. Watch life emerge. Your future meals—and the planet—will thank you.


 浙公网安备
33010002000092号
浙公网安备
33010002000092号 浙B2-20120091-4
Comments
No comments yet. Why don't you start the discussion?