
Growing your own food doesn’t require a backyard, farming knowledge, or expensive equipment. Microgreens—tiny, nutrient-dense versions of leafy greens and herbs—can be cultivated on a windowsill, in an apartment kitchen, or even in a closet with just a few basic supplies. They take up less space than a houseplant, mature in 7–14 days, and deliver intense flavor and nutrition. Best of all, you don’t need prior gardening experience. This guide walks you through everything from seed selection to harvest, using accessible materials and simple techniques that anyone can follow.
Why Microgreens Are Perfect for Small Spaces
Microgreens are harvested at the first true leaf stage, typically 1–3 inches tall, making them ideal for compact environments. Unlike full-grown vegetables, they don’t need deep soil, large containers, or direct sunlight. A sunny windowsill or a $10 LED desk lamp is enough. Because they grow quickly and vertically in shallow trays, you can stack multiple layers in a small footprint—think under-cabinet storage, bookshelves, or unused countertop corners.
They’re also exceptionally efficient. One square foot of tray space can yield over 10 harvests per year, providing fresh greens year-round without trips to the grocery store. Nutritionally, studies show that microgreens often contain up to 40 times more vitamins and antioxidants than their mature counterparts. Broccoli microgreens, for example, are packed with sulforaphane, a compound linked to reduced inflammation and improved cellular health.
Essential Supplies You Already Own (Or Can Get Cheaply)
You don’t need specialized gear. Most of what you’ll use can be found at home or purchased for under $20. The key components are light, water, air, and a growing medium. Here’s what works best for beginners:
- Containers: Shallow trays 2–3 inches deep. Reuse plastic food containers, baking pans, or seed starter trays.
- Soil: Seed-starting mix (light and sterile). Avoid garden soil—it’s too dense and may carry pathogens.
- Seeds: Choose fast-sprouting varieties like radish, arugula, broccoli, or sunflower.
- Light source: A south-facing window or an affordable LED grow light (5000K color temperature).
- Spray bottle: For gentle watering without disturbing seeds.
- Plastic wrap or humidity dome: Helps retain moisture during germination.
Air circulation matters. Stagnant air encourages mold, so avoid cramming trays into dark cabinets. A small fan set on low, running for an hour daily, improves airflow and strengthens stems.
“Microgreens are one of the most accessible entry points into urban agriculture. With just a tray and a window, you’re participating in real food production.” — Dr. Linda Chalker-Scott, Urban Horticulture Specialist, Washington State University Extension
Step-by-Step Guide to Your First Microgreen Harvest
Follow this timeline to go from seed to salad in under two weeks. This method assumes no prior experience and uses only beginner-friendly practices.
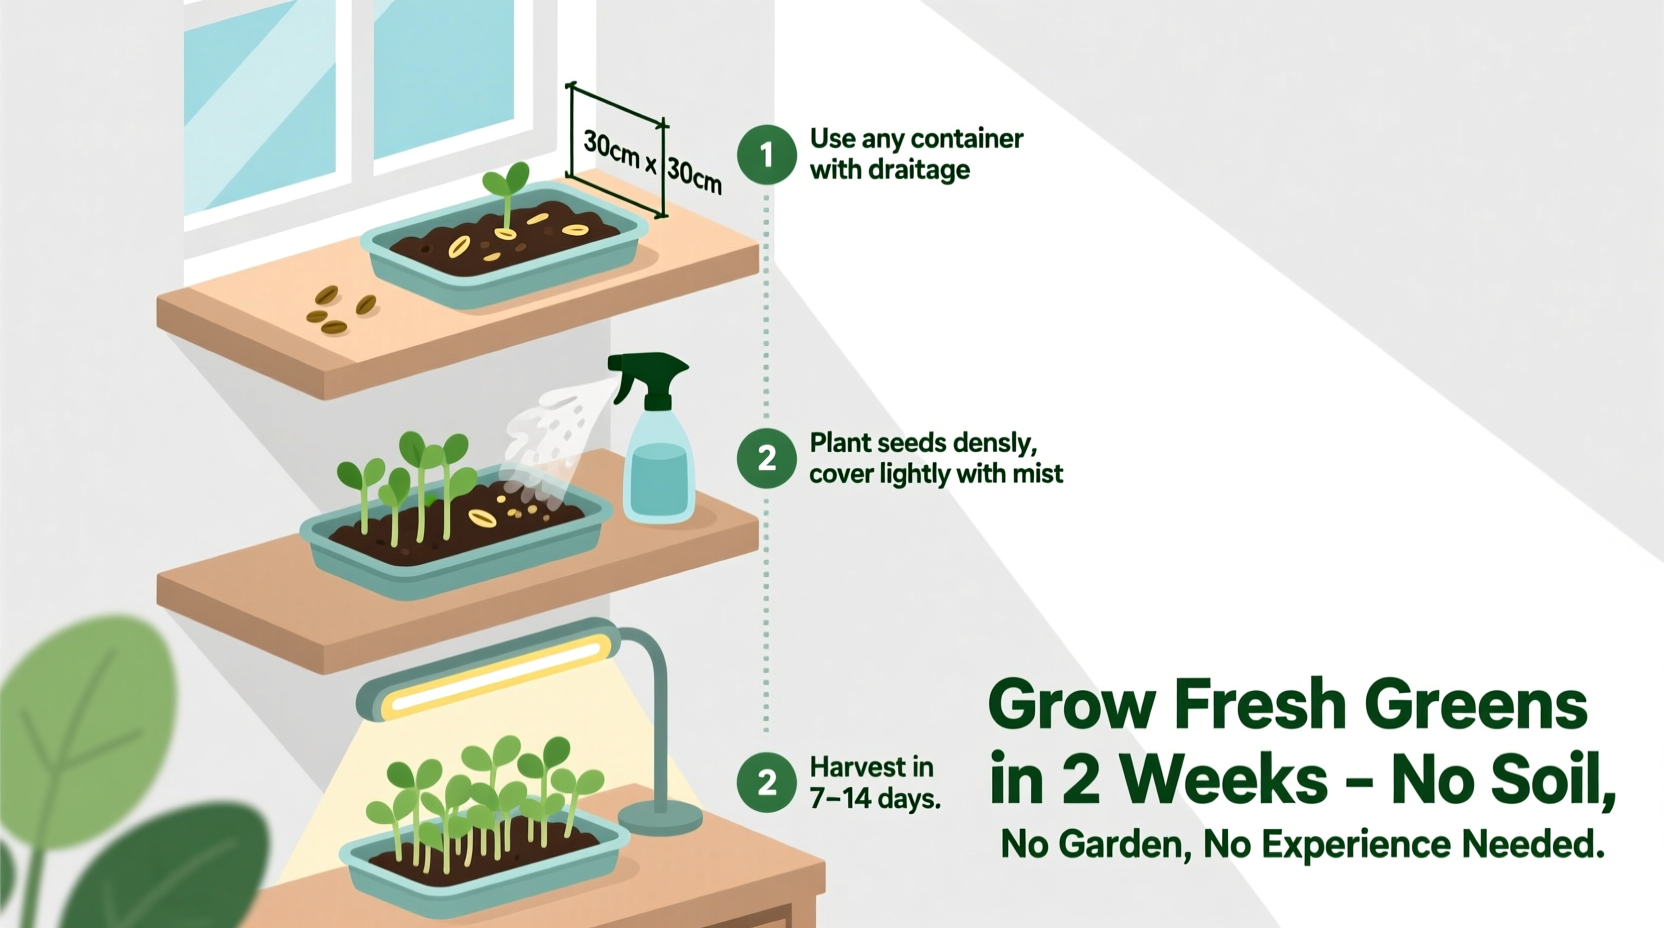
- Day 1: Prepare Your Tray
Select a container with drainage holes or add them using a knife or drill. Fill it with 1–1.5 inches of moistened seed-starting mix. Level the surface but don’t pack it down. - Day 1: Sow Seeds Thickly
Scatter seeds evenly across the soil. For small seeds (like broccoli or kale), aim for coverage similar to a light snowfall. For larger seeds (sunflower, pea), place them about ¼ inch apart. Gently press them into the soil with the back of a spoon—no need to bury deeply. - Day 1: Water and Cover
Mist the surface until damp but not soggy. Cover the tray with plastic wrap or an inverted lid to create a mini greenhouse. This retains humidity and speeds germination. - Days 2–4: Monitor and Ventilate
Check daily. If condensation forms inside the cover, lift it briefly to allow airflow. Mist lightly if the soil feels dry. Most seeds will begin sprouting by day 3. - Day 4–5: Remove Cover and Add Light
Once green shoots emerge, remove the cover immediately. Place the tray under natural light or a grow light positioned 6–12 inches above. Provide 12–16 hours of light daily. - Days 5–10: Maintain Moisture
Water from below by placing the tray in a shallow dish of water for 10–15 minutes. This prevents disturbing delicate stems. Let excess drain before returning to light. - Days 7–14: Watch for True Leaves
Harvest when the first set of true leaves appear—these are the second pair of leaves after the initial seedling leaves (cotyledons). Timing varies: radish greens take 7 days; sunflower shoots may take 12. - Harvest Day: Cut and Enjoy
Use clean scissors to snip stems just above the soil line. Rinse gently and pat dry. Eat immediately for peak flavor and nutrition.
Common Challenges and How to Solve Them
Even with minimal experience, problems can arise. The good news is most issues are preventable or fixable with small adjustments.
| Issue | Likely Cause | Solution |
|---|---|---|
| Seeds didn’t sprout | Old seeds, overly wet soil, or insufficient warmth | Use fresh seeds, keep soil moist but not soaked, and maintain room temperature (65–75°F) |
| White fuzzy growth on soil | Harmless saprophytic mold due to high humidity | Ventilate more, reduce cover time, and water from below |
| Leggy, weak stems | Insufficient light | Move closer to window or use a grow light for longer periods |
| Wilting or yellowing leaves | Overwatering or poor drainage | Ensure drainage holes exist; let soil surface dry slightly between waterings |
Don’t panic if your first batch isn’t perfect. Even uneven growth or minor discoloration doesn’t mean failure. Most microgreens are resilient, and each round teaches you more about your environment’s unique conditions.
Recommended Beginner-Friendly Varieties
Not all seeds perform equally well indoors. Some sprout faster, tolerate lower light, and resist mold better—ideal traits for new growers. Start with these reliable options:
- Radish: Spicy, fast-growing (harvest in 7 days), highly germinative.
- Arugula: Peppery flavor, consistent performance, popular in salads.
- Buckwheat: Crisp texture, grows well in lower light, excellent for smoothies.
- Sunflower shoots: Nutty taste, thick stems, very visual appeal.
- Broccoli: Mild flavor, high in nutrients, easy to manage.
Buy seeds labeled for microgreen production. These are tested for high germination rates and are often pathogen-free. Avoid “treated” garden seeds, which may contain fungicides unsafe for consumption.
Mini Case Study: Maria’s Kitchen Counter Transformation
Maria, a nurse living in a studio apartment in Chicago, wanted fresh greens but had no balcony and little free time. She started with a reused salad container, potting mix from a dollar store, and a $12 LED clip lamp. She planted a mix of radish and broccoli seeds on a Saturday morning. By Wednesday, she saw sprouts. On day 7, she harvested her first crop and added it to scrambled eggs. “It tasted way better than store-bought,” she said. “And knowing I grew it in my kitchen made it special.” Within a month, she was rotating three trays weekly, supplying all her salad needs. Her only investment: $25 total.
Your Starter Checklist for Success
Before beginning, gather these items and complete the following actions:
- ☐ Select a shallow container with drainage (or modify one)
- ☐ Purchase organic seed-starting mix (1 bag lasts multiple batches)
- ☐ Buy certified microgreen seeds (start with 2–3 types)
- ☐ Set up a light source (window or LED)
- ☐ Label your tray with seed type and date planted
- ☐ Water from below once daily after germination
- ☐ Harvest at first true leaves using clean scissors
- ☐ Clean tray thoroughly before reusing (use mild soap and water)
Frequently Asked Questions
Can I grow microgreens without a grow light?
Yes, if you have a bright south-facing window that receives 4–6 hours of direct sunlight daily. East or west windows may work for slower-growing varieties. Rotate the tray regularly to prevent leaning. In low-light conditions, growth will be slower and stems may become leggy.
Are microgreens safe to eat raw?
Yes, microgreens are commonly eaten raw in salads, sandwiches, and garnishes. To minimize risk of contamination, use clean containers, uncontaminated soil, and wash hands before handling. Rinse harvested greens gently under cool water and dry before eating.
Can I reuse soil after harvesting?
It’s not recommended. Used soil may harbor pathogens or depleted nutrients. Compost it instead and start fresh with each batch. Sterilizing used soil is possible but impractical for most home growers.
Grow More Than Greens—Grow Confidence
Starting with microgreens is more than a gardening experiment—it’s a shift toward self-reliance, better nutrition, and mindful living. You don’t need expertise, space, or perfection. All you need is a willingness to try. Each tray teaches you something new: how light affects growth, how moisture influences texture, how timing impacts flavor. And when you snip your first harvest and taste the crisp, vibrant result, you’ll realize something powerful—you can grow real food, right where you are.
Begin today with one tray. Use what you have. Learn as you go. Share your results with a friend. Before long, you won’t just be growing microgreens—you’ll be growing confidence, one tiny green at a time.


 浙公网安备
33010002000092号
浙公网安备
33010002000092号 浙B2-20120091-4
Comments
No comments yet. Why don't you start the discussion?