
Microgreens are young vegetable greens harvested just after the first true leaves develop, typically within 7 to 21 days of germination. Packed with nutrients—sometimes up to 40 times more than their mature counterparts—they’re a powerhouse addition to salads, sandwiches, smoothies, and garnishes. The best part? You don’t need a backyard or greenhouse. With just a sunny windowsill, a few basic supplies, and consistent care, you can grow fresh microgreens in your kitchen all year long.
Unlike traditional gardening, growing microgreens indoors is low-maintenance, fast, and highly rewarding. Whether you live in an apartment, have limited outdoor space, or simply want a continuous supply of fresh greens regardless of season, this method offers a practical solution. More than just convenient, it’s also sustainable—reducing food miles, plastic packaging, and grocery trips.
Why Grow Microgreens Indoors?
Microgreens thrive in controlled indoor environments. They require minimal space, grow quickly, and respond well to natural light from a window. Unlike full-grown vegetables, they don’t need deep soil or extensive root systems. Their shallow root structure makes them ideal for tray cultivation on countertops, shelves, or even in small urban kitchens.
Indoor growing also protects them from pests, unpredictable weather, and temperature extremes. This means you can produce crisp, flavorful greens in winter snowstorms or summer heatwaves alike. Plus, harvesting your own microgreens ensures peak freshness—the flavor and nutrient levels are highest right after cutting.
“Growing microgreens indoors is one of the most efficient ways to bring high-density nutrition into a small living space.” — Dr. Lena Torres, Urban Agriculture Researcher, Cornell University
Essential Supplies and Setup
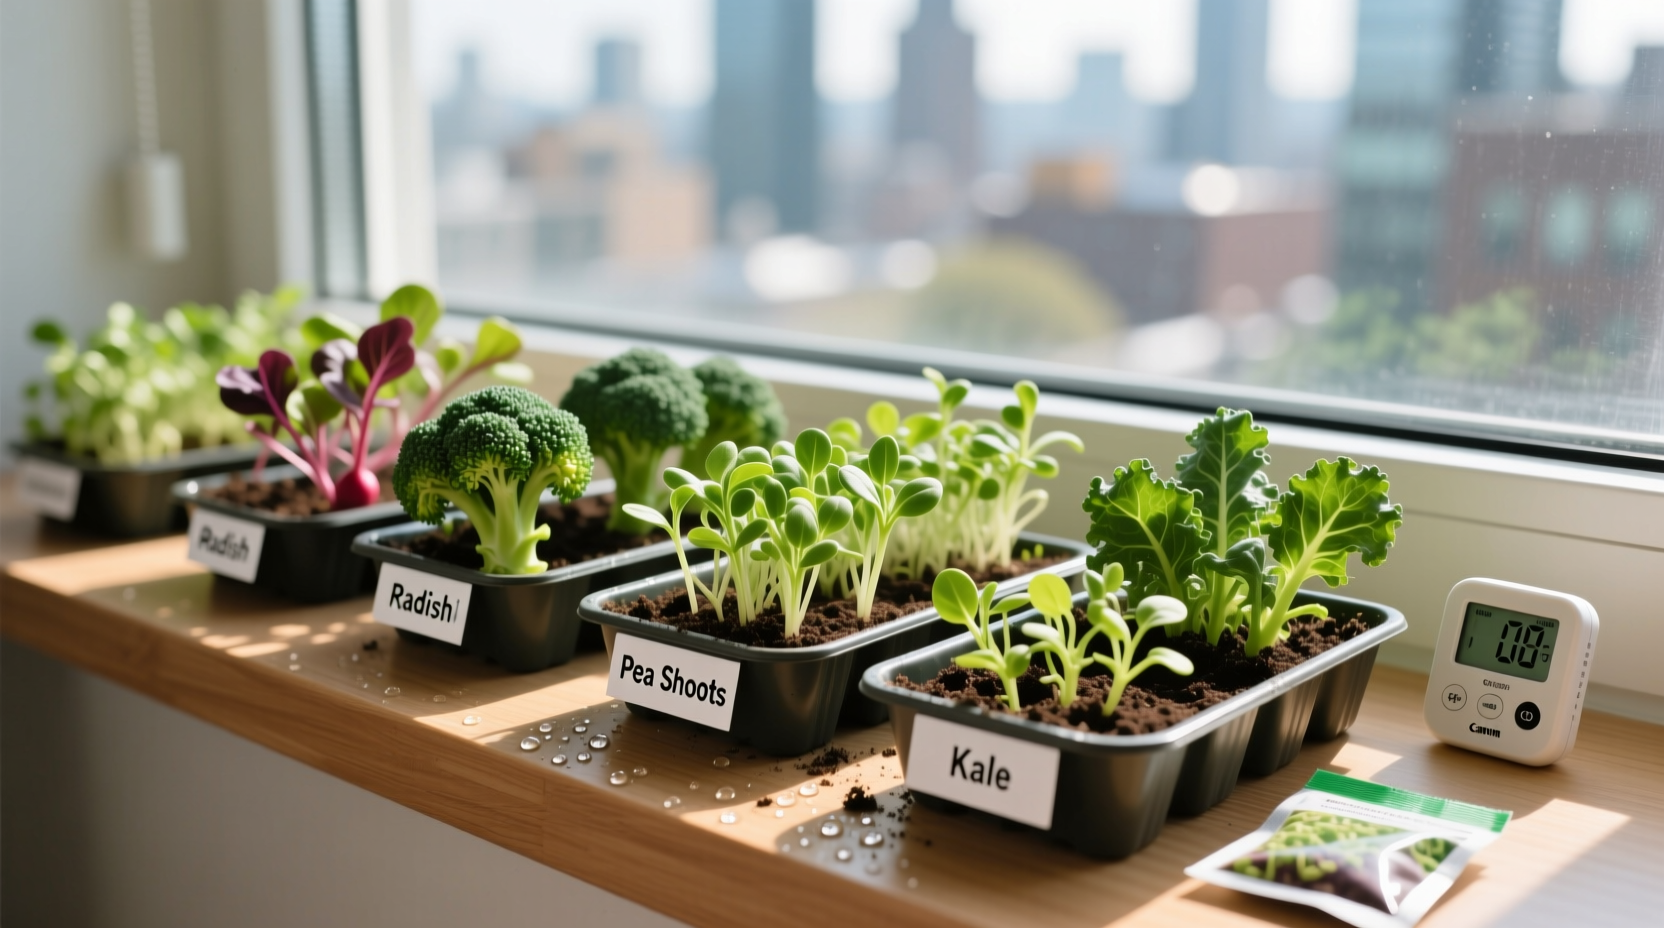
Starting your windowsill microgreen garden doesn’t require expensive equipment. Most materials are affordable, reusable, or repurposable from household items.
- Shallow trays: Use seedling trays, recycled food containers (like clamshell salad boxes), or specialized microgreen trays. Depth should be 1–2 inches.
- Growing medium: Organic potting mix or coconut coir works best. Avoid garden soil, which may contain pathogens or be too dense.
- Seeds: Choose varieties labeled for microgreen production. Common options include broccoli, radish, kale, arugula, sunflower, pea shoots, and basil.
- Spray bottle: For gentle watering without disturbing seeds.
- Lid or humidity dome: A clear plastic cover helps retain moisture during germination. Reuse deli container lids or purchase reusable domes.
- Scissors: Sharp, clean scissors for harvesting.
Choosing the Right Window
Light is the most critical factor. South-facing windows provide the most consistent sunlight in the Northern Hemisphere, offering 6–8 hours of direct light daily. East- or west-facing windows work well too, especially if supplemented with a few hours of indirect light. North-facing windows usually lack sufficient brightness unless paired with artificial lighting.
If your window receives less than 4 hours of direct sunlight, consider adding a small LED grow light. These can be clipped above the tray and used for 12–16 hours per day to ensure strong, even growth.
Step-by-Step Growing Process
- Prepare the tray: Fill a shallow tray with 1–1.5 inches of moistened growing medium. Lightly press down to create a flat surface—no need to pack tightly.
- Sow the seeds: Scatter seeds densely but evenly across the surface. For small seeds (like broccoli or kale), aim for a single layer. For larger seeds (like peas or sunflowers), space slightly apart to avoid overcrowding.
- Water gently: Using a spray bottle, mist the surface until damp. Cover the tray with a humidity dome or inverted tray to retain moisture.
- Place in darkness for germination: Keep the covered tray in a dark, warm spot (65–75°F) for 2–4 days. Check daily for signs of sprouting.
- Introduce light: Once seeds sprout, move the tray to your windowsill. Remove the lid and expose to natural light. Rotate the tray daily for even growth.
- Water consistently: Mist or bottom-water every 1–2 days, keeping the medium moist but not soggy. Overwatering leads to mold; underwatering stunts growth.
- Harvest: When the first true leaves appear (usually 7–14 days), use sharp scissors to cut just above the soil line. Harvest in the morning for peak crispness.
Best Microgreen Varieties for Windowsill Growing
Not all seeds perform equally well in low-light, indoor conditions. Some grow faster, resist mold better, and adapt more easily to confined spaces.
| Variety | Days to Harvest | Light Needs | Flavor Profile | Notes |
|---|---|---|---|---|
| Radish | 7–10 | Medium | Peppery, bold | Fast-growing, resilient, excellent for beginners |
| Broccoli | 10–14 | Medium | Mild, nutty | High in sulforaphane, linked to health benefits |
| Kale | 10–14 | High | Earthy, slightly bitter | Requires good light; prone to legginess in shade |
| Arugula | 7–10 | Medium | Spicy, tangy | Consistently productive; great for salads |
| Pea Shoots | 12–18 | High | Sweet, grassy | Larger seeds; needs deeper planting and support |
| Sunflower | 10–14 | High | Nutty, crunchy | Requires soaking before planting; sturdy stems |
Avoiding Common Problems
Even simple systems can encounter issues. Being proactive prevents setbacks and ensures consistent harvests.
- Mold or mildew: Caused by excess moisture and poor airflow. Prevent by avoiding overwatering, using a fan for air circulation, and removing humidity domes once sprouted.
- Leggy or stretched growth: Indicates insufficient light. Move to a brighter window or add supplemental lighting.
- Seeds not germinating: Could be due to old seeds, overly wet medium, or incorrect temperature. Test seed viability by placing a few on a damp paper towel in a warm place.
- Bitter taste: Often results from over-maturity or stress (e.g., under-watering). Harvest on time and maintain consistent moisture.
Real Example: A Winter Harvest in a Brooklyn Apartment
Jamie, a software developer in Brooklyn, started growing microgreens on her east-facing kitchen windowsill during a harsh winter when fresh produce felt scarce. She began with a recycled takeout container, organic potting mix, and a packet of radish seeds. After following a simple routine—sowing every 7–10 days, rotating trays, and harvesting weekly—she established a steady cycle.
Within three weeks, she was adding spicy radish microgreens to scrambled eggs, grain bowls, and avocado toast. “It feels like cheating,” she said. “I get restaurant-quality greens without leaving my apartment. And I’ve cut back on packaged salad kits by half.” By staggering plantings, she now enjoys a continuous harvest through snowstorms and power outages alike.
Seasonal Adjustments for Year-Round Success
While microgreens can grow year-round, seasonal changes affect light intensity, temperature, and humidity. Adapting your approach ensures consistent results.
- Winter: Days are shorter and sunlight weaker. Maximize exposure by cleaning windows regularly and using reflective surfaces (like aluminum foil) behind trays. Consider a $20 clip-on LED grow light to extend daylight hours.
- Summer: Direct sun can overheat trays. Use sheer curtains to diffuse intense midday light. Water more frequently, but avoid wetting foliage to reduce fungal risk.
- Spring/Fall: Ideal conditions. Natural light is balanced, and temperatures are moderate. Focus on consistency—rotate crops and maintain hygiene between batches.
“Success with microgreens isn’t about perfection—it’s about rhythm. Plant, harvest, clean, repeat.” — Marcus Reed, Urban Microfarm Educator
Checklist: Your First Microgreen Cycle
- Select a bright windowsill (south, east, or west-facing)
- Gather two trays (one for growing, one as a water reservoir)
- Choose fast-growing seeds (radish, broccoli, or arugula)
- Fill tray with 1–1.5 inches of moist growing medium
- Sow seeds densely and evenly
- Cover and place in a warm, dark spot for 2–4 days
- Uncover and place in light once sprouts emerge
- Water lightly every 1–2 days (mist or bottom-water)
- Harvest in 7–14 days when first true leaves appear
- Clean and sterilize trays before next batch
Frequently Asked Questions
Can I reuse the soil after harvesting?
No. The spent medium loses structure, nutrients, and may harbor pathogens. Compost it instead and start fresh with each batch. Soilless mediums like coconut coir can sometimes be reused if thoroughly sanitized, but it’s generally safer and more effective to replace it.
How often should I plant new trays?
To maintain a continuous harvest, sow a new tray every 7–10 days. This staggered approach ensures you always have a crop nearing maturity while others are just starting. Three trays in rotation (germinating, growing, harvesting) create a seamless supply.
Are microgreens safe to eat raw?
Yes, microgreens are commonly eaten raw and are safe when grown hygienically. Always wash hands before handling, use clean tools, and rinse harvested greens under cool water before eating. Avoid consuming any batch showing mold or off-smells.
Final Thoughts and Next Steps
Growing microgreens on your windowsill is more than a gardening trend—it’s a practical shift toward self-reliance, better nutrition, and mindful consumption. You don’t need expertise, acres of land, or perfect conditions. Just a few square inches of sunlight, a bit of attention, and the willingness to try.
The real reward isn’t just the harvest. It’s watching life emerge from tiny seeds, knowing exactly where your food comes from, and enjoying flavors that supermarket greens can’t match. Each batch teaches you something new—about timing, light, moisture, and patience.


 浙公网安备
33010002000092号
浙公网安备
33010002000092号 浙B2-20120091-4
Comments
No comments yet. Why don't you start the discussion?