
Hanging heavy artwork on drywall presents a unique challenge: you want the piece securely mounted, but you also want to avoid drilling holes or causing cracks that devalue your walls. This is especially true in rental units, historic homes, or freshly painted rooms where even a single nail hole can be problematic. Fortunately, modern adhesive and mechanical solutions make it possible to support substantial weight without traditional fasteners. Whether you're displaying a large canvas, a mirror, or a sculptural piece, there are reliable, non-invasive methods that combine strength with discretion.
The key lies in understanding wall dynamics, load distribution, and the right tools for the job. Drywall is not designed to bear concentrated loads, which is why standard picture hooks often fail under heavier pieces. But by spreading force across a broader surface area and using materials engineered for high adhesion, you can achieve secure mounting—without a single nail.
Understanding Drywall Limitations and Weight Distribution
Drywall, typically made from gypsum sandwiched between paper layers, is structurally weak when subjected to point loads. A standard ½-inch drywall panel can support around 40 pounds when anchored properly into a stud, but only about 5–10 pounds when relying solely on the drywall itself. The danger with hanging heavy artwork directly into drywall without proper support is that the material can crack, crumble, or pull away from the framing.
This is where alternative hanging systems shine. Instead of concentrating weight on a small hook or nail, these methods distribute pressure over a wider area. For example, adhesive strips bond to both the wall and the frame, allowing the entire contact zone to share the load. Similarly, tension-based systems use opposing forces to create stability without penetration.
Before selecting a method, determine the exact weight of your artwork. Use a digital scale if possible. Then assess the back of the frame—does it have a wire? D-rings? Keyhole hangers? The mounting hardware on the artwork will influence which no-nail solution works best.
Top No-Nail Solutions for Heavy Artwork
Not all adhesive products are created equal. When dealing with artwork over 10 pounds, generic tape or basic command strips won’t suffice. You need industrial-grade adhesives or mechanical systems designed for long-term load-bearing. Below are the most effective options currently available.
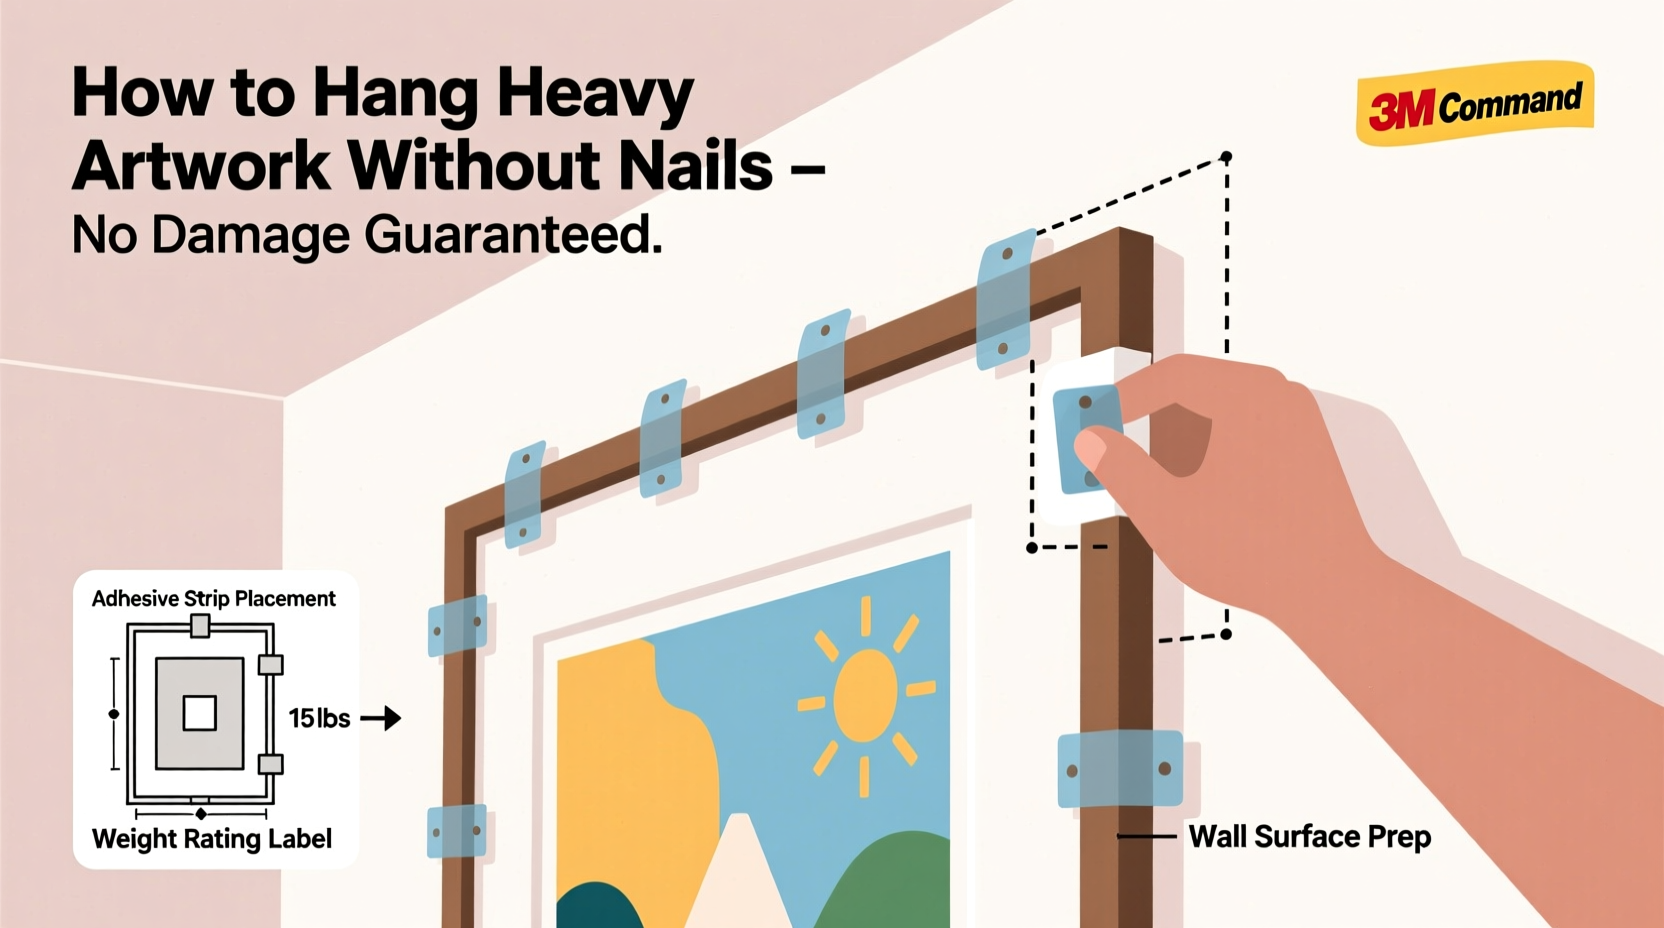
1. High-Strength Adhesive Strips (Weight-Rated)
Brands like 3M Command offer \"heavy-duty\" strips rated up to 16 pounds per pair. These consist of a foam adhesive pad bonded to both the wall and the mounting bracket. They work best when applied to clean, smooth surfaces and given 24 hours to cure before loading.
For heavier pieces, multiple strip pairs can be used in tandem. However, spacing matters—distribute them evenly along the top edge of the frame to prevent tilting or shear stress.
2. Double-Sided Mounting Tape (VHB Grade)
Very High Bond (VHB) tapes, such as those from 3M’s VHB line, are used in construction and automotive industries. They form a permanent-like bond and can support over 20 pounds per square inch. While not removable without some surface impact, they leave no holes and minimal residue when removed carefully with heat.
VHB tape is ideal for metal-backed frames or rigid panels. It requires meticulous surface preparation: clean with isopropyl alcohol, let dry, then press firmly for at least 30 seconds.
3. Tension Rods with Non-Marring Pads
In spaces where walls face each other—such as in a hallway or between two bookshelves—a spring-loaded tension rod can support horizontal rails or wires from which artwork is hung. These rods exert outward pressure against the walls, creating friction-based stability.
Choose models with wide rubber or silicone end caps to prevent scuffing. Load capacity varies, but some adjustable rods support up to 30 pounds. This method is excellent for rotating displays or temporary installations.
4. Ceiling-to-Floor Support Poles
Freestanding poles that extend vertically from floor to ceiling use compression to remain upright. Attach a horizontal arm or wire to the pole, then hang your artwork from it. These require no wall attachment whatsoever and can support significant weight depending on build quality.
Ideal for galleries, entryways, or open-plan living areas, these poles are often used in retail displays and can be painted to blend into the décor.
5. Magnetic Systems (For Metal Surfaces)
If your wall has a metal backing—such as a steel stud or a hidden sheet of metal—you can use rare-earth magnets to suspend artwork. Neodymium magnets can hold up to 15 pounds each and are nearly invisible when paired with thin frames.
Note: This only works if the wall contains ferrous material. Standard drywall without metal reinforcement won’t support magnetic hanging.
“With the right adhesive technology, you can safely mount up to 20-pound artworks on drywall without anchors or nails—provided the installation follows manufacturer guidelines.” — Daniel Ruiz, Building Materials Engineer
Step-by-Step Guide: Hanging a 15-Pound Canvas Without Nails
Let’s walk through a real-world application using heavy-duty adhesive strips. This process ensures maximum bond strength and alignment precision.
- Prepare the Wall and Frame: Clean the wall area with rubbing alcohol and a lint-free cloth. Let dry completely. Wipe the back of the frame where the strips will attach.
- Select the Right Strips: Use a pair rated for at least 16 pounds. If the total weight is 15 pounds, one pair may suffice—but for safety, use two pairs spaced evenly.
- Attach the Strips: Press the adhesive side firmly onto the frame for 30 seconds. Remove the liner to expose the wall-side adhesive.
- Position the Artwork: Hold the piece against the wall at the desired height. Use a level to ensure it’s straight. Lightly mark the spot with a pencil if needed.
- Apply Pressure: Press the strips firmly against the wall for 30 seconds, applying even pressure across the entire contact area.
- Wait Before Loading: Allow 24 hours for the adhesive to reach full strength before removing any temporary supports.
- Final Check: Gently tug downward to test adhesion. If there’s no movement, the installation is secure.
Do’s and Don’ts: Best Practices Table
| Do’s | Don’ts |
|---|---|
| Use weight-rated adhesive products specifically designed for heavy objects | Assume all “heavy-duty” tapes are equal—check manufacturer specs |
| Clean and dry surfaces thoroughly before applying adhesives | Install in humid or dusty environments without proper prep |
| Distribute weight across multiple mounting points | Hang off edges or corners of frames where stress concentrates |
| Allow 24-hour curing time before finalizing the installation | Rush the process—adhesives need time to bond |
| Inspect regularly for signs of slippage or wall separation | Forget seasonal changes—humidity and temperature affect adhesion |
Mini Case Study: Gallery Wall in a Rental Apartment
Sophie, a graphic designer renting a downtown loft, wanted to create a gallery wall in her living room. The space featured pristine white drywall, and her lease prohibited any permanent alterations. She had seven pieces ranging from 8 to 18 pounds, including framed photographs and a large abstract canvas.
Instead of nails, she opted for a combination of 3M Command Large Picture Hanging Strips and a ceiling-to-floor display pole for the heaviest piece (18 lbs). She cleaned each wall section with alcohol, applied double strip pairs for pieces over 12 pounds, and waited 24 hours before final placement.
After six months, all artwork remained securely mounted. During move-out, she followed the removal instructions—slowly stretching the tab downward—and the walls showed no damage. Her landlord approved the security deposit return without issue.
Sophie’s success came from careful planning, using the right products, and respecting the curing time. Her experience demonstrates that no-nail hanging isn’t just for lightweight decor—it’s viable for serious art displays.
Checklist: How to Hang Heavy Artwork Without Nails
- ✅ Weigh your artwork accurately
- ✅ Inspect the frame’s back for suitable attachment points
- ✅ Choose a no-nail method based on weight and wall type
- ✅ Clean the wall and frame surface with isopropyl alcohol
- ✅ Apply adhesive products according to manufacturer instructions
- ✅ Allow 24 hours for full adhesion before finalizing
- ✅ Use a level to ensure straight alignment
- ✅ Test gently after curing to confirm stability
- ✅ Schedule periodic checks every few months
- ✅ Keep removal instructions handy for future moves
Frequently Asked Questions
Can adhesive strips really hold heavy mirrors or televisions?
While some industrial tapes can support flat-panel TVs or small mirrors, we don’t recommend adhesive-only solutions for televisions due to safety risks. Mirrors under 20 pounds can be mounted with proper VHB tape or heavy-duty strips, but always ensure the mirror has a stable backing and is not subject to vibration or impact.
Will these methods damage painted walls when removed?
High-quality removable adhesives, like those in the Command line, are designed to come off cleanly when removed correctly—by pulling the release tab slowly downward. However, older paint, textured walls, or improper removal can lead to peeling. Always follow the manufacturer’s removal guide.
What if my artwork is too heavy for any no-nail solution?
If your piece exceeds 25–30 pounds, consider alternative display methods such as easels, display stands, or freestanding shelves. If wall mounting is essential, consult a professional about using toggle bolts or locating studs—even in rentals, minor repairs are often allowed for structural necessity.
Conclusion: Secure, Smart, and Wall-Safe Art Display
Hanging heavy artwork without nails is not only possible—it’s practical, elegant, and increasingly accessible thanks to advances in adhesive engineering and smart design. By choosing the right method, preparing surfaces properly, and respecting installation timelines, you can enjoy bold visual statements without compromising your walls.
Whether you’re a renter, a minimalist, or simply someone who values intact drywall, these techniques empower you to decorate freely and confidently. The next time you’re faced with a blank wall and a cherished piece of art, remember: you don’t need a drill to make a lasting impression.


 浙公网安备
33010002000092号
浙公网安备
33010002000092号 浙B2-20120091-4
Comments
No comments yet. Why don't you start the discussion?