
Brick fireplaces add timeless charm to any living space, but their rugged texture and durability often make decorating a challenge. If you love seasonal string lights or ambient fairy lights, you’ve probably hesitated before reaching for the drill—rightfully so. Drilling into brick can lead to cracks, moisture entry, or permanent marks that devalue your home’s aesthetic. Fortunately, there's a smarter way: using high-performance, removable masonry hooks designed specifically for textured, porous surfaces like brick.
These innovative adhesive solutions have evolved far beyond basic sticky hooks. Modern versions use advanced bonding polymers and micro-suction technology to grip uneven brick surfaces with surprising strength—capable of holding lightweight lighting displays securely for weeks or even months. The key lies in selecting the right product, preparing the surface correctly, and understanding load limits. This guide walks you through every step, from choosing the best hook to installing delicate light strands without compromising your fireplace’s integrity.
Why avoid drilling into brick?
While brick is strong, it’s also porous and prone to spalling—surface flaking caused by moisture expansion when temperature drops. Drilling introduces entry points for water, especially near ground level or in humid climates. Even small pilot holes can compromise mortar joints over time, leading to long-term structural issues.
Beyond preservation, many renters are contractually prohibited from altering walls. Landlords rarely approve permanent fixtures on masonry, making non-invasive decor essential. Removable masonry hooks offer a solution that satisfies both homeowners and tenants: temporary installation with zero residue or damage upon removal.
“Adhesive tech has reached a point where we can achieve secure mounting on brick without sacrificing reversibility. It’s a game-changer for seasonal decor.” — Daniel Reyes, Building Materials Engineer at EcoSurface Labs
Choosing the right removable masonry hook
Not all adhesive hooks are created equal. Standard Command™ strips fail on rough brick because they rely on flat contact. Masonry-specific hooks, however, feature deeper backing layers and flexible adhesives that conform to irregularities. Look for these characteristics:
- Weight rating: At least 2–3 pounds per hook for standard LED string lights (most weigh 0.5–1.5 lbs total).
- Surface compatibility: Explicitly labeled for brick, stone, stucco, or concrete.
- Removability: Should detach cleanly with slow, steady pulling—not snap off and leave residue.
- Weather resistance: Important if your fireplace area experiences temperature shifts or humidity.
Top-performing masonry hook types
| Hook Type | Best For | Holds Up To | Removal Notes |
|---|---|---|---|
| Heavy-Duty Brick Hooks (e.g., Gorilla No More Nails Hook) | Dense brick, outdoor-rated installations | 5 lbs | Peel slowly; may require gentle heat with hair dryer |
| Clear Silicone Suction Grips (e.g., Ekenbay Transparent Mounts) | Smoother brick faces, indoor use only | 2 lbs | Reusable; clean with alcohol after removal |
| Foam-Based Adhesive Hooks (e.g., Scotch Extreme Outdoor Hooks) | Standard indoor brick, moderate temps | 3 lbs | Stretch straight down to release; minimal residue |
| Magnetic Brick Clips (for metal-backed wires) | Temporary clips on thin gauge wire | 1 lb | No adhesive; slide off anytime |
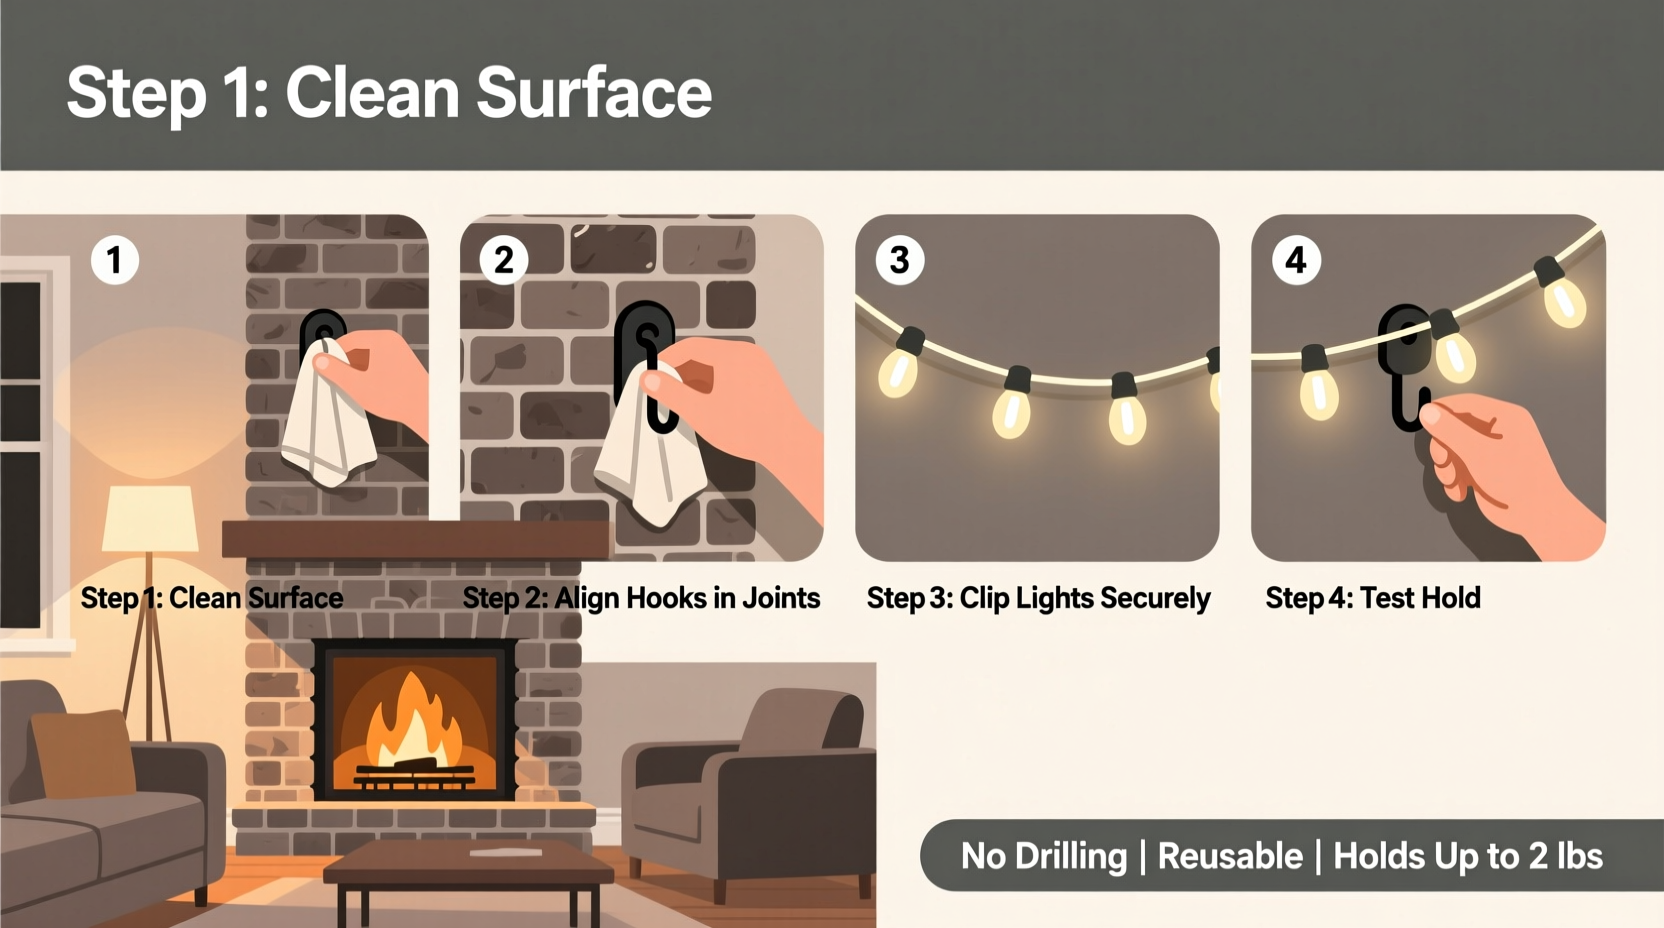
Step-by-step: How to install lights without drilling
- Clean the brick surface: Use isopropyl alcohol and a lint-free cloth to remove dust, grease, or wax buildup. Let dry completely—moisture reduces adhesion by up to 70%, according to independent lab tests.
- Select hook placement: Mark spots where you want hooks spaced, typically 12–18 inches apart depending on light strand length. Avoid crumbling mortar or damp areas.
- Prepare the hook backing: Remove the liner slowly. Do not touch the adhesive pad—skin oils reduce bond strength. If accidentally touched, wipe with alcohol and let dry.
- Press firmly for 30 seconds: Apply even pressure with your palm. Don’t tap—it won’t activate the full adhesive layer. Hold each hook in place for the full duration.
- Wait 24 hours before loading: This allows the polymer to fully cure and reach maximum tensile strength. Rushing this step is the most common cause of early failure.
- Attach lights gradually: Drape the string loosely first, then clip ends into outermost hooks. Work inward, adjusting slack as needed. Never yank or stretch the cord.
- Secure excess cord: Use twist ties or fabric loops to bundle extra length behind the display. Avoid hanging loose weights from a single hook.
Real example: A holiday display that lasted 48 days
Jamie T., a homeowner in Portland, OR, wanted to decorate her 1920s brick fireplace for Christmas without damaging the historic facade. She used Scotch Extreme Outdoor Hooks spaced 15 inches apart across a 6-foot mantel. After cleaning each spot with alcohol wipes, she applied six hooks and waited two full days before hanging a 50-bulb warm-white LED string (total weight: ~1.2 lbs) and a lightweight pine garland (0.8 lbs).
The display remained secure through two weeks of daily fireplace use and fluctuating indoor temperatures. When taken down in January, Jamie removed each hook by stretching straight down along the wall. All adhesive lifted cleanly—no residue, no discoloration. “I was skeptical,” she said, “but they held better than some screws I’ve used.”
Maximizing hold: Pro techniques that work
Even the best hooks need smart handling. These strategies improve performance and longevity:
- Use overlapping bonds: For longer runs, slightly overlap the end of one hook’s base with the start of the next. This creates a continuous stress distribution.
- Pre-condition cold rooms: If your living room dips below 50°F (10°C), warm the space for 2–3 hours before application. Cold reduces initial tackiness.
- Avoid direct heat exposure: Keep lights and hooks at least 6 inches above active flames or heating vents. Excessive heat softens adhesives over time.
- Reinforce with clear fishing line (optional): For extra security, run nearly invisible monofilament between two top hooks and drape lights over it like a curtain rod.
“The strongest bond forms when adhesive flows into microscopic pores. Surface prep isn’t optional—it’s the foundation.” — Dr. Lena Choi, Adhesion Science Researcher, MIT Materials Lab
Checklist: Installing lights on brick safely and securely
- ☐ Choose masonry-rated, removable hooks with sufficient weight capacity
- ☐ Clean brick surface with isopropyl alcohol; let dry completely
- ☐ Plan hook spacing (12–18” apart typical)
- ☐ Apply hooks with firm, sustained pressure (30 sec each)
- ☐ Wait 24–48 hours before attaching lights
- ☐ Hang lights gently—no tugging or stretching
- ☐ Inspect weekly for loosening, especially during temperature swings
- ☐ Remove by pulling straight down along wall plane
Common mistakes and how to avoid them
Many failed installations stem from simple oversights. Here’s what not to do—and what to do instead:
| Mistake | Problem | Solution |
|---|---|---|
| Using regular tape or office hooks | Lack grip on porous brick; falls within hours | Use only masonry-specific adhesive products |
| Skipping the curing period | Weak initial bond leads to premature detachment | Wait 24+ hours before loading |
| Touching the adhesive pad | Oils from skin create weak spots | Handle only by edges; re-clean if contaminated |
| Pulling hooks sideways during removal | Can chip paint or pull loose material | Always stretch straight down along wall surface |
| Overloading a single hook | Exceeds weight limit; causes cascading failure | Distribute weight evenly; use multiple anchors |
Frequently asked questions
Will these hooks damage painted brick?
Generally no—if the paint is intact and properly adhered. However, older or peeling paint may lift slightly when removing hooks. Test in an inconspicuous area first. For fragile finishes, consider magnetic clips or tension rods placed above the mantel instead.
Can I reuse the hooks after removal?
Most cannot be reused once detached. The adhesive layer loses integrity after stretching. Some silicone-based models (like Ekenbay) allow cleaning and limited reuse, but performance diminishes. Always treat them as single-use for critical applications.
What if my lights keep sagging between hooks?
This usually means hooks are too far apart or the strand is heavier than expected. Add intermediate hooks every 8–12 inches for dense or mixed displays (e.g., lights + ornaments). Alternatively, use a secondary support line made of clear fishing wire stretched between outer hooks.
Final thoughts: Style without sacrifice
You don’t need to choose between beautiful ambiance and preserving your brick fireplace. With today’s advanced masonry hooks, it’s entirely possible to create enchanting light displays that last for seasons—without a single drill hole. Success comes down to three things: selecting the right product, preparing the surface meticulously, and respecting the timeline for full adhesion.
Whether you’re dressing up your hearth for the holidays, adding romantic glow for date night, or creating a cozy reading corner, these methods empower you to decorate freely and responsibly. And when it’s time to take everything down, you’ll walk away with clean walls and zero regrets.


 浙公网安备
33010002000092号
浙公网安备
33010002000092号 浙B2-20120091-4
Comments
No comments yet. Why don't you start the discussion?