
Hanging outdoor lights enhances curb appeal, creates inviting ambiance, and extends the usability of patios and decks into the evening. But traditional methods involving nails, screws, or staples can damage siding, gutters, and trim—especially problematic for renters or those who want to preserve their home’s exterior. The good news: you can install beautiful, durable lighting displays without a single nail by using gutter clips and specialized hooks. This method is safe, removable, and surprisingly sturdy when done correctly.
Whether you're preparing for holidays, a backyard gathering, or simply want year-round charm, this guide walks you through a reliable, non-invasive approach that protects your home while delivering professional-looking results.
Why Avoid Nails? The Case for Damage-Free Installation
Nails may seem like the simplest way to attach outdoor string lights, but they come with long-term drawbacks. Driving fasteners into wood, vinyl, or aluminum siding risks water infiltration, which can lead to rot, mold, or pest entry over time. Even small punctures in gutters can compromise their integrity, leading to leaks during heavy rain.
Renters face additional concerns. Landlords often prohibit permanent modifications, and failing to comply could result in withheld security deposits. A no-nail solution not only keeps your rental agreement intact but also gives you the freedom to move your lighting setup seasonally or between properties.
“More than 60% of property managers cite exterior damage from holiday decorations as a recurring issue.” — National Rental Housing Council, 2023 Maintenance Report
Gutter clips and adhesive-backed hooks eliminate these risks. They’re engineered to hold lightweight cables securely while allowing full removal without residue or damage when used properly.
Understanding Gutter Clips and Hooks: Types and Uses
Not all clips and hooks are created equal. Choosing the right type depends on your gutter style, light weight, and desired layout. Below is a breakdown of the most effective options.
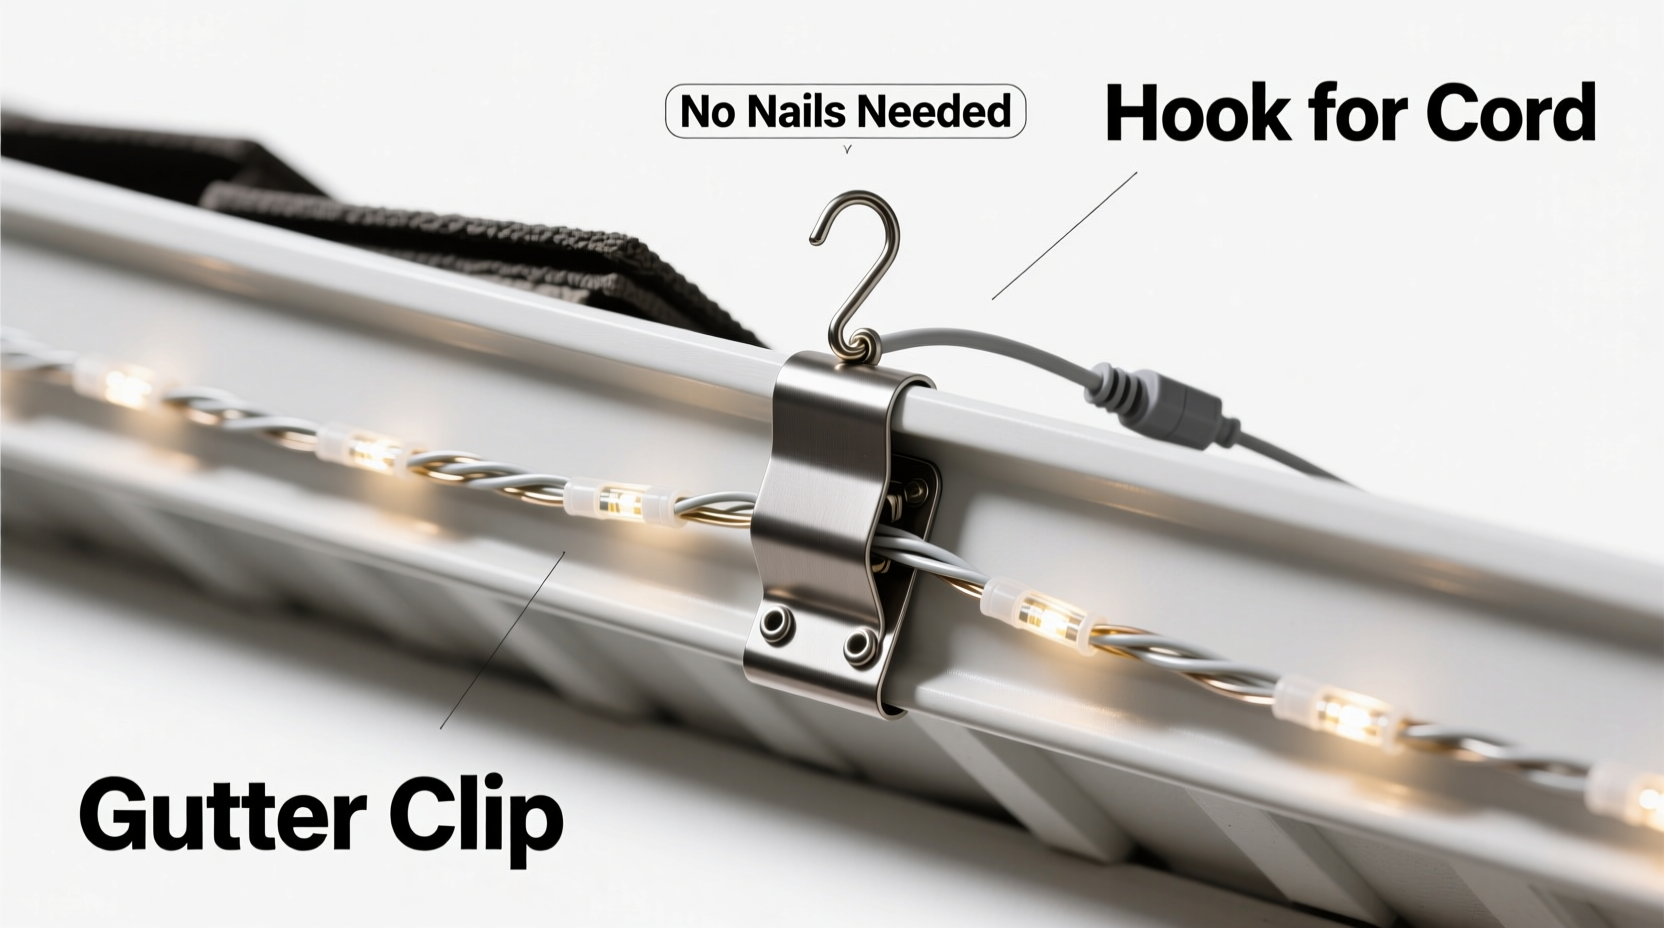
Gutter Clips
These are typically plastic or rubberized clamps designed to grip the front edge of a gutter. They clip on without tools and provide a stable anchor point for string lights. Most models feature a loop or hook at the top where you can drape or tie light strands.
- S-Type Clips: Ideal for K-style gutters; they wrap around the front lip and bottom edge for added stability.
- Cable Clips: Feature a built-in channel to guide and secure the light cord, reducing sway in wind.
- Adjustable Clips: Fit multiple gutter widths and are useful if your home has inconsistent gutter sizes.
Adhesive Hooks
These are versatile mounting solutions that stick directly to surfaces like fascia boards, soffits, or walls. High-quality outdoor hooks use UV-resistant adhesives (often 3M VHB tape) that bond strongly to clean, dry surfaces.
- J-Hooks: Shaped like the letter \"J,\" they support vertical drops or horizontal runs along eaves.
- Swivel Hooks: Allow slight movement, reducing stress on cords during temperature shifts or wind.
- Multi-Pack Sets: Often include various sizes for different stages of installation—starting near outlets and extending outward.
| Type | Best For | Weight Capacity | Removal Method |
|---|---|---|---|
| Gutter S-Clips | K-style gutters, medium-duty lights | 1–2 lbs per clip | Unclip manually |
| Cable-Retaining Clips | Windy areas, taut installations | Up to 3 lbs | Slide out cable, unclip |
| Outdoor Adhesive J-Hooks | Fascia, brick, stucco | 0.5–1 lb per hook | Peel slowly; use rubbing alcohol for residue |
| Magnetic Hooks | Metal gutters or downspouts | 0.75 lb max | Lift off |
For best results, combine both systems—use gutter clips along the roofline and adhesive hooks to route lights toward patios or trees.
Step-by-Step: Installing Outdoor Lights Without Nails
Follow this timeline-based process to ensure a secure, even, and visually pleasing installation. Plan for 2–4 hours depending on the size of your home and complexity of layout.
- Assess Your Layout (15 min)
Walk around your house and sketch a rough plan. Identify where the power source is located, the path of the gutters, and any obstacles like vents or windows. Determine how many strings you’ll need based on length (typically 25 ft per strand). - Gather Supplies (10 min)
Collect:- Weather-rated string lights (LED recommended)
- Gutter clips (one per 12–18 inches of gutter)
- Adhesive hooks (one every 12–24 inches along secondary paths)
- Rubbing alcohol and lint-free cloth
- Measuring tape
- Ladder (with stabilizer if near gutters)
- Prepare Surfaces (20 min)
Clean all attachment points. Wipe gutter edges and fascia boards with rubbing alcohol to remove dirt, grease, or pollen. Let dry completely. This step is critical—adhesives fail on dirty surfaces. - Install Gutter Clips (30–60 min)
Starting near the outlet, clip each S-clip onto the front lip of the gutter at consistent intervals. For heavier lights or windy locations, space them every 12 inches. Rotate the hook portion upward so the light cord can rest securely. - Mount Adhesive Hooks (30 min)
Press J-hooks firmly onto fascia or wall surfaces along planned routes. Apply steady pressure for 30 seconds per hook. Wait at least one hour before loading to allow the adhesive to cure fully. - Run the Lights (45 min)
Begin draping the first strand from the outlet, feeding it through each gutter clip. Avoid sharp bends or pinching the cord. Use cable retainers if provided to keep wires aligned. Extend to adhesive hooks for side runs. Overlap strands end-to-end only if rated for connector use. - Test and Adjust (15 min)
Plug in the system and inspect for flickering or dead sections. Re-seat any loose connections. Gently adjust spacing for even glow—avoid over-stretching. - Secure Excess Cord (10 min)
Use zip ties or velcro straps to bundle extra wire near the outlet. Never leave loose cords dangling where they can be tripped over or exposed to moisture.
Real Example: A Renter’s Holiday Lighting Success
Sophie Ramirez lives in a leased two-story colonial with aluminum siding and K-style gutters. Each December, she wanted to decorate for the holidays but feared damaging the exterior. Her landlord had previously denied permission for drilled installations.
She opted for a no-nail solution using 18 S-clips and 12 outdoor adhesive J-hooks. After cleaning the gutter edges with alcohol wipes, she installed the clips every 15 inches along the front and side gutters. She used adhesive hooks to guide lights down the fascia toward her patio railing, where she clipped additional strands horizontally.
The entire setup took three hours over a weekend. The lights remained secure through two snowstorms and winds up to 25 mph. In January, she removed everything in under an hour—no marks, no complaints. “It looked better than my neighbor’s nailed-up display,” she said. “And I got my full deposit back.”
Pro Tips for Longevity and Safety
A well-installed no-nail lighting system can last several seasons with proper care. These expert-backed strategies improve durability and reduce maintenance.
- Choose LED Lights: They generate less heat, consume less power, and are lighter—reducing strain on clips and hooks.
- Use a GFCI Outlet: Protects against electrical shock, especially important in wet climates.
- Avoid Overloading Circuits: Most outdoor circuits handle 15 amps. Check your lights’ wattage and stay below 80% capacity.
- Inspect Seasonally: Before reinstalling, examine clips and hooks for cracks or weakened adhesion.
- Store Properly Off-Season: Coil lights neatly and store in labeled bins away from extreme temperatures.
“Using the right clips and allowing adhesive curing time makes all the difference. I’ve seen installations last five years with seasonal reuse.” — Mark Tran, Residential Lighting Installer with 12 years of experience
Frequently Asked Questions
Can gutter clips work on round or half-round gutters?
Yes, but standard S-clips are designed for K-style. For round gutters, use adjustable clips with rubber grips or silicone-lined clamps that conform to curved edges. Magnetic clips also work well if the gutter is made of metal.
Will adhesive hooks damage paint or siding when removed?
High-quality outdoor hooks with proper removal techniques rarely cause damage. To remove, gently stretch the hook sideways to break the adhesive bond. If residue remains, apply rubbing alcohol with a soft cloth. Avoid scraping with metal tools.
How do I prevent lights from swaying in the wind?
Use cable-retaining clips that fully enclose the wire, or add supplemental adhesive hooks every 12 inches in high-wind zones. Avoid tight spans—allow slight sag between supports to absorb movement.
Final Checklist Before You Begin
- ✅ Measure total linear feet of installation area
- Ensures you buy enough lights and hardware
- ✅ Confirm lights are rated for outdoor use
- Look for “UL Listed” and “wet location” labels
- ✅ Buy clips and hooks in advance
- Test fit on your gutter style before installation day
- ✅ Clean all mounting surfaces
- Alcohol wipe-down is essential for adhesion
- ✅ Allow 1+ hour curing time for adhesive hooks
- Do not load immediately after application
- ✅ Test all strings before final placement
- Catch faulty bulbs or connectors early
Conclusion: Illuminate Smart, Protect Your Home
Hanging outdoor lights without nails isn’t just a workaround—it’s a smarter, more sustainable approach to exterior decoration. With gutter clips and quality adhesive hooks, you achieve a polished look while preserving your home’s structure and finish. The method is accessible to DIYers of all skill levels, cost-effective, and fully reversible.
No longer must you choose between festive charm and property protection. By investing a little extra time in surface prep and proper hardware selection, you gain peace of mind, flexibility, and lasting results. Whether for seasonal celebrations or year-round ambiance, this technique proves that great design doesn’t require permanent changes.


 浙公网安备
33010002000092号
浙公网安备
33010002000092号 浙B2-20120091-4
Comments
No comments yet. Why don't you start the discussion?