
String lights bring warmth, charm, and ambiance to both indoor and outdoor spaces. Whether you're decorating a bedroom, patio, or event venue, their soft glow can transform an ordinary environment into something magical. But many people hesitate to install them because of the fear of damaging walls—especially in rentals or freshly painted rooms. The good news is that there are numerous effective, damage-free ways to hang string lights. From adhesive hooks to tension wires, this guide covers practical, tested methods that preserve your walls while delivering beautiful results.
Why Avoid Damaging Walls?
Wall damage isn’t just about holes from nails or screws. Even small punctures or adhesive residue can lead to repair costs, lost security deposits, or strained landlord relationships. Paint peeling, cracked drywall, and uneven surfaces are common issues when traditional mounting methods are used. For renters, students, or anyone cautious about altering their living space, non-invasive installation techniques are essential. Beyond preservation, these methods also offer flexibility—allowing you to reposition or remove lights seasonally without consequence.
“More than 60% of renters avoid permanent decor changes due to lease restrictions. Damage-free lighting solutions empower them to personalize spaces safely.” — Sarah Lin, Interior Design Consultant at Urban Nest Studio
Damage-Free Methods to Hang String Lights
The key to hanging string lights without harming walls lies in distributing weight evenly and avoiding direct penetration. Below are seven proven, wall-safe techniques categorized by application and environment.
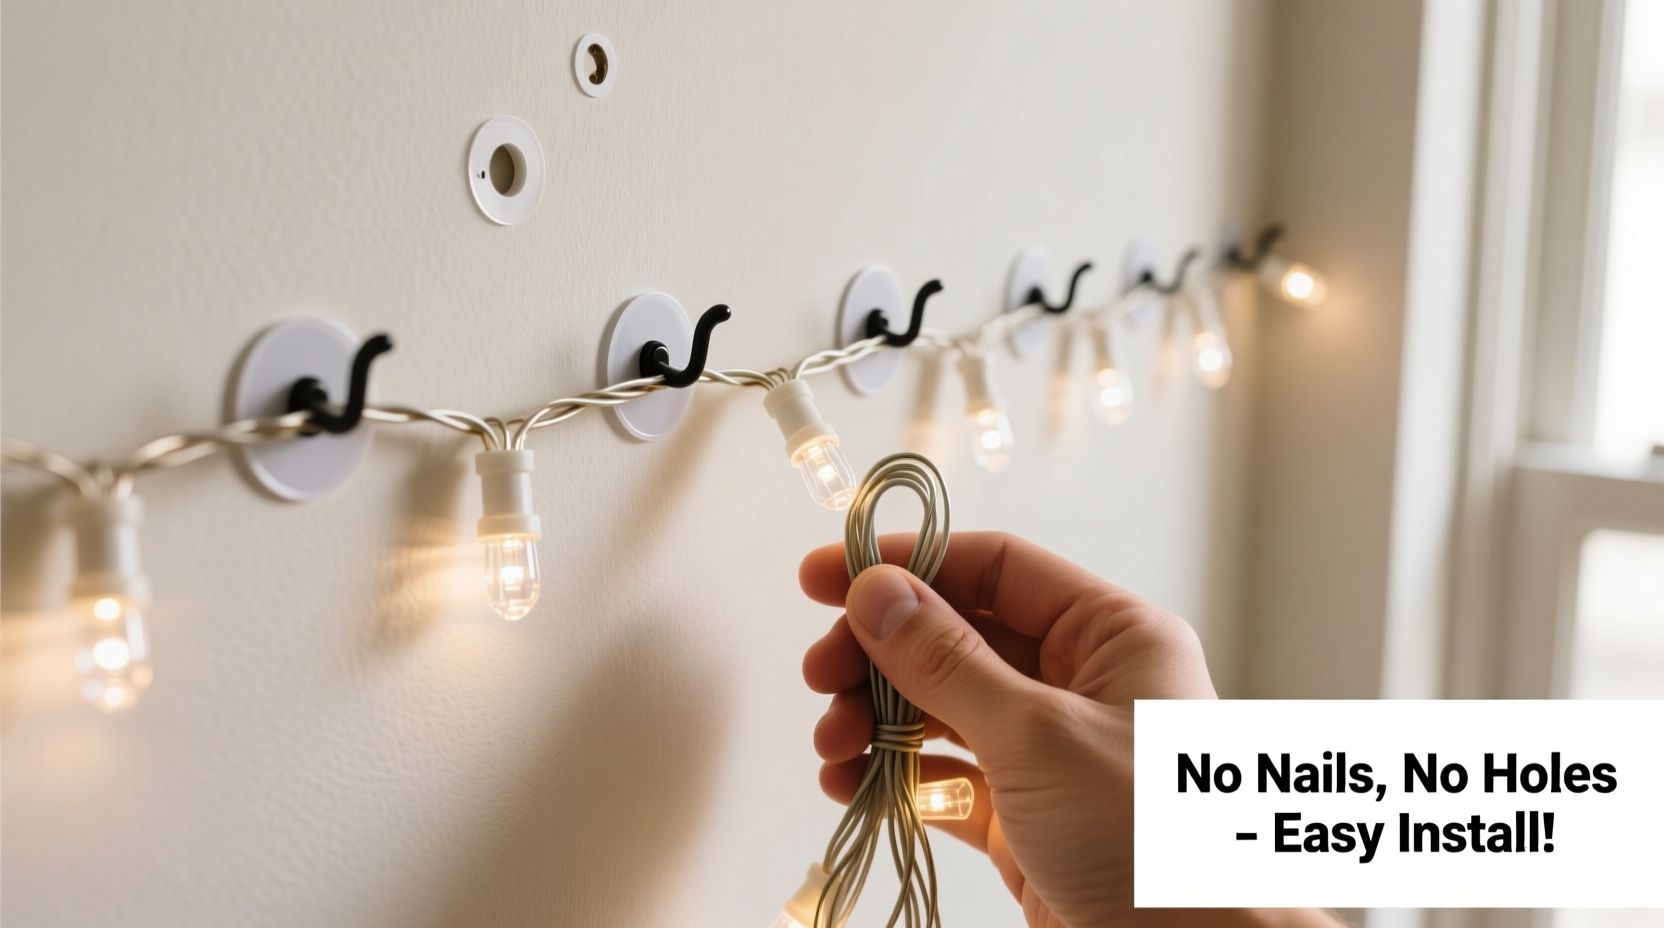
1. Use Adhesive Hooks and Clips
Adhesive wall hooks are among the most accessible and widely used tools for hanging lightweight string lights. Designed with strong yet removable glue, they support several pounds and come off cleanly when needed.
- Premium options: 3M Command™ Hooks and Clips are engineered for smooth removal without residue.
- Weight capacity: Most hold 1–4 lbs per hook, ideal for standard LED fairy lights.
- Placement tip: Apply to clean, dry surfaces and press firmly for 30 seconds to activate adhesion.
2. Install Tension Rods Across Rooms
Tension rods provide invisible support across doorways, windows, or corners. They require no hardware and stay in place through pressure between two parallel surfaces.
Best for: Bedrooms, patios with railings, or hallways where opposite walls exist. Choose spring-loaded rods made of steel or aluminum for durability.
- Measure the distance between two stable surfaces.
- Select a rod within that range (most extend 24–72 inches).
- Twist to expand until snug; don’t overtighten.
- Clip or tie string lights along the rod using zip ties or fabric loops.
3. Utilize Crown Molding or Ceiling Trim
If your room has crown molding, baseboards, or window/door trim, it becomes a natural anchor point. Use plastic clips or small hooks designed to grip edges instead of sticking to flat walls.
These clips wrap around trim and hold light strands securely. Since no surface adhesion is required, paint and wallpaper remain untouched.
4. Hang from Ceiling Hooks or Fans (Ceiling-Mounted)
In rooms with ceilings high enough, consider anchoring one end of the string to an existing ceiling fixture like a fan or light mount. This reduces wall contact significantly.
Use a swag hook rated for light loads if permitted (common in apartments). Ensure it screws into a ceiling joist or existing fixture bracket—not drywall alone.
5. Drape Over Furniture or Room Dividers
A creative alternative is integrating furniture into your lighting design. Drape lights over bookshelves, headboards, curtain rods, or freestanding screens.
This method eliminates wall use entirely. It’s especially effective in bedrooms and studios where personal expression matters more than permanence.
Choosing the Right Tools: A Comparison Table
| Method | Best For | Weight Support | Removal Impact | Cost Estimate |
|---|---|---|---|---|
| Adhesive Hooks | Indoors, smooth walls | 1–4 lbs | None (if removed properly) | $5–$15 |
| Tension Rods | Doorways, narrow gaps | Up to 5 lbs | None | $10–$25 |
| Trim Clips | Rooms with molding | 1–2 lbs | None | $8–$12 |
| Ceiling Fixtures | Kitchens, living areas | Depends on fixture | Low (only if drilling) | $3–$10 (hook only) |
| Furniture Draping | Bedrooms, dorms | Limited by stability | None | $0 (uses existing items) |
Step-by-Step Guide: Installing String Lights with Adhesive Hooks
For those new to damage-free installations, this sequence ensures clean, even placement without guesswork.
- Plan your layout: Sketch the path of your lights—horizontal lines, zigzags, or cascading drops. Measure total length needed and buy extra (10–15%) for adjustments.
- Choose the right hook: Select small adhesive clips if spacing is tight, or larger hooks for heavier strands. Match color to your wall if visibility is a concern.
- Clean the surface: Wipe the wall with rubbing alcohol and let dry. Dust or grease prevents proper bonding.
- Mark positions: Use a pencil and level to mark hook locations every 12–18 inches along the planned route.
- Apply hooks: Peel backing and press each hook firmly for 30 seconds. Wait 1 hour before hanging lights for maximum hold.
- Hang the lights: Starting from the power source, feed the plug end first. Clip bulbs gently into place, avoiding sharp bends.
- Test and adjust: Plug in the lights. Reposition any sagging sections by adding intermediate hooks.
Real-World Example: Apartment Balcony Makeover
Jamila, a tenant in a downtown Chicago apartment, wanted to turn her plain concrete balcony into a cozy evening retreat. She loved the idea of string lights but was restricted by her lease from making any wall modifications.
Her solution? She installed two adjustable tension rods across the width of her balcony railing, spaced vertically. Using fabric loop clips attached to the rods, she draped two sets of weather-resistant LED string lights in a crisscross pattern. The entire setup took 20 minutes, cost under $30, and created a café-style atmosphere perfect for reading or entertaining friends.
When she moved out a year later, she simply collapsed the rods and stored them for future use—no trace left behind.
Dos and Don’ts of Damage-Free Lighting Installation
| Do | Don't |
|---|---|
| Check weight limits of adhesive products | Use duct tape or masking tape as long-term solutions |
| Use outdoor-rated lights and hooks for exterior spaces | Nail or screw into walls unless absolutely necessary and permitted |
| Test removal technique on one hook first | Install near heat sources or flammable materials |
| Combine methods (e.g., tension rod + adhesive clips) | Overload a single hook beyond its rated capacity |
| Label cords for easy identification during removal | Leave lights exposed to rain without proper IP rating |
FAQ: Common Questions About Hanging String Lights Safely
Can I reuse adhesive hooks after removing them?
No, most adhesive hooks—including 3M Command™—are designed for single use. Once the strip is stretched during removal, its bonding strength is compromised. However, replacement strips are available for some models, allowing reuse of the plastic hook.
What if my walls are textured or brick?
Standard adhesive hooks may not bond well to rough surfaces. In such cases, use specialized solutions like removable putty (e.g., Museum Wax or Sticky Tack) to secure lightweight strands. Alternatively, opt for freestanding structures like plant stands, pergolas, or shepherd’s hooks placed outside.
Are there wireless string lights that eliminate cord concerns?
Yes. Battery-operated or solar-powered string lights eliminate the need for wall-plugged cords. These are ideal for temporary displays, outdoor patios, or locations far from outlets. Just ensure batteries are replaced regularly and enclosures are sealed against moisture.
Expert Tips for Long-Term, Safe Decor
Interior designers and rental specialists agree that thoughtful planning prevents regret later. Here are three advanced strategies professionals use:
- Layer lighting: Combine string lights with floor lamps or table fixtures to reduce dependency on wall-mounted sources.
- Use cord concealers: If cords must run along walls, use raceways or adhesive cord clips to keep them tidy and minimize visual clutter.
- Seasonal rotation: Store lights carefully in labeled containers. Reuse the same layout annually by documenting hook placements with photos or notes.
“The best decor doesn’t fight the space—it works with it. Invisible installations often make the strongest visual impact.” — Daniel Cho, Sustainable Interior Designer
Final Checklist Before You Install
✅ Damage-Free String Light Installation Checklist:
- Measured total length of lights needed (+15% buffer)
- Selected appropriate method (adhesive, tension rod, etc.)
- Verified weight compatibility with chosen hardware
- Cleaned all wall or surface contact points
- Planned outlet access and cord management
- Tested one section before full installation
- Documented layout for future reinstallation
Conclusion: Illuminate Freely, Without Fear
Hanging string lights without damaging walls is not only possible—it’s simple with the right approach. By choosing removable adhesives, leveraging furniture, or using tension-based systems, you can enjoy the beauty of ambient lighting while respecting your space and agreements. Whether you’re in a rental, a shared home, or simply value preserving your walls, these methods offer lasting flexibility and peace of mind.


 浙公网安备
33010002000092号
浙公网安备
33010002000092号 浙B2-20120091-4
Comments
No comments yet. Why don't you start the discussion?