
As holiday decorators strive for clean, polished outdoor lighting displays, one persistent challenge arises: where to place the bulky, unsightly controllers for LED Christmas lights. Many homeowners turn to decorative lanterns as a clever concealment solution—blending functionality with seasonal aesthetics. However, stuffing electronic components into enclosed spaces risks overheating, moisture damage, and disrupted wireless signals. Done incorrectly, this shortcut can lead to shortened lifespans, flickering lights, or even fire hazards.
The good news is that with proper planning and materials, it’s entirely possible to tuck controllers neatly inside lanterns while maintaining safety, performance, and reliable connectivity. This guide walks through best practices, real-world-tested techniques, and expert-backed strategies to ensure your holiday setup looks seamless without compromising function.
Selecting the Right Lantern for Controller Housing
Not all lanterns are suitable for housing electrical components. The first step in a successful installation is choosing a lantern that supports ventilation, weather resistance, and enough internal space. Metal or wood-framed lanterns with glass panels are common in outdoor settings, but their design often limits airflow and exposure to the elements.
Look for models with removable tops, side access panels, or larger interior volumes. Lanterns designed for solar lights typically have built-in drainage and modest ventilation—features that can be adapted for controller storage. Avoid fully sealed or plastic enclosures unless they’re explicitly rated for electrical use.
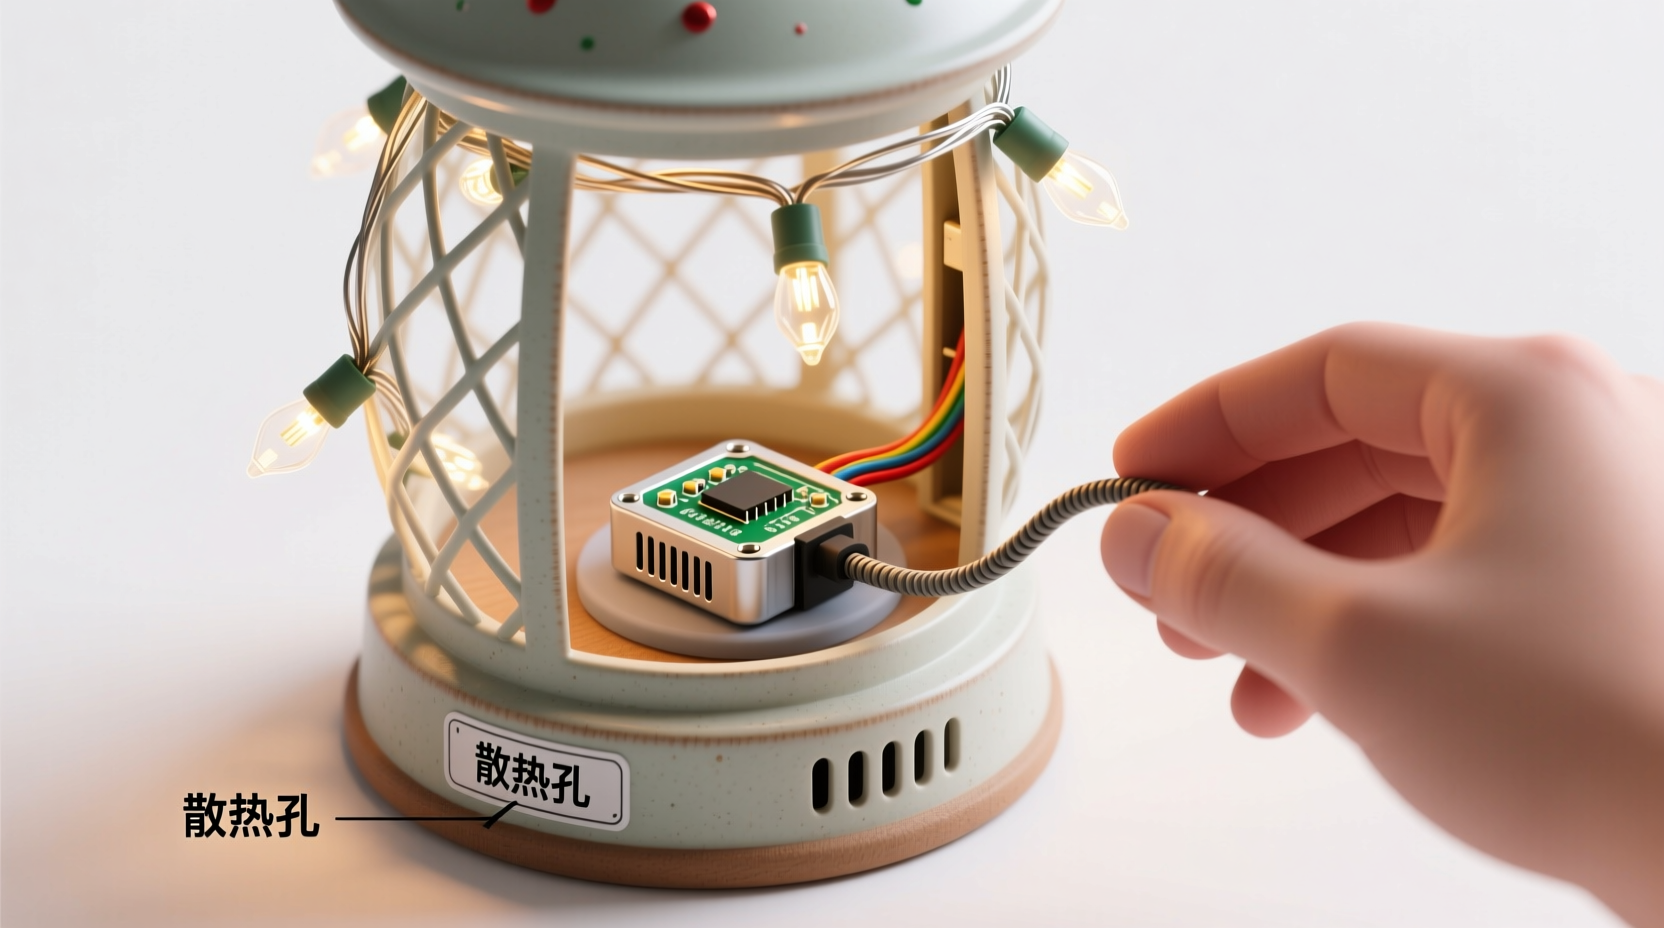
Preventing Overheating: Ventilation and Heat Dissipation
LED light controllers generate heat during operation, especially when managing multiple strands or running animation sequences. Enclosing them in tight spaces traps warm air, accelerating component degradation and potentially triggering thermal shutdowns. In extreme cases, poor heat management can create fire risks, particularly if low-quality power supplies or damaged wiring are involved.
Adequate ventilation is non-negotiable. Drill small (1/8-inch) vent holes near the top and bottom of the lantern to encourage convection airflow—warm air exits from the top, cooler air enters below. Position these holes under overhangs or behind decorative grilles to maintain visual appeal while allowing passive cooling.
Use thermally conductive mounting pads or adhesive aluminum sheets to transfer heat away from sensitive circuitry. Attach the controller to a small metal plate screwed inside the lantern; this acts as a heatsink, spreading heat over a larger surface area. Never allow the controller to rest directly on wood or plastic surfaces that can insulate heat.
“Even low-power electronics need breathing room. A 10°C increase in operating temperature can halve the expected lifespan of capacitors and semiconductors.” — Dr. Alan Reyes, Electrical Systems Engineer, Holiday Lighting Safety Institute
Maintaining Wireless Signal Integrity
Many modern Christmas light controllers rely on Wi-Fi, Bluetooth, RF (radio frequency), or infrared signals for remote operation. Placing them inside metal-framed or glass-enclosed lanterns can block or weaken these signals, resulting in unresponsive apps, delayed effects, or complete disconnection.
To preserve signal strength:
- Avoid full-metal enclosures: Steel or iron frames act as Faraday cages, blocking electromagnetic waves. If using a metal lantern, position the controller near a glass panel and orient antennas (if external) toward open space.
- Use signal extenders: For Wi-Fi-based systems, consider a mesh network node nearby or a signal repeater to boost coverage in the display area.
- Relocate the antenna: Some advanced controllers allow you to attach an external wire antenna. Route a thin coaxial extension to the edge of the lantern, tucked behind trim or within a faux candle element.
- Test signal strength: Use a smartphone app like Wi-Fi Analyzer or Fing to measure signal levels before and after enclosure. Aim for at least -70 dBm RSSI for stable communication.
| Lantern Material | Signal Impact | Mitigation Strategy |
|---|---|---|
| Clear Glass | Minimal attenuation | None needed; ideal for visibility and transmission |
| Tinted or Frosted Glass | Moderate signal loss (~30%) | Place controller near thinnest section; avoid center mounting |
| Wrought Iron Frame | Severe blockage (up to 90% loss) | Mount controller off-center; use external antenna |
| Wood & Fabric Shades | Low interference | Suitable for RF and Bluetooth; ensure dry conditions |
| Plastic (non-conductive) | Negligible impact | Verify UV resistance and structural integrity |
Step-by-Step Installation Guide
Follow this sequence to safely install a Christmas light controller inside a decorative lantern while minimizing risks:
- Power down and inspect: Unplug all lights and examine the controller for damage, frayed wires, or signs of prior overheating (discoloration, warping).
- Measure and mock-up: Place the controller inside the lantern to assess fit. Mark locations for cable entry, vents, and mounting points.
- Drill ventilation holes: Using a small bit, drill two sets of 1/8-inch holes—one near the top rim, another near the base—on opposite sides for cross-airflow.
- Create a waterproof entry point: Use a rubber grommet or silicone gland where cords enter the lantern to prevent moisture ingress. Seal gaps with outdoor-rated silicone caulk.
- Mount the controller: Secure it to a non-flammable backing (e.g., ceramic tile fragment or aluminum sheet) using zip ties or insulated screws. Keep it elevated above the lantern floor.
- Route cables neatly: Leave a drip loop outside the entry point so water runs down the cord instead of into the lantern.
- Test before sealing: Power up the system and operate lights via remote or app. Monitor for responsiveness, heat buildup, and stability over 30 minutes.
- Finalize concealment: Replace the lantern cover, ensuring no wires are pinched. If applicable, install a faux candle or decorative insert to obscure the electronics visually.
Real-World Example: The Front Porch Lantern Project
In suburban Connecticut, homeowner Maria Tran transformed her front porch display by integrating four smart light controllers into existing post-mounted lanterns. Each lantern housed a different zone: roofline, tree wrap, stair rail, and pathway markers. Initially, she placed the controllers directly inside the sealed metal bases, which led to repeated Wi-Fi dropouts and one unit shutting down mid-display.
After consulting a local electrician, she modified each lantern: drilling ventilation ports beneath the decorative scrollwork, installing rubber grommets for cord entry, and mounting controllers on small aluminum plates angled toward glass panels. She also added a $20 outdoor Wi-Fi extender mounted under the eaves. The result? Full app control throughout the season, zero overheating incidents, and a clean aesthetic praised by neighbors and local media.
“It took an extra afternoon of work,” Maria said, “but now I can change colors from my phone while sipping cocoa indoors. Worth every minute.”
Do’s and Don’ts: Quick Reference Table
| Action | Recommended? | Reason |
|---|---|---|
| Use a lantern with removable top | ✅ Yes | Allows easy access and better airflow design |
| Seal all openings completely | ❌ No | Traps moisture and heat; promotes corrosion |
| Mount controller on foam pad | ❌ No | Foam insulates heat and may be flammable |
| Add a silica gel desiccant pack | ✅ Yes | Reduces internal humidity and condensation risk |
| Use indoor-rated controllers outdoors | ❌ No | Not designed for temperature swings or moisture |
| Label each controller by zone | ✅ Yes | Speeds troubleshooting and seasonal reuse |
FAQ: Common Questions Answered
Can I leave the controller in the lantern all year?
Only if the lantern is consistently dry, well-ventilated, and protected from direct weather exposure. Most experts recommend seasonal removal. If left in place, check every 4–6 weeks for moisture, insect nests, or corrosion. Use only outdoor-rated equipment designed for extended exposure.
Will painting the lantern affect signal performance?
Paint alone won’t block signals significantly unless it contains metallic pigments (e.g., chrome, copper, or magnetic iron oxide). Standard acrylic or oil-based outdoor paints have negligible impact. However, multiple thick coats on metal frames may slightly degrade RF penetration—test afterward.
What if my controller has no external antenna?
Internal antennas are more vulnerable to obstruction. Position the unit so its longest edge faces outward, typically aligned with internal trace antennas. Avoid placing metal objects nearby. If signal remains weak, consider relocating the controller to a less obstructed lantern or using a wired extension setup.
Conclusion: Smart Integration for Seamless Holiday Displays
Hiding Christmas light controllers in decorative lanterns is more than a cosmetic upgrade—it’s a strategic move toward cleaner, safer outdoor lighting. When executed with attention to ventilation, signal propagation, and weather protection, this method enhances both reliability and curb appeal. The key lies not in hiding technology, but in integrating it thoughtfully.
Every component deserves consideration: from the material of the lantern frame to the placement of a single vent hole. By applying these principles, you protect your investment, reduce maintenance headaches, and enjoy uninterrupted holiday cheer. Whether you're illuminating a city balcony or a countryside porch, smart integration turns functional necessities into invisible assets.


 浙公网安备
33010002000092号
浙公网安备
33010002000092号 浙B2-20120091-4
Comments
No comments yet. Why don't you start the discussion?