
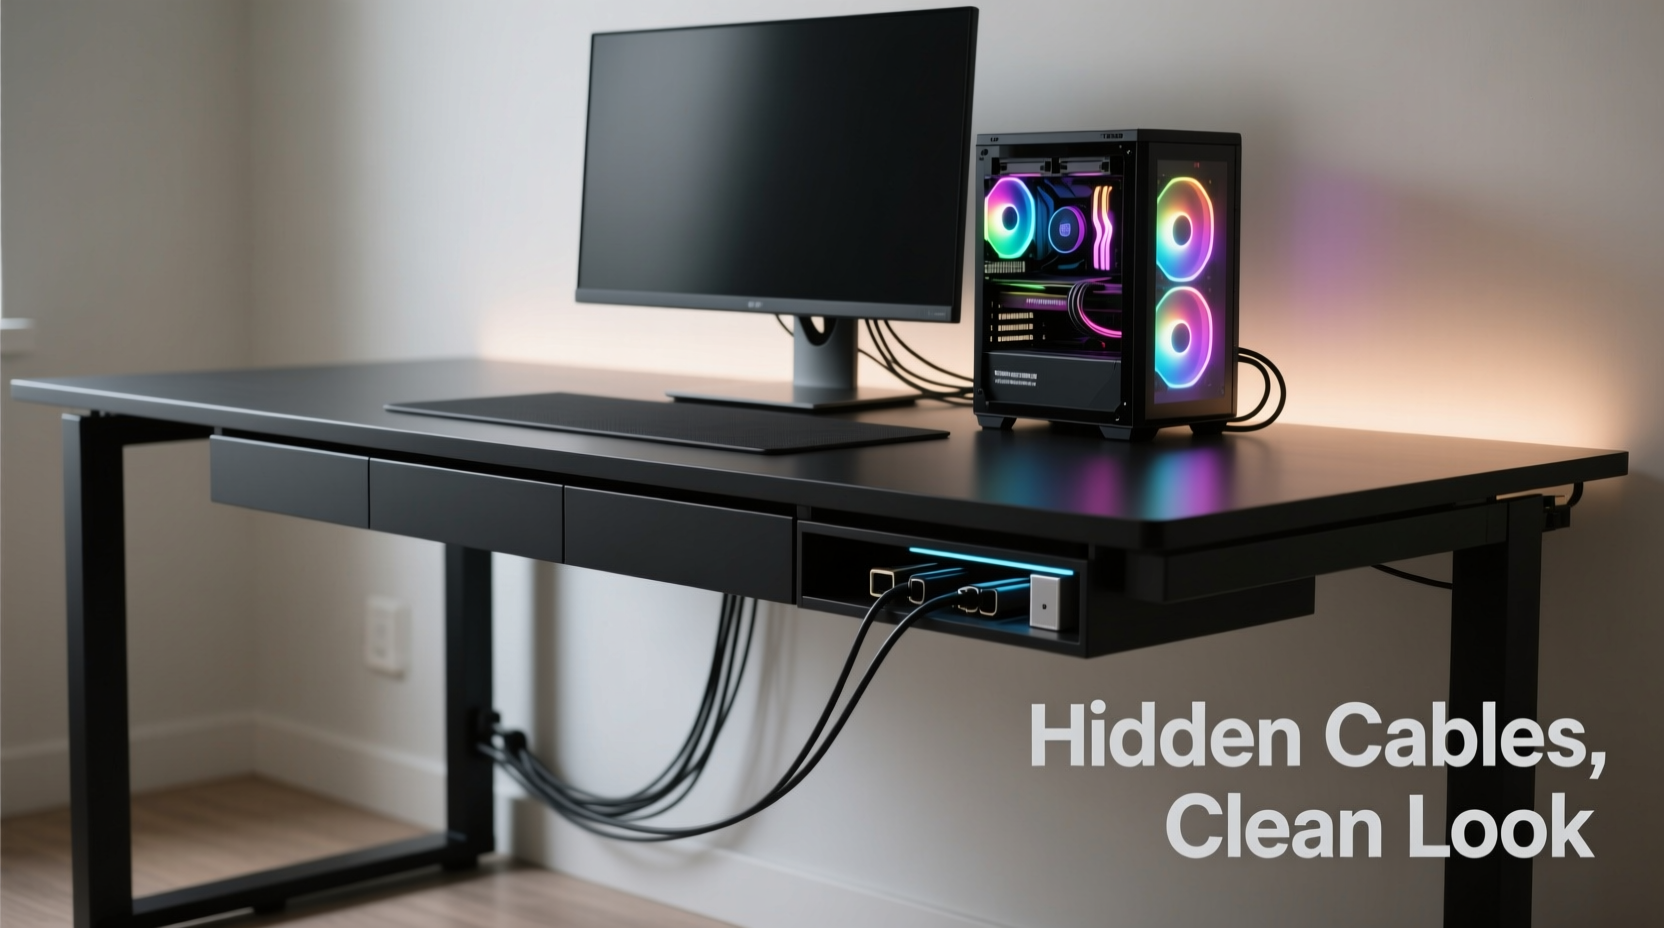
A cluttered gaming desk isn’t just visually distracting—it can disrupt focus, reduce productivity, and make streaming or recording sessions feel unprofessional. One of the biggest contributors to desktop chaos? Exposed cords. From power cables and HDMI lines to USB hubs and audio jacks, modern gaming setups involve multiple devices, each with its own set of wires. But a sleek, organized workspace is within reach. With the right tools and techniques, you can completely conceal cords and achieve a clean, minimalist aesthetic that complements your gaming environment.
This guide walks through practical, tested strategies to manage and hide cords effectively. Whether you’re building a new setup or revamping an existing one, these solutions prioritize both function and form—ensuring accessibility without sacrificing visual harmony.
Assess Your Cable Load First
Before reaching for cable ties or adhesive clips, take inventory of every cord connected to your gaming station. This includes:
- Monitor power and video cables (HDMI, DisplayPort)
- Gaming PC or console power and data cables
- Peripherals: keyboard, mouse, headset, webcam, microphone
- Audio equipment: speakers, DACs, subwoofers
- Charging stations for controllers or mobile devices
- Network cables (Ethernet vs. Wi-Fi considerations)
Mapping out what needs routing helps determine which hiding method suits your space. A compact desk with wall-mounted monitors requires different solutions than a large L-shaped battlestation with floor-standing towers.
Use Cable Management Trays and Raceways
Cable raceways are enclosed channels designed to bundle and conceal cords along walls or desks. They come in various sizes and finishes—white, black, wood-grain—to blend seamlessly into any decor.
Mount a raceway vertically from your desk surface up to the wall outlet if your PC tower sits on the floor. Feed all power and peripheral cables through it. For horizontal runs across the back of your desk, use low-profile under-desk trays that attach magnetically or with adhesive strips.
Raceways offer two major advantages: they protect cables from dust and accidental tugs, and they keep everything neatly aligned. Choose split designs for easier access when adding new devices.
“Proper cable routing starts with planning the path—not just bundling. Raceways create invisible highways for cords.” — Jordan Lee, Tech Setup Consultant at Streamline Labs
Step-by-Step Guide: Installing a Wall-Mounted Raceway
- Measure the vertical distance from your desk’s rear edge to the nearest power outlet.
- Select a raceway slightly longer than this span (e.g., 3–4 feet).
- Mark mounting points on the wall using a level to ensure straight alignment.
- Drill pilot holes and secure brackets with drywall anchors if needed.
- Open the raceway cover and feed all necessary cables through the channel.
- Close the cover and test device functionality before finalizing placement.
For renters or those avoiding wall modifications, opt for adhesive-backed raceways. While less durable than screw-mounted versions, they’re removable and leave minimal residue.
Incorporate Desk Grommets and Cord Ports
If you're assembling a new desk or upgrading your current one, consider integrating grommet holes. These are pre-drilled openings—usually 2 to 4 inches in diameter—designed to pass cables cleanly from the desktop surface to the underside.
Place grommets near monitor stands or center desk zones where multiple cords converge. Once installed, insert rubber-edged cord ports to prevent abrasion and improve aesthetics. All video, power, and USB cables can then drop vertically into a centralized management zone below.
This method eliminates horizontal sprawl across the desk surface. It also makes swapping monitors or docking laptops faster since only one bundled line needs disconnection.
| Solution | Best For | Installation Effort | Visibility After Setup |
|---|---|---|---|
| Cable Sleeves | Bundling short-run cords under desk | Low (wrap & zip-tie) | Visible but tidy |
| Wall Raceways | Floor-to-desk cable runs | Moderate (mounting required) | Nearly invisible |
| Desk Grommets | New builds or modifiable desks | High (drilling involved) | Fully hidden |
| Under-Desk Trays | Temporary or rental-friendly fixes | Very Low (adhesive) | Hidden beneath desk |
Leverage Wireless Technology Strategically
One of the most effective ways to reduce cord clutter is to eliminate cords altogether—where possible. Modern peripherals offer reliable wireless alternatives:
- Wireless mechanical keyboards with rechargeable batteries
- Low-latency gaming mice using RF or Bluetooth 5.0+
- USB-C docks that charge multiple devices over one connection
- Wi-Fi 6E routers reducing need for Ethernet (except for competitive play)
While hardcore esports players may still prefer wired connections for zero input lag, casual and mid-tier gamers often find no performance difference with high-end wireless gear.
Adopt a hybrid approach: go wireless for accessories, keep wired for critical components like monitors and primary PCs. This reduces cable density by up to 60% in many setups.
Real Example: Transforming a Cluttered Battlestation
Taylor, a Twitch streamer with a dual-monitor rig and full peripheral suite, struggled with tangled cords obscuring camera angles and complicating cleaning routines. His original setup had:
- Power strip dangling off the desk edge
- Three loose HDMI cables snaking across the floor
- Headset, mic, and ring light cords draped over the monitor arm
Over one weekend, he implemented the following changes:
- Mounted a 4-foot plastic raceway from desk level to wall outlet.
- Installed an under-desk cable tray to organize USB hubs and audio interfaces.
- Switched to a wireless keyboard and mouse combo.
- Used braided cable sleeves to group remaining cords behind the PC.
- Added velcro straps inside the tower case for internal wire control.
The result? A studio-ready backdrop with zero visible mess. Viewers complimented the “clean pro setup,” and Taylor reported improved mental clarity during long streams. Most importantly, he regained easy access to ports without tripping over wires.
Essential Tools and Accessories Checklist
To execute a flawless cord-hiding plan, gather these items beforehand:
- Measuring tape and level (for precise alignment)
- Cable raceways (self-adhesive or screw-in)
- Under-desk cable management trays
- Braided cable sleeves (choose diameter based on bundle size)
- Velcro straps or reusable zip ties (avoid permanent plastic ties)
- Cable clips (adhesive-backed, for temporary holds)
- Power strip with right-angle plugs (to save depth space)
- Label maker or masking tape + marker (for identification)
- Desk grommet kit (if modifying furniture)
- Wire lacing cord or loom (for advanced bundling)
Investing $30–$50 in quality tools pays dividends in longevity and ease of maintenance. Cheap clips lose adhesion; flimsy sleeves fray. Prioritize durability, especially if you frequently reconfigure your setup.
Common Mistakes to Avoid
Even well-intentioned cable management can backfire. Steer clear of these pitfalls:
- Over-tightening ties: Compressing cables damages internal conductors and reduces lifespan.
- Blocking ventilation: Routing cords over PC exhaust fans traps heat. Leave airflow gaps.
- Ignoring future expansion: Don’t pack raceways to capacity. Allow room for new devices.
- Hiding faulty cables: Concealing frayed or overheating wires creates fire hazards. Replace first.
- Using permanent adhesives on rental furniture: Opt for removable mounts to avoid deposit deductions.
“A clean setup shouldn’t compromise safety or serviceability. If you can’t unplug a device in 10 seconds, your system is too restrictive.” — Maria Tran, Ergonomic Design Engineer
FAQ: Frequently Asked Questions
Can I hide cords without drilling holes in my desk or wall?
Yes. Adhesive-backed raceways, under-desk trays, and cable sleeves require no permanent modifications. For wall runs, use double-sided mounting tape rated for heavy loads (e.g., 3M VHB). Just ensure surfaces are clean and dry before application.
How do I manage cords if my PC is on the desk instead of the floor?
Position a vertical cable manager behind the tower. Use magnetic cable clips to hold cords flush against the back panel. Route all outputs downward into an under-desk tray. Consider a desk with built-in rear channels or a riser with hollow legs for internal routing.
Are cable sleeves better than individual wraps?
Sleeves are ideal for grouping multiple cords into a single streamlined line. Individual wraps (like spiral wrap) offer more flexibility for partial bundling. Use sleeves for fixed bundles (e.g., behind monitor), wraps for dynamic areas needing frequent access.
Final Thoughts: Build With Intention
A minimalist gaming setup isn’t achieved overnight—it’s the result of deliberate choices about layout, technology, and maintenance. Hiding cords is more than cosmetic; it reflects a mindset of order, efficiency, and respect for your personal space.
Start small: bundle what’s visible, route what’s exposed, replace what’s obsolete. Then refine over time. The goal isn’t perfection but progress toward a cleaner, calmer environment where your focus stays on the game—not the mess behind it.


 浙公网安备
33010002000092号
浙公网安备
33010002000092号 浙B2-20120091-4
Comments
No comments yet. Why don't you start the discussion?