
Mounting a TV on the wall creates a clean, modern focal point in any living room or bedroom. But once the sleek flat-screen is up, unsightly cords dangle down like an afterthought—power cables, HDMI lines, audio connectors—all unraveling the illusion of minimalism. While many solutions involve drilling additional holes or installing in-wall conduit systems, not everyone can (or wants to) alter their walls permanently. Renters, homeowners with plaster walls, or those simply avoiding unnecessary damage need alternatives. The good news: you can conceal TV cords effectively without a single drill bit.
This guide explores practical, non-invasive methods to manage and hide cords for a floating TV. From adhesive cable channels to furniture-based routing and clever decor tricks, these strategies maintain a polished look while protecting your walls and electronics.
Why Avoid Drilling? Common Constraints
Drilling may seem like the obvious solution for hiding cords, but it’s not always feasible—or allowed. Understanding the limitations helps clarify why alternative approaches are essential.
- Rental restrictions: Most leases prohibit permanent modifications, including drilling into walls beyond anchor points for the mount itself.
- Wall material challenges: Plaster, lath, or tiled walls are fragile and prone to cracking when drilled.
- Future resale concerns: Homeowners may avoid drilling to prevent cosmetic damage that could affect property value.
- Lack of access behind walls: In multi-unit buildings or finished basements, there may be no safe way to route wires internally without opening drywall.
These constraints make surface-level cord management not just convenient—but necessary.
Effective No-Drill Cord Hiding Methods
The key to concealing cords without drilling lies in combining adhesive solutions, strategic placement, and visual camouflage. Below are five proven techniques that deliver clean results without compromising your walls.
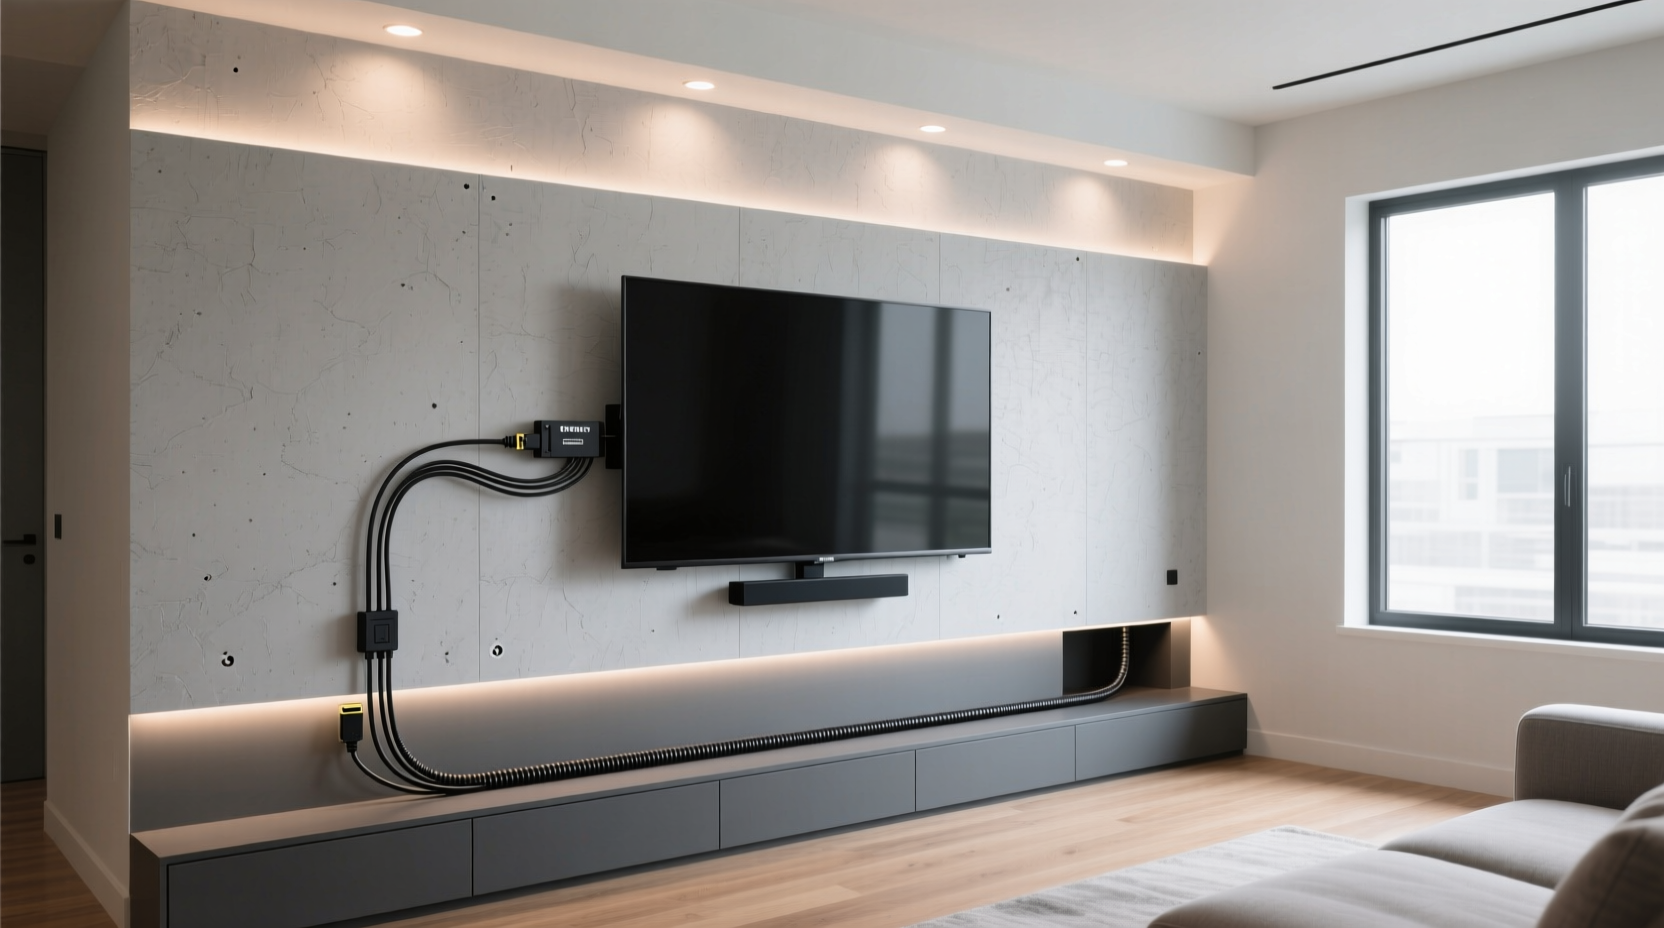
1. Use Adhesive Cable Raceways
Cable raceways are slim, plastic channels designed to bundle and conceal multiple cords. Modern versions use strong, removable adhesive backing instead of screws.
Choose a paintable white or neutral-colored raceway that matches your wall. Cut it to length with scissors or a utility knife, then press it firmly along the path from your TV to the nearest outlet or entertainment center. Feed power, HDMI, and streaming device cords inside. Most models snap shut securely but open easily for future adjustments.
For best results, align the raceway vertically down from the TV to baseboard level, then run it horizontally along the floor molding. This mimics professional in-wall routing while remaining fully reversible.
2. Leverage Baseboard and Trim Routing
Baseboards naturally create a small gap between the wall and floor—a hidden highway for cords. Use flat, low-profile braided cables or slim HDMI wires to slip them behind base molding.
Gently lift or loosen any flexible trim using a plastic putty knife. Slide cords behind it, then press the trim back into place. For homes with fixed baseboards, use double-sided adhesive clips designed to grip both the cord and the bottom edge of the molding. These hold wires flush against the wall, nearly invisible from a standing position.
“Surface-mounted cable management has evolved to offer near-invisible solutions. With the right materials, you can achieve a built-in look without construction.” — Jordan Lee, Interior Technology Consultant
3. Install Cord Covers with Removable Adhesive Strips
Unlike traditional raceways, cord covers use nano-suction or gel-based adhesives that stick firmly but leave no residue when removed. Brands like Command™ offer cord clips and vertical track systems ideal for TVs.
Attach one end near the TV's input panel and run the strip downward. Use integrated clips to tuck in each cable at intervals. Because these strips conform to slight wall imperfections, they stay secure even on textured surfaces.
Available in various lengths and colors, they’re especially useful in rentals where tenants must return walls to original condition.
4. Route Cords Through Furniture
If your floating TV is above or near a console, media stand, or shelf unit, use the furniture as a physical barrier. Instead of running cords straight down the wall, angle them diagonally toward the back of the cabinet.
Use adhesive-backed cord clips to guide wires across the wall until they reach the furniture. Once behind the unit, bundle them with Velcro ties and plug into a surge protector tucked out of sight. This method hides 80–90% of the cable run and leverages existing decor.
5. Camouflage with Wall Decor and Art
Sometimes the best way to hide something is to draw attention elsewhere. Position a large piece of artwork, mirror, or shelving unit slightly below or beside the TV to obscure the descending cords.
Alternatively, install floating shelves perpendicular to the cord path. Arrange books, plants, or decorative objects so they naturally block the line of sight to the wires. This works especially well in living rooms where the viewing angle is from a distance.
Step-by-Step: Hide Your TV Cords Without Drilling
Follow this sequence to implement a clean, no-drill cord solution in under an hour.
- Unplug and label all cords: Disconnect power, HDMI, optical audio, and Ethernet. Label each with tape to avoid confusion during reassembly.
- Plan the cable route: Decide whether to go straight down, angle toward furniture, or follow baseboard lines. Measure the distance.
- Choose your concealment method: Select adhesive raceway, cord clips, or furniture routing based on your setup and wall type.
- Prepare the wall surface: Clean thoroughly with rubbing alcohol to ensure adhesive bonds properly.
- Install the raceway or clips: Press adhesive products firmly for 30 seconds at each attachment point. Allow 1 hour to cure before loading.
- Thread the cords: Feed cables through the channel or clip system, grouping by function (e.g., power together, signal cables together).
- Secure at endpoints: Use a cable organizer box near the outlet or entertainment center to contain excess length and plugs.
- Test and adjust: Plug everything back in, turn on the TV, and verify all devices work. Tidy any slack with Velcro straps.
Comparison Table: No-Drill Cord Management Options
| Solution | Installation Time | Removability | Visibility | Best For |
|---|---|---|---|---|
| Adhesive Raceway | 20–30 min | High (no residue) | Low (if painted to match) | Long vertical runs |
| Nano-Suction Cord Strip | 10–15 min | Very High | Very Low | Renters, smooth walls |
| Baseboard Routing | 15–25 min | Medium (may loosen trim) | Low (hidden behind molding) | Homes with removable trim |
| Furniture Concealment | 10 min | Complete | Medium (depends on layout) | TVs above consoles |
| Decorative Camouflage | 5–10 min | Full | High (relies on positioning) | Minimalist setups |
Real Example: Sarah’s Rental Living Room Makeover
Sarah rented a downtown apartment with beautiful crown molding but strict no-modification rules. She mounted her 55-inch TV above a non-anchored console but hated the exposed black cords.
She used a white adhesive raceway from the TV down to the baseboard, then ran flat HDMI cables behind the molding to the back of her soundbar and streaming box. Power cords were grouped into a fabric cable sleeve and clipped behind the entertainment unit using removable adhesive hooks.
To finish, she placed a tall potted plant in the corner near the outlet, subtly blocking the final stretch. Her landlord never noticed any changes, and guests assumed the installation was professionally done.
Common Mistakes to Avoid
Even with no-drill methods, poor execution can lead to visible cords, peeling paint, or tripping hazards.
- Overloading adhesive strips: Exceeding weight limits causes strips to detach over time. Use multiple anchors for heavy bundles.
- Ignoring heat buildup: Bundling too many power cables tightly can trap heat. Leave slight gaps or use ventilated raceways.
- Using the wrong cable type: Thick, stiff cords won’t fit neatly in slim channels. Opt for flat or braided variants.
- Skipping wall prep: Dust or grease prevents adhesives from bonding. Always clean with isopropyl alcohol before applying.
- Routing near foot traffic: Cords along baseboards should be secured to avoid tangling or tripping, especially in high-traffic areas.
FAQ: No-Drill TV Cord Management
Can I paint adhesive cable covers to match my wall?
Yes, most plastic raceways accept latex paint. Lightly sand the surface, apply primer, then paint with a small brush. Allow 24 hours to dry before installing.
Will removing adhesive strips damage my paint?
High-quality strips (like 3M Command™) are designed to release cleanly when pulled correctly—slowly and straight down. Test on a small area first if you have freshly painted or delicate walls.
What if my cords are too long?
Use adjustable Velcro cable ties or magnetic wraps to coil excess neatly behind the TV or inside a cable management box. Avoid tight knots that can degrade wire insulation over time.
Final Checklist: Get It Right the First Time
- ✅ Unplugged all devices and labeled cords
- ✅ Measured and planned the optimal cable path
- ✅ Chose a no-drill method suited to your wall and layout
- ✅ Cleaned wall surface with alcohol wipe
- ✅ Installed adhesive products with proper pressure and spacing
- ✅ Threaded cords neatly and secured endpoints
- ✅ Tested all connections and tidied slack
- ✅ Verified aesthetics from common viewing angles
Conclusion: A Clean Look Without Compromising Your Walls
Hiding cords for a floating TV doesn’t require invasive work or specialized tools. With thoughtful planning and the right adhesive-based products, you can achieve a seamless, built-in appearance that enhances your room’s design. Whether you’re in a rental, preserving historic finishes, or simply avoiding drywall dust, these no-drill solutions offer flexibility, reversibility, and lasting results.
The effort pays off every time you glance at your TV and see only the screen—not the tangled web behind it. Take the time today to organize your cords the smart way. Your space will look sharper, safer, and more intentional.


 浙公网安备
33010002000092号
浙公网安备
33010002000092号 浙B2-20120091-4
Comments
No comments yet. Why don't you start the discussion?