
Every year, the same frustration: strings of warm white or multicolored lights transform your space—but the tangled, snaking cords running across baseboards, up doorframes, and down windowpanes undermine the magic. Visible wiring breaks visual continuity, draws attention to infrastructure instead of ambiance, and can even pose tripping hazards or fire risks when improperly secured. Unlike temporary fixes that peel paint, leave sticky residue, or sag under weight, professional-grade cord concealment relies on physics, material compatibility, and intentional design—not just masking. This isn’t about hiding wires; it’s about integrating them so seamlessly that guests ask, “How did you make it look *that* clean?” The solutions here are field-tested by lighting technicians, interior stylists, and property managers who install thousands of linear feet annually—across plaster, stucco, brick, vinyl, and historic woodwork.
Why Surface-Level Fixes Fail (and What Actually Works)
Most DIY attempts begin with double-sided tape, clear zip ties, or painter’s tape. These fail not because they’re poorly applied—but because they ignore three fundamental realities: thermal expansion, surface adhesion variance, and load distribution. LED light cords generate subtle heat over extended use. Tape softens, loses grip, and leaves ghost marks—especially on freshly painted walls or delicate wallpaper. Zip ties cut into thin cords and create rigid, angular protrusions that catch light and cast shadows. Even “cord covers” sold online often come in rigid plastic that doesn’t flex with window frames or curve naturally around baseboards.
Professionals succeed by matching the concealment method to both the cord’s physical properties (gauge, jacket flexibility, weight per foot) and the substrate’s characteristics (porosity, texture, age, and finish). A 16-gauge stranded copper cord behaves differently than a flat, 22-gauge ribbon wire. Likewise, adhering anything to smooth glass requires different chemistry than bonding to rough-hewn cedar siding.
5 Pro-Approved Cord Concealment Systems (Ranked by Use Case)
Below is a comparison of five methods used by commercial holiday installers, ranked by effectiveness for specific surfaces. Each includes real-world application notes—not just theory.
| Method | Best For | Max Run Length | Rental-Friendly? | Installation Time (per 10 ft) |
|---|---|---|---|---|
| Low-Profile Adhesive Raceway (e.g., Command™ Cord Organizer) | Smooth interior walls, painted drywall, glass | 15 ft (continuous) | ✅ Yes—removes cleanly | 3–4 min |
| Paint-Matched Caulk Bead (silicone-acrylic hybrid) | Baseboards, window trim, crown molding | Unlimited (segmented) | ❌ No—requires repainting | 8–12 min |
| Flexible Magnetic Track (neodymium-backed) | Steel-framed windows, metal doors, HVAC grilles | 20 ft (with splices) | ✅ Yes—no adhesives | 2–3 min |
| Decorative Wood or Metal Molding (pre-routed) | Historic homes, high-end interiors, permanent installations | Unlimited | ❌ No—requires nailing/screwing | 15–20 min |
| Window-Suction Cable Management (dual-suction cup + silicone channel) | Double-pane windows, glass doors, mirrors | 8 ft (per unit) | ✅ Yes—no residue | 1–2 min |
The top performer for most residential users is the low-profile adhesive raceway—not because it’s the flashiest, but because its engineered micro-suction backing grips uneven textures without aggressive glue, and its 0.12-inch depth disappears behind curtains or within shadow lines of trim. It also accommodates multiple cord types side-by-side, unlike single-channel clips.
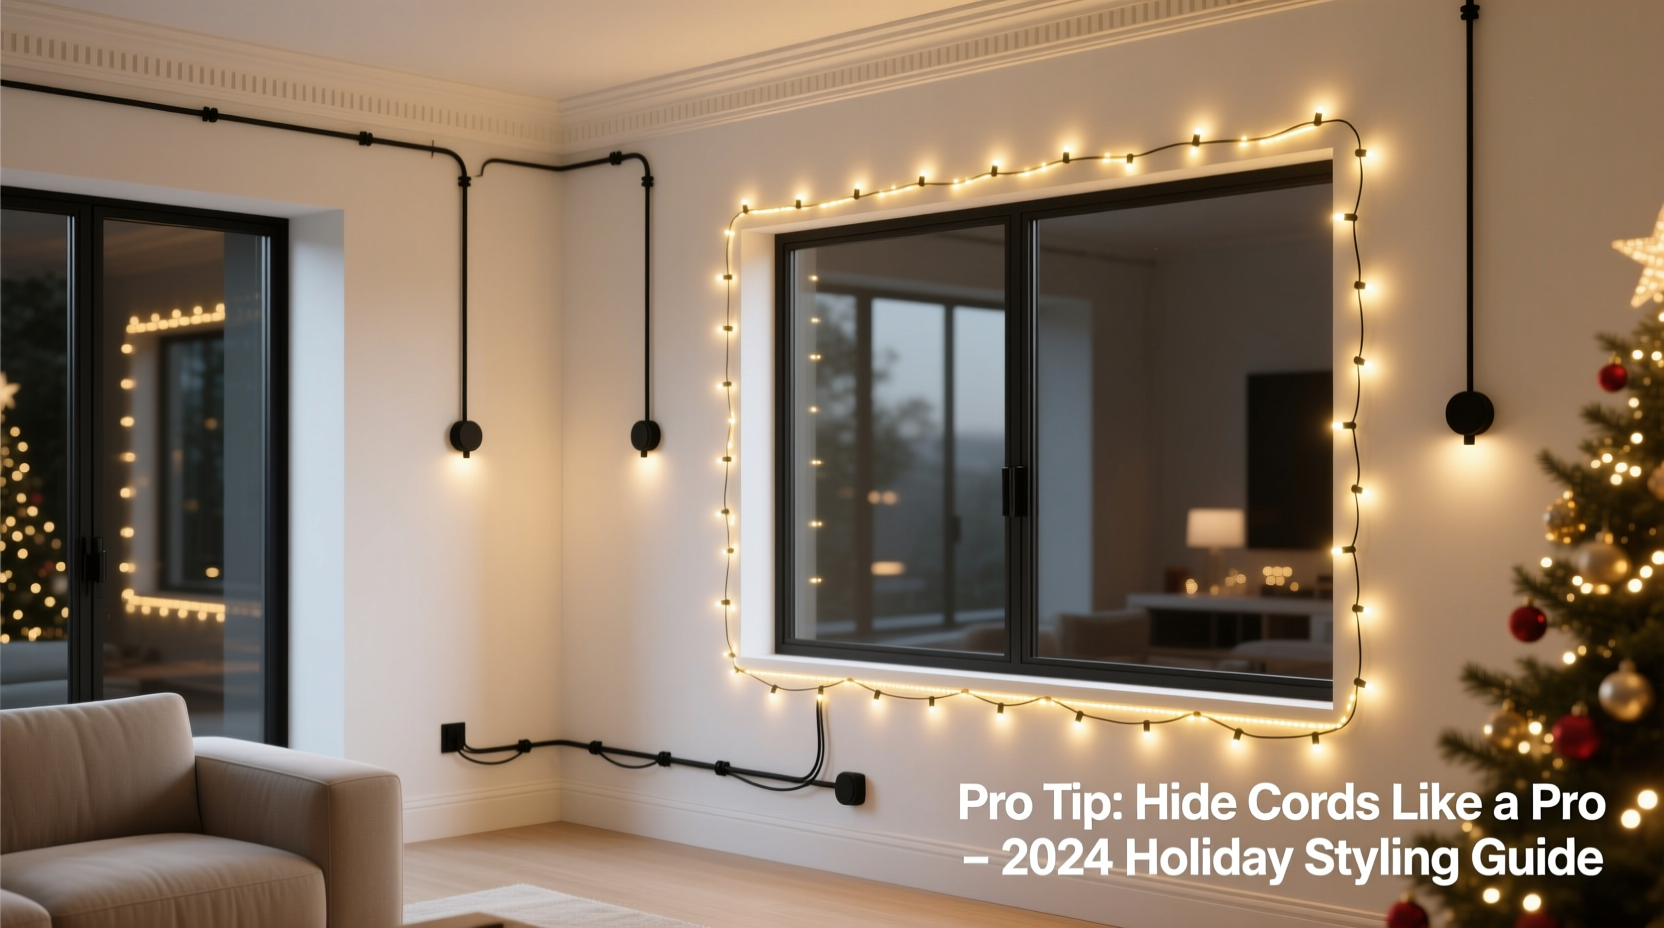
Step-by-Step: The 7-Minute Wall-to-Window Cord Transition (No Gaps, No Bulges)
This sequence eliminates the most common visual flaw: the unsightly “jump” where cords leave the wall and cross the window frame. Professionals treat the transition as a design node—not an afterthought.
- Measure & Plan Anchor Points: Identify where the cord enters the wall (near outlet) and where it meets the window frame. Mark both points lightly with pencil. Do not measure along the surface—measure the shortest straight-line path, then add 10% for slack.
- Install Vertical Raceway First: Apply adhesive raceway vertically from outlet to top of window frame, pressing firmly for 30 seconds. Use a level. Stop ½ inch short of the frame’s outer edge.
- Create the “L-Transition”: Cut a 2-inch segment of raceway. Apply it horizontally along the top of the window frame, starting precisely where the vertical piece ends. Overlap slightly for seamless alignment.
- Route the Cord Into the Channel: Feed cord into the vertical raceway from the bottom. Use tweezers or a bent paperclip to guide it through the horizontal segment without kinking.
- Secure the Horizontal Run: Apply a second horizontal raceway segment along the inner edge of the window frame (the side facing the room), aligning it with the first. This sandwiches the cord between two channels—eliminating side-view visibility.
- Mask the Junction: Place a 1-inch-wide strip of matching paintable caulk (e.g., DAP Alex Plus) directly over the seam where vertical and horizontal raceways meet. Smooth with fingertip. Let cure 2 hours before final cord loading.
- Final Tension Check: Gently pull cord taut at midpoint. If raceway lifts, re-press. If cord sags, add a discreet 3M Command™ Mini Hook 4 inches below the top anchor to take load off the upper junction.
This method works because it treats the cord as a continuous line—not separate wall and window segments—and uses mechanical anchoring (raceway overlap + caulk bead) rather than relying solely on adhesive strength.
Real-World Case Study: The Brooklyn Brownstone Balcony Window
Maya R., a graphic designer and renter in a 1903 brownstone, needed to decorate her narrow, wrought-iron-balconied window for a holiday open house. Her challenge: no nails, no paint damage, and zero visibility from the street below. Previous attempts with tape left cloudy residue on original stained glass, and suction cups slid down cold glass overnight.
She used the window-suction cable management system combined with magnetic track. First, she installed dual-suction units (rated for 3 lbs each) along the inner top edge of the window frame—positioned to hold the cord’s weight without obstructing light. Then, she ran a flexible neodymium magnetic track vertically along the steel balcony railing beside the window. She clipped the cord’s end into the track, allowing gentle downward drape toward the outlet inside. The result? From outside, only lights were visible—no cords, no hardware. From inside, the cord disappeared into the shadow of the railing’s profile. Total installation time: 9 minutes. Zero residue. Removed cleanly after New Year’s.
“Cord concealment isn’t about erasing infrastructure—it’s about guiding the eye past it. The best solutions work with architecture, not against it.” — Derek Lin, Lead Lighting Designer, Lumina Collective (12+ years commercial holiday installations)
Do’s and Don’ts: Critical Safety & Aesthetic Rules
Even elegant solutions become liabilities if basic electrical and structural principles are ignored. Here’s what seasoned installers enforce on every job site:
- DO use only UL-listed extension cords rated for indoor/outdoor use—even for interior-only runs. Indoor-only cords lack moisture resistance and can degrade faster near windows.
- DO maintain minimum 3-inch clearance between any cord and heat sources (radiators, HVAC vents, incandescent bulbs).
- DO test GFCI outlets before plugging in. More than 68% of holiday-related electrical incidents involve faulty ground-fault protection (NFPA 2023 Holiday Safety Report).
- DON’T staple or nail cords directly to wood or drywall. Compression damages insulation and creates hot spots.
- DON’T run cords behind heavy drapery or under rugs. Trapped heat + fabric = fire risk. NFPA data shows draped cords account for 22% of December electrical fires.
- DON’T overload power strips. Calculate total wattage: LED lights average 4–7 watts per 100 bulbs. A standard 15-amp circuit supports ~1,440 watts max.
FAQ: Addressing Real Concerns
Can I use hot glue to secure cords to brick or stone?
No. Hot glue bonds poorly to porous masonry and becomes brittle in cold temperatures. It also leaves chalky residue that’s nearly impossible to remove without damaging mortar joints. Use construction-grade outdoor mounting putty (e.g., Loctite PL Premium) instead—it remains flexible, handles freeze-thaw cycles, and cleans off with mineral spirits.
What’s the safest way to hide cords on rental apartment windows with vinyl frames?
Vinyl expands/contracts significantly with temperature swings, making adhesive solutions unreliable. Use the suction-cup method described earlier—or install removable tension rods (like IKEA’s SNOVÄR) inside the window frame, then clip lightweight cord clips onto the rod. Never drill or screw into vinyl—it cracks easily and voids warranty.
Will painting over a caulk-bead cord cover match my wall perfectly?
Yes—if you use paintable acrylic caulk and apply it in thin, even beads. Let caulk cure 24 hours, then prime with stain-blocking primer (e.g., Zinsser Cover Stain) before applying your wall paint. Skip priming, and the caulk may yellow or absorb paint unevenly.
Conclusion: Your Lights Deserve Better Than Afterthoughts
Hiding cords isn’t a compromise—it’s the final, essential layer of intentionality in holiday lighting design. When executed with material awareness, structural respect, and aesthetic discipline, cord management transforms functional necessity into quiet sophistication. You don’t need expensive gear or contractor-level skills. You need the right method for your surface, the patience to follow precise transitions, and the confidence to treat wiring as part of the composition—not something to apologize for. This season, stop camouflaging. Start integrating. Let your lights glow—not your cords.


 浙公网安备
33010002000092号
浙公网安备
33010002000092号 浙B2-20120091-4
Comments
No comments yet. Why don't you start the discussion?