
A cluttered desk undermines both productivity and aesthetics. Among the most persistent offenders are tangled cords—power cables, USB lines, monitor connectors, and headphone wires that snake across surfaces and pool beneath desks. While temporary fixes like twist ties or tape may help in the short term, they often fail to deliver lasting results. Achieving a clean, minimalist workspace requires permanent, thoughtful cord management. This guide outlines proven strategies to hide cords effectively, maintain organization over time, and elevate the functionality of your desk setup.
Why Permanent Cord Management Matters
Disorganized cables do more than look unsightly—they pose tripping hazards, increase dust accumulation, and make troubleshooting difficult when devices malfunction. A well-managed cable system improves airflow around electronics, reduces wear and tear on connectors, and makes it easier to upgrade or replace components. Most importantly, a clean desk contributes to mental clarity. Studies in environmental psychology suggest that visual clutter increases cognitive load, making focus harder to sustain.
“Cable management isn’t just about appearance—it’s a core component of ergonomic design and long-term workspace efficiency.” — Jordan Lee, Industrial Designer & Workspace Consultant
Permanent solutions go beyond bundling cords with zip ties. They involve integrating cable routing into the physical structure of your desk, using dedicated channels, anchors, and access points that keep wires out of sight and out of mind.
Step-by-Step: Creating a Permanent Cord-Hiding System
Transforming a chaotic desk into a streamlined workstation involves careful planning and execution. Follow this timeline to implement a durable, invisible cord system.
- Assess Your Cable Load: List all devices (monitor, laptop, keyboard, speakers, lamp, etc.) and their power and data requirements. Note which cables are essential and which can be eliminated through wireless alternatives.
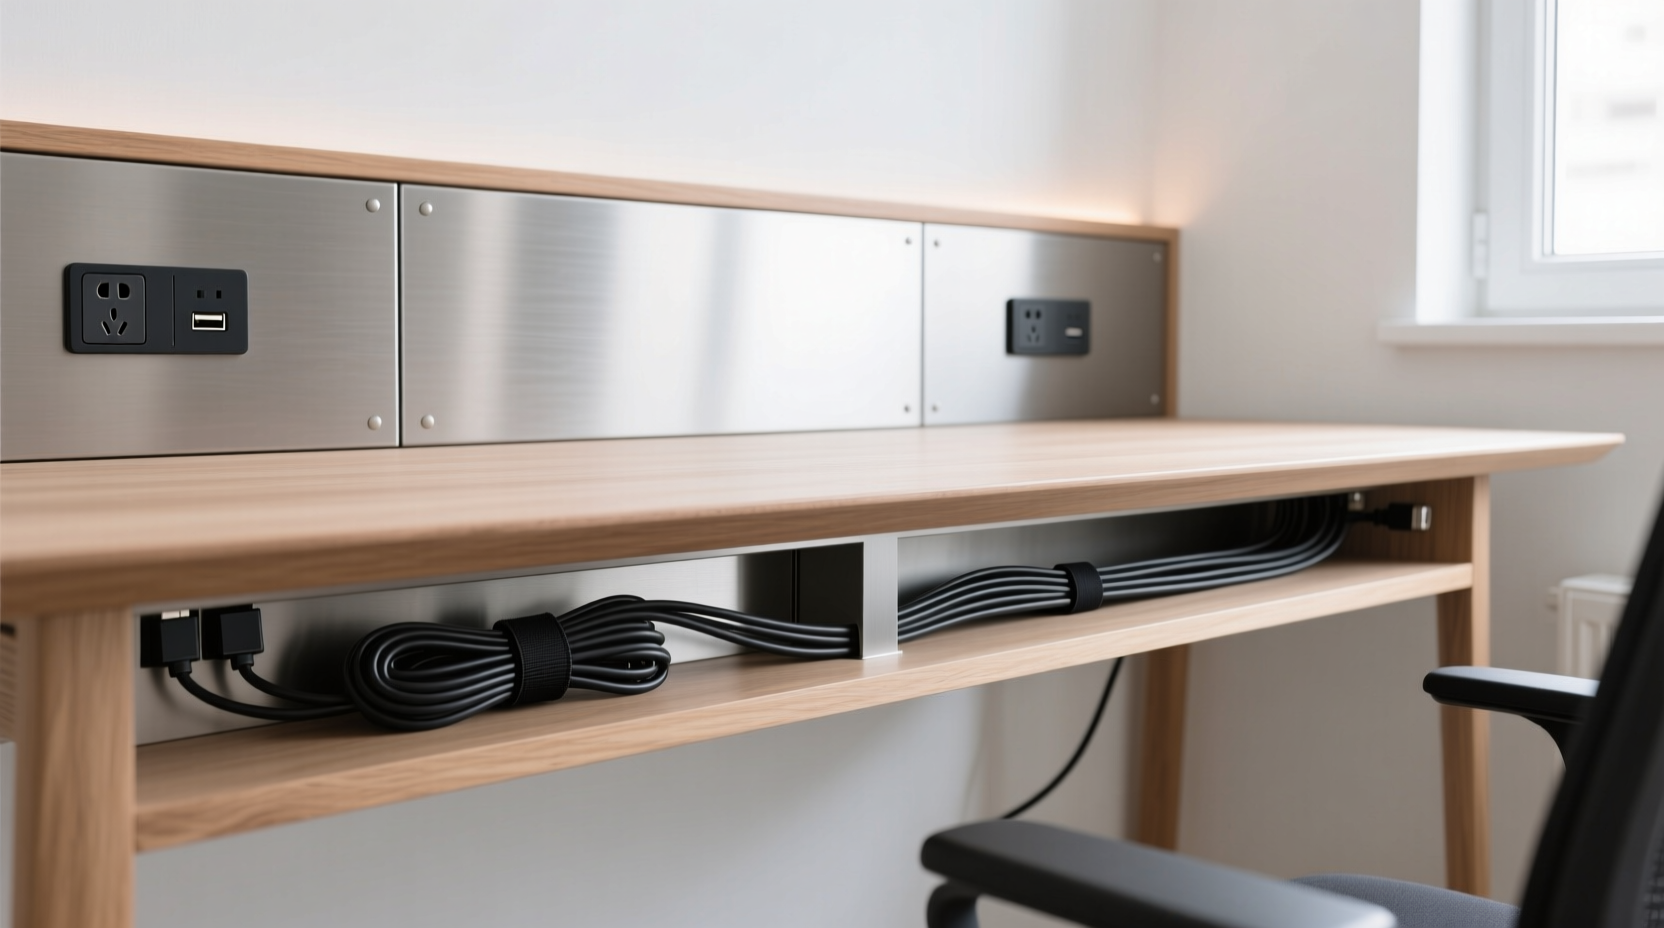
- Choose the Right Desk: If you’re purchasing new furniture, opt for models with built-in cable management features such as grommet holes, internal raceways, or rear panels with cutouts.
- Plan Your Routing Path: Decide whether cables will run underneath, behind, or inside the desk. Map where each wire will travel from device to outlet or power strip.
- Install Conduits and Channels: Use adhesive-backed cable raceways along the back or underside of the desk to conceal multiple wires in a single enclosed track.
- Anchor Cables Securely: Use Velcro straps, mounting clips, or under-desk trays to prevent strain and movement over time.
- Conceal Power Strips: Mount a power strip underneath the desk or inside a closed compartment to centralize connections without exposing bulky units.
- Label and Test: Label each cable at both ends for future identification. Plug everything back in and verify all devices function correctly.
Effective Tools and Materials for Long-Term Results
Not all cord organizers are created equal. Temporary solutions like rubber bands or masking tape degrade quickly and can damage insulation. For permanent results, invest in durable, reusable materials designed for continuous use.
| Tool | Best For | Lifespan | Installation Effort |
|---|---|---|---|
| Cable Raceway Kit | Running multiple wires along desk legs or walls | 5+ years | Moderate (adhesive/screws) |
| Velcro Cable Ties | Bundling similar-length cords | 3–5 years | Low (reusable) |
| Under-Desk Cable Tray | Holding power strips and excess wire length | 4+ years | Moderate (mounting required) |
| Grommet Hole Cover with Port | Routing cables through desktop neatly | 5+ years | High (requires drilling) |
| Magnetic Cable Clips | Securing short runs on metal desks | 2–3 years | Low (no tools) |
Raceway kits—plastic channels that snap shut after wires are inserted—are especially effective for baseboard or vertical routing. Choose paintable white or neutral gray versions to blend with walls or furniture. For desks made of wood or composite materials, drill a grommet hole near the back edge to feed cables downward into a raceway mounted on the leg or frame.
Real-World Example: Transforming a Home Office Setup
Consider Mark, a freelance graphic designer working from a small bedroom converted into an office. His original setup included a dual-monitor rig, mechanical keyboard, external hard drives, laptop dock, lamp, and Wi-Fi router—all connected with overlapping cords that draped over the desk edge and tangled under the table. Daily frustration grew as unplugging one device pulled others loose.
He implemented a permanent solution in four phases:
- Replaced his basic desk with a sit-stand model featuring pre-drilled grommet holes and an integrated rear cable channel.
- Mounted a 6-outlet surge protector underneath the desk using anti-vibration brackets.
- Installed a 4-foot adhesive raceway down the back leg, connecting it to a wall-mounted conduit leading to the nearest outlet.
- Used labeled Velcro straps every 8 inches to group HDMI, USB-C, and power cables by destination.
The result? A completely hidden wiring system that survived daily height adjustments, allowed easy access for maintenance, and gave his clients confidence during video calls. “It feels like a studio now, not a dorm room,” he said. “And I haven’t had a single cable issue in eight months.”
Do’s and Don’ts of Permanent Cord Hiding
To ensure your system remains functional and safe over time, follow these best practices.
| Do | Don't |
|---|---|
| Use modular power strips with right-angle plugs to save space | Overload a single power strip beyond its rated capacity |
| Leave service loops (coiled extra length) under the desk for mobility | Stretch cables tight between devices and outlets |
| Secure heavy bundles every 12 inches to prevent sagging | Use duct tape or staples to fasten cords to surfaces |
| Label each cable with printable tags or colored rings | Ignore heat buildup around bundled power adapters |
| Route data and power cables separately if possible to reduce interference | Bury cables under carpets or pinch them in furniture joints |
Advanced Options for Custom Setups
For users building high-end workstations or media centers, consider upgrading to in-wall or built-in solutions. These require more effort but offer seamless integration.
- In-Floor Conduits: In home offices with raised flooring or accessible subfloors, install PVC conduits from desk location to electrical panel. Wires disappear entirely from view.
- Desktop Grommet Ports: Replace standard grommet holes with multi-port inserts that include USB charging, Ethernet, and AC outlets flush with the desktop surface.
- Suspended Cable Trays: For standing desks or rooms with ceiling access, suspend low-profile trays from above to carry all cables vertically down to the desk.
- Smart Power Management: Use remotely controllable power strips to turn off peripherals automatically, reducing cable dependency through scheduled shutdowns.
These methods are commonly used in professional studios and executive offices where appearance and reliability are non-negotiable. While installation may require an electrician or carpenter, the payoff is a truly minimalist, future-proof workspace.
Frequently Asked Questions
Can I hide cords without drilling or modifying my desk?
Yes. Use adhesive-backed cable raceways, under-desk trays, and fabric cable sleeves to organize wires without permanent changes. Magnetic clips work well on steel-framed desks. However, these are semi-permanent—best for renters or temporary setups.
How do I prevent cords from becoming messy again?
Establish a routine: unplug only what’s necessary, return cables to designated paths after use, and avoid daisy-chaining too many devices. Use a cable management checklist (below) during monthly cleanups to stay consistent.
Are wireless solutions better for reducing cord clutter?
Wireless tech helps, but doesn’t eliminate cords. Keyboards, mice, and headphones can go Bluetooth, but monitors, docking stations, and high-power devices still need wired connections. Think of wireless as a supplement—not a replacement—for smart cable management.
Essential Cord Management Checklist
Use this checklist to ensure your setup is clean, safe, and sustainable.
- ✅ Inventory all devices and their cables
- ✅ Remove any unused or redundant cords
- ✅ Upgrade to shorter or right-angle cables where possible
- ✅ Install a cable raceway or under-desk tray
- ✅ Mount power strip securely out of sight
- ✅ Route all cables through designated channels
- ✅ Bundle cords by destination using Velcro ties
- ✅ Label each cable at both ends
- ✅ Test all connections post-installation
- ✅ Schedule quarterly inspections for wear or looseness
Conclusion: Build a Workspace That Works for You
A clean desk is not the result of occasional tidying—it’s the product of intentional design. By treating cable management as a structural element of your workspace, not an afterthought, you create a foundation for lasting order and efficiency. The methods outlined here go beyond quick fixes, offering real permanence through smart planning, quality materials, and disciplined execution.


 浙公网安备
33010002000092号
浙公网安备
33010002000092号 浙B2-20120091-4
Comments
No comments yet. Why don't you start the discussion?