
A cluttered entertainment center can disrupt the harmony of an otherwise well-designed living space. Exposed power strips, tangled HDMI cables, and dangling charging cords not only look unsightly but can also pose safety hazards. Many people assume that achieving a clean setup requires permanent modifications like wall drilling or built-in cabinetry. However, it’s entirely possible—and surprisingly effective—to manage your cords neatly without making a single hole in your wall. Whether you're renting, want to avoid damaging drywall, or simply prefer non-invasive solutions, this guide delivers practical, proven methods to conceal cords safely and stylishly.
Why Cord Management Matters Beyond Aesthetics
Beyond improving visual appeal, proper cord organization enhances functionality and safety. Loose cables increase tripping risks, attract dust, and make device troubleshooting more difficult. According to the U.S. Consumer Product Safety Commission, over 4,000 injuries annually are linked to electrical cords in homes—many due to poor placement or entanglement. A tidy setup also improves airflow around electronics, reducing overheating risks and extending device lifespan.
For renters, maintaining a pristine wall surface is essential to avoid deposit deductions. Even homeowners may hesitate to drill into newly painted walls or behind expensive furniture. The good news is that modern cord management tools and clever techniques offer reliable alternatives to invasive installation.
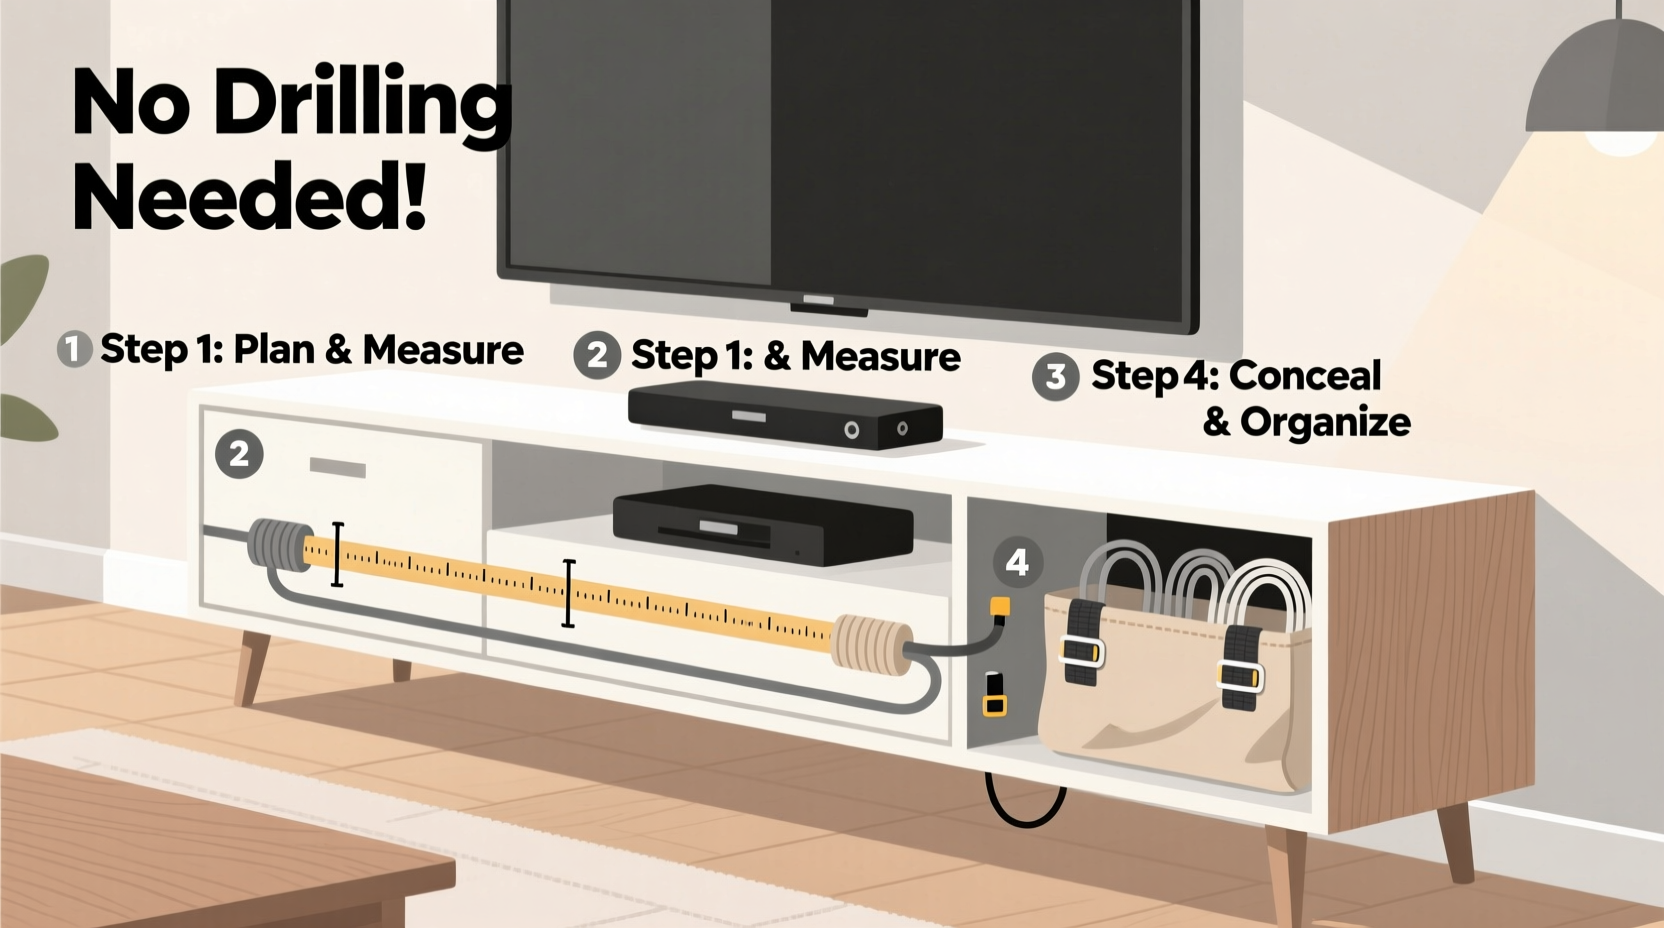
Step-by-Step Guide: Non-Drilling Cord Concealment
Follow this logical sequence to achieve a streamlined entertainment center with no drilling required.
- Unplug and assess all devices. Start by turning off and unplugging every component—TV, soundbar, gaming console, streaming box, etc. Lay them out so you can see exactly how many cords you’re dealing with.
- Group cords by function. Separate power cables from data cables (HDMI, optical audio, Ethernet). This makes bundling easier and prevents interference.
- Use adhesive-backed cable clips. These plastic or fabric-covered clips stick firmly to the back of furniture using strong double-sided tape. Run cords through them vertically to keep everything aligned.
- Bundle with reusable ties. Velcro straps or braided fabric sleeves allow you to group similar-length cords together without damaging insulation. Avoid zip ties—they’re hard to adjust and can cut into wires over time.
- Route along existing edges. Most entertainment centers have rear grooves, raised backs, or base molding. Use these natural pathways to guide cords downward toward the floor or outlet strip.
- Hide excess length. Coil extra cable and secure it with a twist tie or velcro loop. Store coils behind components or inside hollow legs if available.
- Use a cord concealer raceway. Adhesive-mounted raceways attach directly to the back panel of your entertainment unit and enclose multiple cords in a sleek channel that blends with your decor.
- Anchor power strips discreetly. Attach your surge protector to the underside of a shelf or side panel using heavy-duty adhesive mounting squares. This keeps it stable and out of sight.
Top 5 Damage-Free Tools for Cord Management
Not all cord organizers require screws or nails. These five tools are designed specifically for temporary, residue-free use:
- Adhesive Cable Clips: Small, low-profile clips that hold individual cords in place. Best for lightweight cables like phone chargers or USB hubs.
- Velcro Cable Ties: Reusable, adjustable, and gentle on insulation. Ideal for grouping HDMI or speaker wires.
- Fabric Cord Covers: Soft, pliable sleeves that bundle multiple cords into one neat tube. Available in neutral colors to match wood or paint finishes.
- Mounting Putty: Removable adhesive putty (like museum gel) can temporarily anchor short cords or small power bricks to the back of furniture.
- Over-the-Edge Cord Raceways: These sit on top of the entertainment center’s back panel and drop down the rear, enclosing cords from view while allowing easy access.
“With today’s adhesive technologies, you can achieve professional-level cord management without ever touching a drill.” — Jordan Lee, Home Automation Specialist
Do’s and Don’ts of No-Drill Cord Hiding
| Do | Don’t |
|---|---|
| Use high-quality adhesive products rated for weight and temperature changes | Apply adhesives to dusty or greasy surfaces—clean first with alcohol wipe |
| Leave slack in cords to prevent strain on connectors | Pull cables too tight—they can disconnect or fray over time |
| Check manufacturer guidelines for maximum load on adhesive mounts | Stack heavy components directly on top of bundled cords |
| Test removal method before full installation (e.g., floss for putty) | Use duct tape or masking tape as a long-term solution—it leaves residue |
| Choose raceways with split designs for easy future access | Cover ventilation slots on electronics with cord bundles—this causes overheating |
Real Example: Transforming a Renter-Friendly Living Room
Sophia, a graphic designer living in a downtown apartment, struggled with a chaotic entertainment center. Her TV, Apple TV, soundbar, and Nintendo Switch generated eight separate cords, all spilling over the back edge. She couldn’t drill into the walls—her lease prohibited structural changes—and didn’t want to invest in custom furniture.
She started by labeling each cord with colored tape. Then she used clear adhesive cable clips along the vertical edges of her media console, routing power and signal cables separately. For the main cluster, she chose a beige fabric cord sleeve that matched her rug. She mounted a 6-outlet surge protector under the center shelf using adhesive mounting squares rated for 5 lbs—well above the strip’s weight.
To bridge the gap between the console and wall outlet, she installed an over-the-edge raceway that extended from the back of the cabinet to the floor. Inside, she routed all grouped cords, securing the raceway with foam-padded adhesive strips. The result? A clean, minimalist look that impressed guests and made tech updates effortless. When she moved out a year later, she removed everything without a trace.
Alternative Layouts for Different Furniture Types
The best cord strategy depends on your entertainment center’s design. Here’s how to adapt for common configurations:
Low-Profile Media Console (No Back Panel)
If your unit has an open back, focus on vertical alignment. Use dual-adhesive clips on the sides to run cords straight down. Place a floor-level cord cover (like a flat raceway) to hide the final stretch to the outlet. Keep power strips in a fabric bin tucked beside the unit for a soft, hidden look.
Tall Cabinet with Doors
Inside cabinets, use magnetic cable holders or adhesive hooks on the interior walls. Bundle cords leading to devices on different shelves and route them along the frame. Close doors will conceal everything, but ensure cords don’t get pinched during closure.
Floating Shelf Setup
Without a full console, use wall-mounted cord channels that adhere with industrial-strength adhesive. Run cords from the TV down the wall into a baseboard raceway. Alternatively, let cords fall behind decorative plant stands or tall vases positioned strategically.
Corner Entertainment Unit
Take advantage of the L-shape. Route power cables down one side and AV cables down the other to avoid cross-interference. Use corner-friendly raceways with flexible joints to maintain a seamless path.
Checklist: Quick Setup Without Drilling
Use this checklist to ensure a complete, safe installation:
- ☐ Unplug all devices and identify each cord
- ☐ Clean surfaces where adhesives will be applied
- ☐ Group cords by type (power, video, audio, data)
- ☐ Trim excess length or coil neatly with Velcro
- ☐ Attach adhesive clips or raceways to furniture (not wall)
- ☐ Secure power strip under shelf or behind unit
- ☐ Test all connections after reassembly
- ☐ Inspect monthly for wear, heat, or loosening
FAQ
Will adhesive products damage my furniture?
High-quality adhesive mounts (like 3M Command™ strips) are designed to release cleanly when pulled correctly. Always follow removal instructions—usually involving a slow, downward pull. Test on a small area first, especially with laminated or lacquered finishes.
Can I hide thick cables like HDMI in slim raceways?
Yes, but choose a raceway with internal width of at least 1.5 inches for multiple HDMI cables. Avoid sharp bends—HDMI cables perform best with gentle curves. If space is tight, consider using right-angle HDMI connectors to reduce protrusion.
How do I manage cords when the outlet is far from the entertainment center?
Use a low-profile extension cord with surge protection and run it through a flat cord cover that matches your flooring. Tape the cover temporarily with painter’s tape if needed, or weigh it down with a rug edge. Never run cords under high-traffic areas unless protected by a floor cord protector.
Final Thoughts: Simplicity Meets Smart Design
Hiding cords behind your entertainment center doesn’t require construction skills or permanent alterations. With thoughtful planning and the right tools, you can achieve a polished, clutter-free look that enhances both safety and style. The key is working with what you have—using furniture contours, smart adhesives, and modular organizers to guide cords out of sight. These methods are ideal for renters, frequent movers, or anyone who values flexibility and simplicity.
Technology will continue to evolve, but tangled cords don’t have to be a constant. By investing just an hour in organizing your setup, you gain lasting peace of mind and a cleaner living environment. Start today—your eyes (and your guests) will thank you.


 浙公网安备
33010002000092号
浙公网安备
33010002000092号 浙B2-20120091-4
Comments
No comments yet. Why don't you start the discussion?