
A sleek, modern living room can quickly lose its charm when tangled cords snake across the wall behind the TV stand. Exposed power cables, HDMI wires, audio connectors, and charging cords not only look messy but can also pose tripping hazards and collect dust. The good news is you don’t need professional help or expensive gear to fix this. With a few common household items and some creative thinking, you can conceal cords effectively and maintain a polished look. This guide walks through proven DIY methods that are accessible, affordable, and surprisingly effective.
Why Hiding Cords Matters Beyond Aesthetics
While visual appeal is the most obvious benefit of cord management, there are deeper advantages. Tangled wires are harder to troubleshoot when devices malfunction. A jumbled mess makes it difficult to identify which cable belongs to which device, slowing down repairs or replacements. Additionally, exposed cords are vulnerable to pets chewing them, accidental tugs, and dust buildup—all of which shorten their lifespan.
Properly managed cords also enhance safety. Loose cables near children or high-traffic areas increase the risk of falls. By organizing and concealing them, you reduce these risks significantly. Finally, a tidy entertainment center contributes to mental clarity. Clutter has been linked to stress and reduced focus—so managing cords isn’t just about appearance; it’s about creating a calmer, more functional space.
Essential Tools and Materials for DIY Cord Management
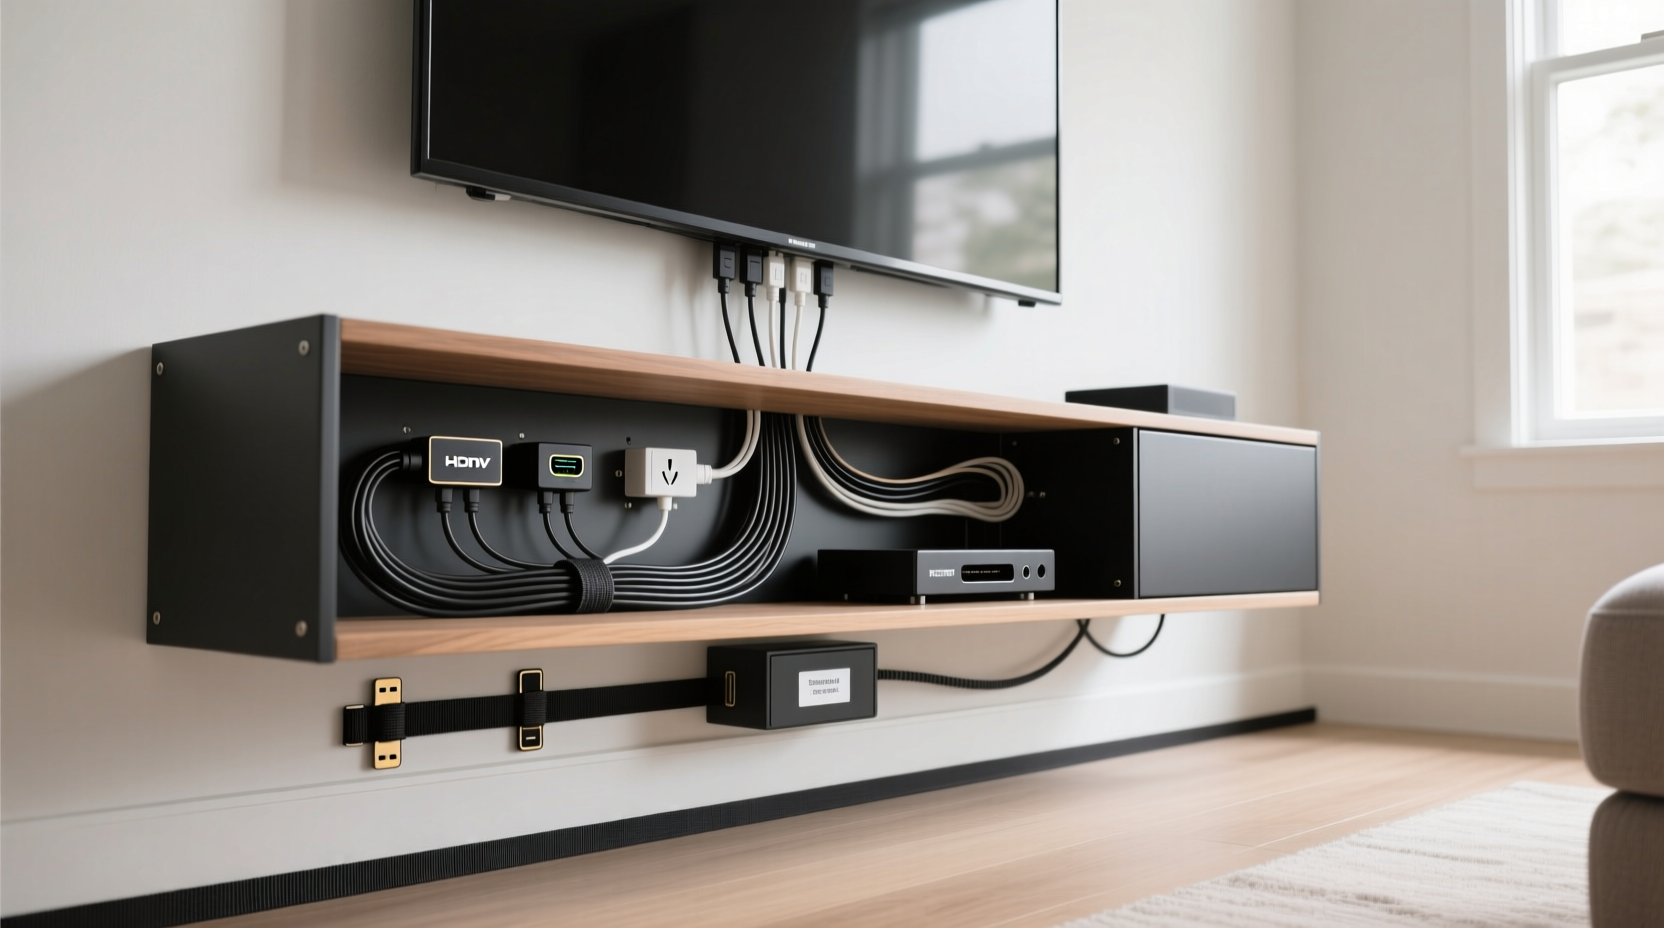
You don’t need specialized equipment to organize cords behind your TV stand. Most of what you’ll require can be found at home or purchased inexpensively at hardware or dollar stores. Here’s a checklist of useful supplies:
- Velcro straps or reusable zip ties
- Cable raceways (plastic channels that mount to walls)
- Fabric cord sleeves or braided cable wraps
- Adhesive hooks or clips
- Zip ties (nylon) – use sparingly as they’re not reusable
- Wall anchors and screws (for mounting)
- Measuring tape and scissors
- Cable labels or masking tape
- Double-sided tape or adhesive mounting pads
Having these on hand allows you to adapt to different setups—whether your TV stand is against a drywall, sits on carpet, or includes built-in shelving. Flexibility in materials means you can customize the solution to your space.
Step-by-Step Guide to Concealing Cords Behind Your TV Stand
Follow this logical sequence to achieve a clean, organized setup without damaging walls or furniture.
- Unplug all devices and lay out the cables. Start by turning off and disconnecting everything from the wall outlet. Pull the TV stand away from the wall if possible to access the back freely.
- Identify and label each cable. Use tape or labels to mark power cords, HDMI, optical audio, Ethernet, etc. This prevents confusion during reassembly.
- Group similar cables together. Bundle power cords separately from signal cables (like HDMI or coaxial). This reduces electromagnetic interference and simplifies future troubleshooting.
- Trim excess length if possible. Avoid coiling extra wire tightly. Instead, loosely loop and secure with Velcro to prevent kinks.
- Route cables along the back panel. Use adhesive clips or mounts to guide cords vertically down the back of the TV stand. Keep them centered to minimize visibility from the sides.
- Use a cable raceway for wall-mounted routing. If running cords to an outlet or media hub below or beside the stand, attach a low-profile raceway along the baseboard or wall.
- Reconnect and test all devices. Once hidden, plug everything back in and verify that all components function properly.
- Final inspection. Step back and view the setup from multiple angles. Adjust any visible sections and ensure nothing is stretched or pinched.
DIY Solutions That Actually Work
Not all homes have the same layout, so flexibility in approach is key. Below are five reliable DIY methods tailored to different needs and budgets.
1. Fabric Cord Sleeve with Adhesive Clips
This method combines aesthetics and functionality. Purchase a stretchable fabric sleeve (available in neutral colors) and feed all grouped cables through it. Secure the sleeve to the back of the TV stand using adhesive-backed clips spaced every 10–12 inches. The fabric blends into most backgrounds and hides multiple cords in one smooth line.
2. Baseboard Cable Raceway
If your outlet is located below the TV stand, run a plastic raceway along the baseboard. These come in paintable white or wood-tone finishes. Mount it with screws or strong adhesive, feed the cables inside, and close the cover. It keeps wires flush against the wall and out of sight.
3. PVC Pipe Hack for Floor Routing
For rooms where cords must cross the floor to reach an outlet behind furniture, use a short section of painted PVC pipe. Cut a slit along the length, insert the bundled cables, and paint the pipe to match your baseboard. Place it flat against the floor and secure with double-sided tape. It’s durable, discreet, and pet-safe.
4. Magazine Holder as a Vertical Organizer
Repurpose a metal or plastic magazine file by mounting it vertically on the back of the TV stand using heavy-duty tape or screws. Slide coiled cords into the slots to keep them separated and contained. This works especially well for gaming consoles, soundbars, and streaming devices with multiple connections.
5. Wall-to-Stand Bridge with Decorative Trim
For a permanent-looking solution, install a small wooden trim piece between the wall and the top rear edge of the TV stand. Route cables underneath it, securing them with discreet clips. Paint the trim to match the wall for a seamless look. This mimics built-in cabinetry design and completely hides vertical drops.
“Cable management isn’t about eliminating wires—it’s about controlling them intelligently. A well-organized system saves time, reduces stress, and protects your investment in electronics.” — Marcus Tran, Home Theater Installation Specialist
Do’s and Don’ts of Cord Hiding
| Do | Don’t |
|---|---|
| Use reusable fasteners like Velcro | Use permanent zip ties that can’t be removed easily |
| Leave slack for movement and servicing | Stretch cables tight across corners |
| Label all cables before hiding them | Assume you’ll remember which cord goes where |
| Check for heat buildup around bundled cords | Bundle too many power cables tightly together |
| Paint raceways to match your wall color | Install bulky conduit that draws attention |
Real-Life Example: Transforming a Cluttered Entertainment Nook
Sarah, a remote worker in Portland, struggled with a chaotic TV setup in her open-plan living room. Her husband’s gaming console, a soundbar, Roku, and laptop charger all fed into a single power strip behind a narrow stand. Wires spilled onto the floor, and guests often commented on the mess.
She spent $18 on a fabric cord sleeve, adhesive clips, and Velcro straps. After labeling each cable, she grouped power cords and AV cables separately, ran them through the sleeve, and mounted clips down the center-back of the stand. She extended the bundle into a beige raceway along the baseboard, leading to an outlet under the window.
The result? A clean, streamlined look that matched her minimalist decor. More importantly, when her son accidentally knocked over the soundbar, she could unplug and repair it in seconds—thanks to clear labeling and easy access. Sarah now checks her cable setup quarterly and trims new tangles early.
FAQ: Common Questions About Hiding TV Cords
Can I hide cords without drilling holes in the wall?
Yes. Adhesive-backed raceways, fabric sleeves, and surface-mount clips require no drilling. For heavier setups, consider removable mounting tapes designed for semi-permanent installations. These hold securely but won’t damage paint when removed.
What’s the safest way to bundle multiple power cables?
Loosely group them with Velcro straps, leaving space between cords to prevent overheating. Avoid wrapping tightly or enclosing them in non-breathable tubing. Never bundle power cables with data cables (like HDMI or Ethernet) for long stretches, as this can cause interference.
How do I hide cords if my TV stand doesn’t sit against the wall?
If the stand is recessed or floating, use a decorative basket or bin behind it to house a power strip and coiled excess. Run cables through a soft fabric sleeve from the TV to the bin. Alternatively, place a small side table nearby to act as a concealed hub.
Final Checklist Before You Finish
- All cables are labeled clearly
- Bundles are secured with reusable fasteners
- No cables are stretched or pinched
- Heat-generating devices have ventilation
- Raceways or sleeves are mounted flush and level
- Power strip is accessible and not overloaded
- Setup looks clean from seated viewing positions
Conclusion: A Cleaner Space Starts with One Simple Fix
Hiding cords behind your TV stand isn’t a luxury—it’s a small act of care that elevates your entire living environment. With minimal effort and everyday materials, you can transform a chaotic corner into a model of organization. The benefits go beyond looks: improved safety, easier maintenance, and greater peace of mind. These DIY solutions prove you don’t need a renovation or expert installer to achieve a polished result. Start today with just a roll of Velcro and a few clips. In under an hour, you’ll enjoy a tidier, more intentional space.


 浙公网安备
33010002000092号
浙公网安备
33010002000092号 浙B2-20120091-4
Comments
No comments yet. Why don't you start the discussion?