
A cluttered entertainment center can ruin the sleek look of an otherwise well-designed living room. Behind the TV stand, tangled cords from power strips, gaming consoles, soundbars, and streaming devices often create a chaotic mess. While professional cable management kits exist, you don’t need specialized gear to solve this problem. With common household items already in your home, you can achieve a clean, organized setup that looks intentional and stays functional.
This guide walks through practical, low-cost methods to conceal and manage cords using only what you likely already own. From binder clips to toilet paper rolls, these solutions are accessible, effective, and easy to implement—without drilling holes or buying expensive accessories.
Why Cord Management Matters Beyond Aesthetics
Neat cord organization isn’t just about making your space look better—it’s also about safety, maintenance, and long-term usability. Loose cables can become tripping hazards, especially in homes with children or pets. Dust accumulates faster on exposed wires, which can reduce airflow around electronics and contribute to overheating over time.
Properly managed cords are easier to identify and access when troubleshooting. If your Wi-Fi cuts out or a device stops responding, being able to quickly unplug and reset without untangling a knot saves time and frustration.
“Good cable management is one of the most overlooked aspects of home electronics setup. It directly impacts both performance and longevity.” — Daniel Reeves, Home AV Technician with 12 years of experience
Everyday Household Items That Double as Cable Organizers
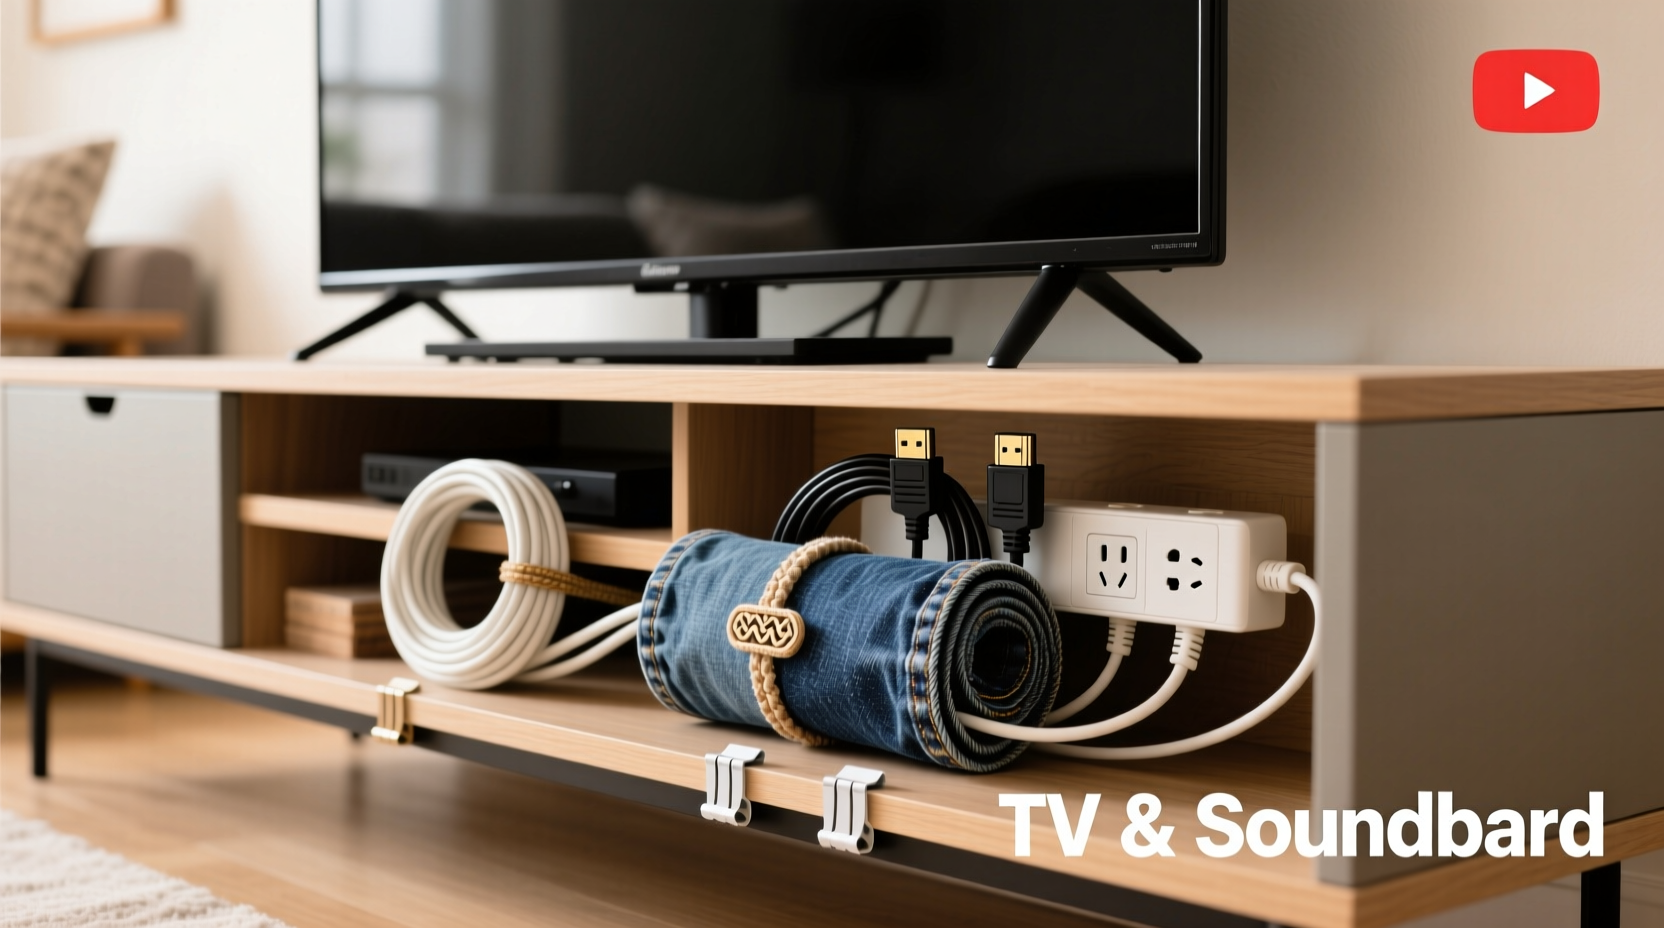
You don’t need to visit a hardware store to get started. Many ordinary objects serve as excellent cord-hiding tools. The key is repurposing them creatively while ensuring they don’t interfere with ventilation or create fire risks near electrical outlets.
| Household Item | How It Helps | Best For |
|---|---|---|
| Binder Clips | Clip cords to the back of the TV stand or wall edge | Grouping multiple cords together |
| Toilet Paper or Paper Towel Rolls | Bundle loose cords inside for concealment | Vertical cable runs behind stands |
| Velcro Straps (or Shoelaces) | Secure coiled cords at desired lengths | Preventing slack and tangles |
| Laundry Clips (Drying Rack Type) | Hang cords along baseboards or furniture edges | Temporary setups or rentals |
| Cereal Boxes or Cardboard Tubes | Create DIY cord channels or covers | Full back-panel coverage on a budget |
Step-by-Step Guide: Hide Cords Using Only What You Have at Home
Follow this timeline to transform a messy TV area into a streamlined, tidy zone in under 30 minutes.
- Unplug Everything Safely (5 minutes)
Turn off all devices and unplug them from the wall. Label each cord with masking tape and a pen if needed (e.g., “Soundbar,” “Xbox”). This prevents confusion during reassembly. - Sort and Group by Device (3 minutes)
Lay cords out flat and group those belonging to the same device. Keep power cords, HDMI, optical audio, and USB lines together. - Use Toilet Paper Rolls to Bundle Cords (7 minutes)
Slide each group of cords into separate toilet paper rolls. If the bundle is thick, use a paper towel roll cut down to size. Secure the ends with rubber bands or twist ties. This keeps cords contained and hides the mess behind the stand. - Anchor Cords with Binder Clips (5 minutes)
Flip large binder clips upside down and clip them to the back edge of the TV stand. Feed the bundled cords through the metal arms to hold them in place vertically. Space clips every 6–8 inches depending on cord weight. - Route Wires Along Baseboards with Laundry Clips (5 minutes)
If cords run along the wall to an outlet, use laundry drying rack clips to pin them gently to the baseboard. These clips open and close easily and won’t damage paint. - Reconnect and Test (5 minutes)
Plug everything back in and verify all devices work properly. Adjust positioning so no cord is stretched tight or bent sharply.
Real Example: Sarah’s Living Room Transformation
Sarah rented a small apartment with a floating TV stand mounted above a narrow console table. Her Roku, Nintendo Switch, and soundbar created a web of cords that dangled visibly, catching dust and drawing complaints from her roommate.
She had no budget for new organizers but found a shoebox, three binder clips, and two empty paper towel rolls in her closet. She cut the shoebox into a vertical channel, taped it to the wall behind the stand, and routed all cords inside. She used the paper towel roll to bundle the lower section leading to the power strip and secured it with a rubber band. Binder clips kept the upper segment aligned.
The result? A completely hidden wiring system that looked built-in. Her landlord didn’t allow wall modifications, but none were needed. The entire project took 20 minutes and cost nothing.
Do’s and Don’ts of DIY Cord Hiding
Even simple solutions can go wrong if basic safety principles are ignored. Use this checklist to avoid common pitfalls.
| Action | Status | Reason |
|---|---|---|
| Leave space between devices for airflow | ✅ Do | Prevents overheating |
| Cover cords with flammable materials like fabric | ❌ Don’t | Fire hazard near outlets |
| Use non-conductive materials (cardboard, plastic) | ✅ Do | Safer insulation alternative |
| Compress cords tightly in narrow spaces | ❌ Don’t | Can damage insulation over time |
| Check cords monthly for wear or heat | ✅ Do | Early detection prevents failures |
Alternative Uses for Common Items in Cable Management
Get more value from everyday objects by adapting them beyond their original purpose.
- Old Sweater Sleeves: Cut the sleeve off a wool or knit sweater and slide it over a cord cluster. It acts like a fabric sleeve, concealing wires while allowing flexibility.
- Paper Clips (Large): Straighten one end and use it to thread cords behind furniture like a needle. Great for guiding HDMI cables through tight gaps.
- Mailing Envelopes (Bubble Wrap Type): Attach flat to the back of the TV stand with tape and feed cords inside. The padded interior cushions wires and hides them from view.
- Shoelaces: Use as reusable zip ties. Wrap around grouped cords and tie in a bow. Easily adjustable and reusable.
“Improvisation is half the battle in home tech setups. I’ve seen clients use bread clips to label cords—simple, effective, and always available.” — Lena Patel, Smart Home Consultant
Checklist: Quick Setup for Neat Cords Tonight
Use this actionable list to complete a full cord cleanup before bedtime.
- Unplug all devices safely
- Label cords with tape or sticky notes
- Gather binder clips, cardboard tubes, and rubber bands
- Group cords by device
- Bundled with toilet paper rolls or sleeves
- Secure bundles to furniture or wall edges
- Route floor-level cords along baseboards
- Reconnect and test each device
- Store excess length in loose coils (not tight loops)
- Inspect for heat buildup after 30 minutes of use
Frequently Asked Questions
Can I use duct tape to secure cords?
While duct tape sticks well, it tends to leave a sticky residue and can degrade over time, especially in warmer environments. It may also pull off paint or finish when removed. Instead, use painter’s tape or reusable Velcro-style alternatives like old shoelaces or fabric strips.
What if my outlets are far from the TV stand?
If cords stretch across the floor, consider using a low-profile cord cover raceway made from a cut cereal box. Flatten it, paint to match the floor, and tape it down temporarily. Alternatively, route cords along baseboards using laundry clips to keep them flush and safe from foot traffic.
Are there fire risks with hiding cords in cardboard?
Cardboard itself is not a conductor, but it’s important to ensure cords aren’t overloaded or damaged. Never enclose warm-running power adapters inside any material. Maintain ventilation and check periodically for excessive heat. If a device feels hot after 30 minutes, reconsider its placement.
Final Thoughts: Simplicity Wins in Home Organization
Hiding cords neatly doesn’t require a renovation or investment in specialty products. Often, the best solutions are the ones already within reach—repurposed, resourceful, and quietly effective. By taking just 20–30 minutes to organize your TV stand’s wiring, you enhance both the appearance and functionality of your living space.
More importantly, you create a safer environment for everyone in the home. Children and pets are less likely to tug at dangling wires, and you’ll spend less time troubleshooting connection issues caused by accidental disconnections.
Start tonight. Look around your kitchen, laundry room, or office drawer. Find a few binder clips, an empty roll, or an old box. Turn clutter into calm with nothing more than creativity and intention.


 浙公网安备
33010002000092号
浙公网安备
33010002000092号 浙B2-20120091-4
Comments
No comments yet. Why don't you start the discussion?