
A living room should be a space of comfort, style, and calm—not a maze of tangled power strips, exposed HDMI cables, and snaking extension cords. Yet, with modern homes filled with smart TVs, soundbars, gaming consoles, and charging stations, managing cords has become one of the most overlooked but critical aspects of interior design. The good news: hiding cords doesn’t require expensive renovations or technical expertise. With thoughtful planning and the right tools, you can achieve a sleek, minimalist look while maintaining full functionality.
More than just aesthetics, organized cords reduce tripping hazards, make cleaning easier, and extend the life of your electronics by preventing accidental tugs and overheating from poor airflow. This guide walks through practical, tested strategies to conceal cords effectively—without sacrificing accessibility or safety.
Assess Your Cord Landscape
Before reaching for cable ties or wall clips, take inventory of every cord in your living room. Identify which devices need constant power, which are used occasionally, and which can be eliminated entirely through wireless alternatives. A typical entertainment center might include:
- TV power cord
- Streaming device or game console cables
- HDMI, optical audio, or Ethernet lines
- Soundbar or speaker connections
- Charging cables for phones or tablets
- Lamp and floor lighting cords
- Router and modem wires
Group these by function and length. Label each cord temporarily with masking tape if needed. This step prevents confusion later and helps you plan routing paths efficiently.
Choose the Right Cable Management Tools
Not all cord-hiding solutions are created equal. The best choice depends on your furniture layout, wall material, and desired aesthetic. Below is a comparison of common tools and their ideal use cases:
| Tool | Best For | Limitations |
|---|---|---|
| Cable raceways (cord covers) | Wall-mounted setups; long runs along baseboards | Visible unless painted to match walls |
| Fabric cable sleeves | Bundling multiple cords behind furniture | Can trap heat if overfilled |
| Adhesive clips | Securing cords to TV stands or legs | May damage delicate surfaces when removed |
| In-wall conduit kits | Permanent installations with outlets above media consoles | Requires drilling and electrical knowledge |
| Furniture with built-in channels | New purchases; high-end, seamless integration | Higher cost |
Selecting the right tool ensures durability and visual harmony. For renters or those avoiding permanent changes, non-invasive options like adhesive-backed clips and fabric sleeves offer flexibility without compromising results.
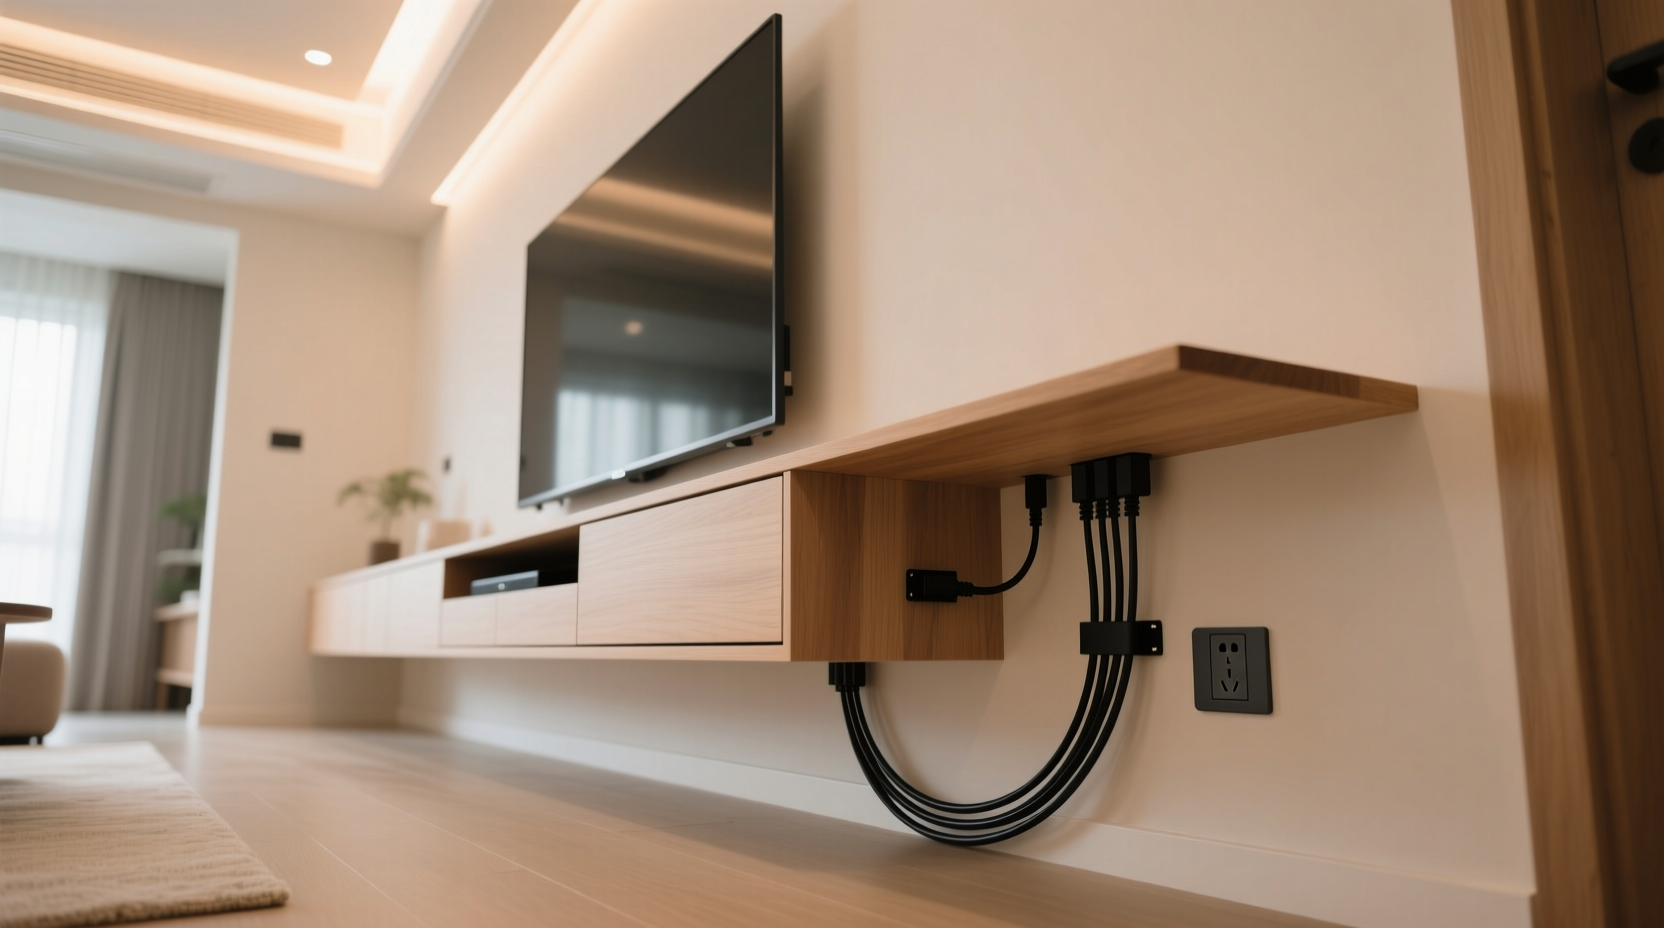
Step-by-Step: Hide Cords Behind Your TV Console
The TV area is usually the biggest offender when it comes to cord clutter. Follow this sequence to streamline the space:
- Unplug everything and lay devices out where you can access ports easily.
- Trim excess length using Velcro straps or modular extensions—avoid coiling too tightly.
- Group similar cables (e.g., HDMI together, power cords separate) using braided sleeves or twist ties.
- Route bundles downward into a low-profile power strip placed behind or beneath the console.
- Use adhesive clips along the back edge of shelves or cabinet sides to keep bundles flat against surfaces.
- Install a cord cover along the baseboard if running cables to an outlet behind nearby furniture.
- Reconnect and test each device before finalizing placement.
If your media console has doors or drawers, consider mounting the power strip inside using anti-vibration pads to prevent noise and allow airflow. This keeps all plugs accessible yet hidden from view.
Smart Furniture and Design Hacks
Furniture choices play a major role in how easy—or difficult—it is to manage cords. Look for pieces designed with cable management in mind:
- Coffee tables with internal compartments for charging stations
- Sofas with USB ports fed by concealed wiring to a nearby outlet
- Media consoles featuring pre-drilled holes or rear channels
- Ottomans that double as storage for extra cables and adapters
For existing furniture, retrofit solutions work well. Drill discreet grommet holes in wooden consoles to feed cords through the top or back. Use rubber grommets to protect wires and soften edges. Alternatively, place a decorative basket near seating areas to house portable chargers and loosely coil spare cables.
“Integrating cable management into furniture selection is one of the most underused secrets of minimalist interior design.” — Lena Torres, Interior Designer & Home Organization Consultant
Another clever trick: position floor lamps so their cords run down the back leg and into a nearby outlet, secured with clear cord clips painted to match the finish. This creates the illusion of a wire-free lamp.
Real Example: From Cluttered to Clean in One Weekend
Consider Mark and Priya, who moved into a small apartment with a wall-mounted TV, gaming rig, sound system, and three smart home hubs. Their initial setup had eight visible cords snaking across the floor, tangled around a basic stand, and plugged into an overloaded power strip.
Over a single Saturday, they implemented the following:
- Replaced the old stand with a media console that had rear cutouts and internal shelving
- Mounted a vertical power strip at the back of the lower shelf
- Bundled HDMI and audio cables using a 3-inch braided sleeve
- Installed a white plastic raceway along the baseboard to carry the bundle to an outlet 5 feet away
- Added a fabric-wrapped charging station on the coffee table for daily-use devices
The result? A completely transformed living room where no cords were visible from a seated position. Setup took less than five hours and cost under $70 in supplies. Most importantly, both reported feeling more relaxed in the space, citing the visual clarity as a subtle but powerful upgrade to their daily routine.
Checklist: Achieve a Cord-Free Living Room in 7 Steps
Use this checklist to stay on track as you organize:
- ✅ Inventory all cords and label them by function
- ✅ Choose a central power hub location (preferably near an outlet)
- ✅ Invest in a surge-protected power strip with enough ports
- ✅ Bundle cables neatly using sleeves or Velcro ties
- ✅ Secure bundles to furniture or walls using clips or raceways
- ✅ Hide remaining runs with paint-matched cord covers or baseboard routing
- ✅ Test all connections and adjust for airflow and access
Don’t Forget Wireless and Future-Proofing
While physical cords can’t always be eliminated, reducing their number makes maintenance easier. Embrace wireless technology where appropriate:
- Use Bluetooth speakers instead of wired ones
- Stream content via Wi-Fi rather than relying on HDMI from external boxes
- Charge phones and earbuds on Qi-enabled pads instead of plugging in nightly
- Opt for mesh Wi-Fi systems that minimize Ethernet needs
Also, leave a little slack in bundled cords. Electronics evolve—today’s unused HDMI port might be essential for tomorrow’s VR headset. Avoid gluing or permanently sealing any cable path unless it’s truly final.
FAQ: Common Questions About Cord Management
Can I paint plastic cord covers to match my walls?
Yes. Most rigid plastic raceways accept water-based paints like acrylic or latex. Lightly sand the surface first, apply a primer, then two thin coats of paint. Allow 24 hours to cure before installing cables.
Is it safe to run cords under a rug?
No. Doing so creates a fire hazard due to heat buildup and increases wear from foot traffic. It also poses a tripping risk. Instead, use flat, low-profile cord covers rated for floor use if crossing a walkway is unavoidable.
How do I keep pets from chewing cords?
Bitter-tasting deterrent sprays work for some animals. More reliably, use metal conduit sleeves or install cords inside furniture legs. Elevated routing (e.g., behind a TV stand) also helps keep tempting wires out of reach.
Final Thoughts: A Cleaner Space Starts With Small Actions
A clutter-free living room isn’t about perfection—it’s about intention. Taking time to hide cords neatly sends a quiet message that your space is cared for, functional, and ready for relaxation. These improvements don’t demand a complete overhaul. Start with one area—your entertainment center, your reading nook, your charging corner—and apply the principles of bundling, securing, and concealing.
As technology continues to fill our homes, the ability to manage its physical footprint becomes more valuable. A well-organized living room reduces mental clutter just as much as visual chaos. You’ll notice guests commenting on how “put together” your space feels—even if they never realize the secret behind it.


 浙公网安备
33010002000092号
浙公网安备
33010002000092号 浙B2-20120091-4
Comments
No comments yet. Why don't you start the discussion?