
A floating shelf TV mount offers a sleek, minimalist aesthetic that enhances any living room. It elevates your television into a piece of functional art, suspended elegantly against the wall. But this polished look can quickly unravel when power cords, HDMI cables, and streaming device wires dangle into view. A cluttered cable run undermines the entire design intent. The good news is that with careful planning and the right techniques, you can conceal these cords completely—creating a seamless, professional finish.
This guide walks through proven strategies to manage and hide cords in a floating shelf TV setup. From in-wall routing to adhesive raceways, each method balances aesthetics, safety, and accessibility. Whether you're installing a new system or cleaning up an existing one, these solutions will help you achieve a tidy, cable-free appearance without sacrificing functionality.
Why Cord Management Matters
Beyond visual appeal, proper cord management improves safety, reduces dust accumulation, and simplifies maintenance. Exposed cables are not only unsightly but also vulnerable to tripping hazards, accidental tugs, and pet interference. In high-end interior design, invisible wiring is often the hallmark of a well-executed installation.
According to interior designer Marcus Tran, “The difference between amateur and professional installations isn’t just the hardware—it’s how you handle the details. A hidden cable path shows intentionality.”
“Cable clutter distracts from the focal point: the screen. When cords disappear, the TV becomes part of the architecture.” — Marcus Tran, Interior Design Consultant
Step-by-Step Guide to Hiding Cords on a Floating Shelf TV Mount
Successfully hiding cords begins before the shelf is even installed. Planning at the outset prevents costly retrofits and ensures optimal results. Follow this sequence for best outcomes:
- Assess Your Devices and Cable Needs
List all devices (TV, soundbar, streaming box, game console, etc.) and their required connections. Count power cords, HDMI, optical audio, Ethernet, and USB cables. Knowing what you’re working with determines routing complexity. - Determine Power Source Location
Identify where your nearest outlet is. If it’s behind the wall below the shelf, in-wall concealment is feasible. If the outlet is far away, consider using a slim power strip mounted discreetly under the shelf. - Choose Between In-Wall and Surface Solutions
In-wall routing looks the cleanest but requires access behind drywall. Surface options like raceways are easier for renters or DIYers but need careful placement to remain subtle. - Install the Shelf with Cable Access in Mind
If building or modifying a shelf, incorporate a small hole or notch in the back panel to allow cables to pass through to the wall. Position the shelf slightly above outlet level if routing downward. - Route and Secure Cables
Use clips, adhesive channels, or conduit to guide cables along the intended path. Never staple or overtighten—allow slight slack to prevent strain on connectors. - Test Before Finalizing
Connect all devices and test signals and power before sealing any openings or applying final finishes. - Conceal Remaining Exposed Sections
For any visible cable runs, use paint-matched raceways or twist ties to bundle and minimize visibility.
Best Methods for Concealing Cords
No single solution fits every home. The ideal method depends on your wall type, budget, skill level, and whether you own or rent. Below are five reliable approaches ranked by effectiveness and ease.
1. In-Wall Cable Routing (Most Discreet)
Running cables inside the wall is the gold standard for clean installations. This involves drilling through the wall behind the shelf and feeding cables down to an outlet or patch panel below. Requires cutting small access holes and using fish tape or rods to pull lines through.
- Best for: Permanent setups in owned homes with accessible walls.
- Tools needed: Drywall saw, fish tape, stud finder, voltage tester.
- Safety note: Always verify there are no electrical wires or pipes in the path before drilling.
2. Wall-Mounted Cable Raceway (Renter-Friendly)
Plastic or fabric-covered raceways adhere directly to the wall, creating a hidden channel for multiple cables. Choose white or paintable models to blend with your decor.
- Advantages: No wall damage, easy to install, removable.
- Limitation: Visible unless carefully positioned or painted.
- Pro tip: Run the raceway vertically from shelf to baseboard, then along the floor molding to hide transitions.
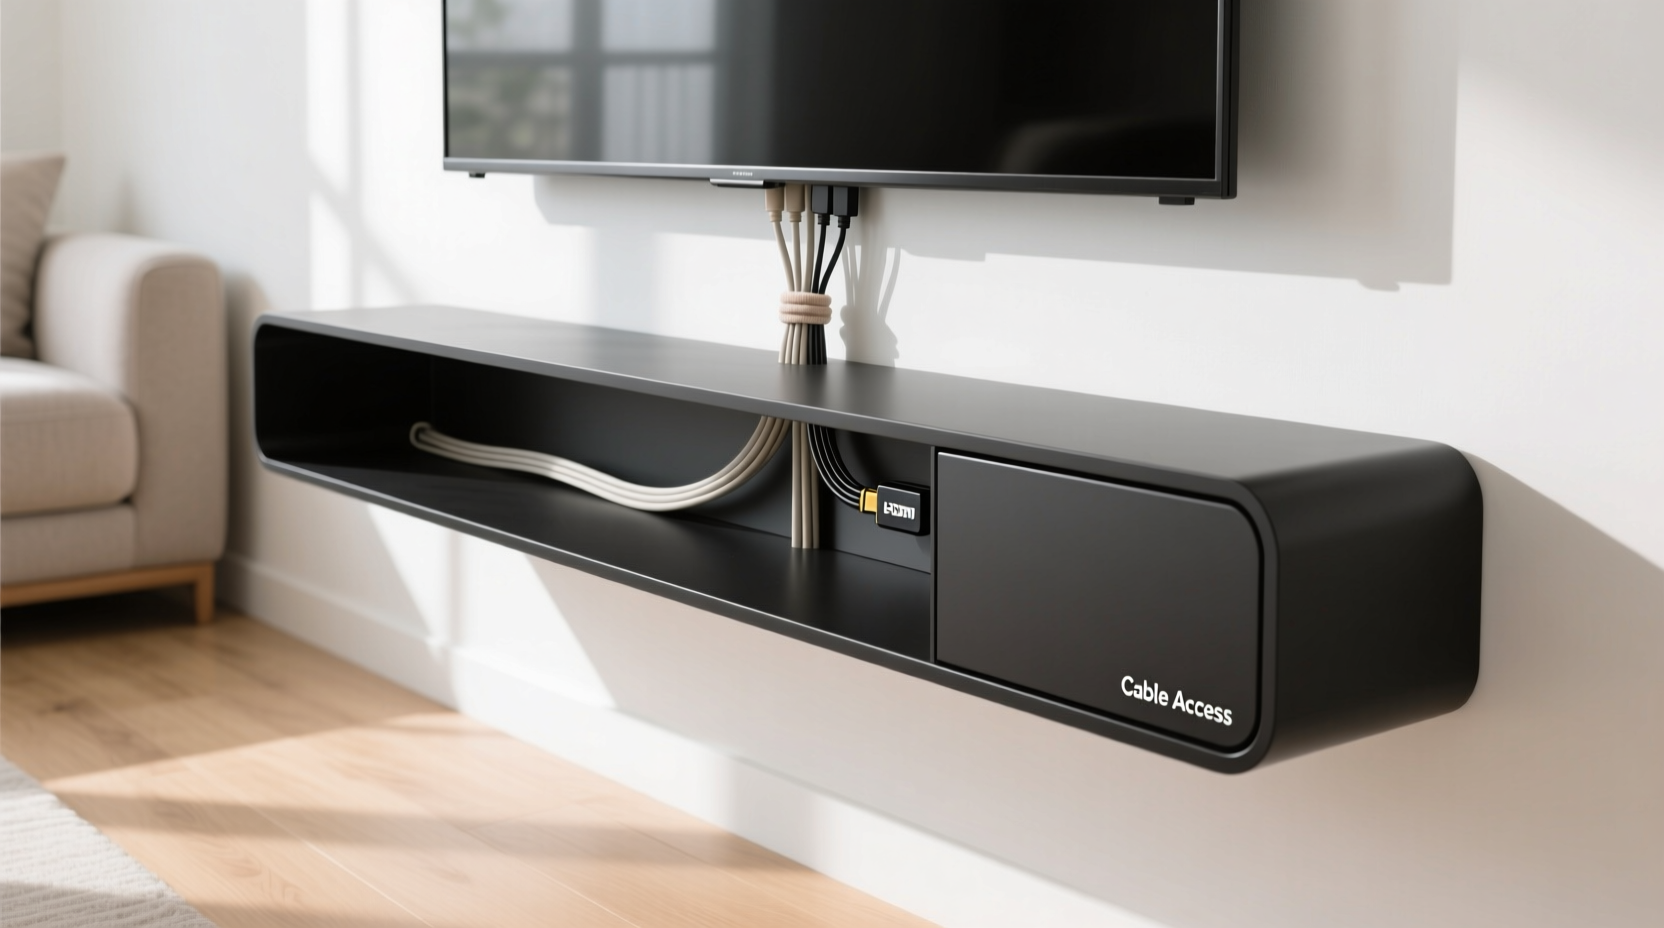
3. Behind-Shelf Wire Management Tray
These slim trays attach under or behind the floating shelf, holding power strips and organizing cords out of sight. Ideal when devices sit directly on the shelf.
- Works well with: Soundbars, streaming boxes, AC adapters.
- Look for: Low-profile metal or ABS plastic trays with ventilation.
4. Cord Covers with Paintable Surfaces
Rigid or flexible cord covers snap over grouped cables and can be painted to match your wall. They’re more durable than fabric sleeves and resist dust.
- Ideal for: Short vertical drops or horizontal runs along baseboards.
- Available in: 0.5\", 1\", and 2\" widths depending on cable volume.
5. Furniture Integration (Creative Alternative)
If your floating shelf is near a media console or cabinet, route cables down into the furniture. Drill a hole in the shelf support or back panel to feed cords into enclosed storage below.
- Example: A wall-mounted shelf above a closed credenza allows all electronics to stay hidden inside while only the TV remains visible.
Do’s and Don’ts of Cable Concealment
| Do’s | Don’ts |
|---|---|
| Leave 6–12 inches of slack behind the TV for adjustments | Stretch cables tightly—they can disconnect from vibration |
| Label each cable with tags or colored tape | Hide unlabeled cables—you’ll struggle during troubleshooting |
| Use Velcro straps instead of zip ties for easy access | Cut or permanently bind cables—you may need to replace them later |
| Ground all metal components if using in-wall conduit | Run low-voltage and high-voltage cables in the same conduit (fire hazard) |
| Check local building codes before in-wall modifications | Ignore firestops or insulation when drilling through studs |
Real-World Example: A Living Room Transformation
Jamie, a graphic designer in Portland, installed a 65-inch OLED on a walnut floating shelf. Initially, three HDMI cables, a power cord, and an Ethernet line hung loosely down the wall. Guests noticed the mess before the picture quality.
She opted for a hybrid solution: a paint-matched PVC raceway ran vertically from the shelf to the baseboard, then followed the floor molding to a nearby outlet. Inside the raceway, she grouped cables with Velcro and labeled each end. Under the shelf, a brushed aluminum wire tray held her Apple TV and soundbar power bricks.
The result? A gallery-like display where the TV appeared to float, unburdened by technology. Jamie reported that friends now compliment the “built-in” look, unaware of the careful planning behind it.
Essential Tools and Materials Checklist
Before starting your project, gather the following items based on your chosen method:
- Measuring tape and pencil
- Stud finder (for secure mounting)
- Drill and appropriate drill bits (including spade bit for large holes)
- Fish tape (for in-wall routing)
- Adhesive-backed cable clips or raceways
- Flat or ultra-slim HDMI cables (e.g., 28AWG)
- Velcro straps or reusable zip ties
- Wall anchors and screws (if mounting hardware)
- Paint-matching sample (for blending cord covers)
- Voltage tester (critical for in-wall work)
For in-wall projects, consider renting a borescope camera to inspect cavities before and after cable runs. It’s a small investment that prevents drywall repairs later.
Frequently Asked Questions
Can I run HDMI cables inside the wall?
Yes, but only if they are CL2 or CL3 rated for in-wall use. Standard HDMI cables are not fire-safe for concealed spaces. Look for “in-wall rated” labels and avoid kinking during installation. For long runs over 15 feet, consider fiber-optic HDMI for signal reliability.
What if I don’t have an outlet behind or below the TV?
You have several options: install a new outlet (hire an electrician), use a wireless power transmitter (limited efficiency), or run a slim power extension cord along the baseboard under a cord cover. Avoid extension cords across walkways for safety.
How do I hide cords without damaging the wall?
Use adhesive-backed raceways, cord sleeves, or surface-mount channels. These stick securely to most surfaces and can be removed with minimal residue. Choose white or paintable versions to maintain aesthetics. Alternatively, route cords behind furniture or through existing gaps like crown molding joints.
Final Tips for a Polished Finish
The goal isn’t just to hide cords—it’s to eliminate the perception that cords exist at all. To achieve this:
- Keep cable groups tight but not compressed. Over-bundling can cause overheating.
- Align raceways with architectural lines—vertical runs next to doorframes or windows appear intentional.
- Use a single power strip under the shelf to centralize plugs and reduce cord sprawl.
- Re-evaluate annually. Tech upgrades mean new cables—update your system proactively.
Conclusion: Elevate Your Space with Invisible Wiring
A floating shelf TV mount should reflect simplicity and sophistication. Letting cords spoil the illusion defeats the purpose. With thoughtful planning and the right tools, you can create a setup where technology serves without being seen. Whether you choose in-wall elegance or surface-level ingenuity, the principles remain the same: organize, conceal, and maintain.
Start today by auditing your current cable situation. Identify one improvement—be it labeling, bundling, or installing a raceway—and build from there. A clean, cord-free TV area isn’t reserved for professionals or big budgets. It’s achievable in any home, one smart step at a time.


 浙公网安备
33010002000092号
浙公网安备
33010002000092号 浙B2-20120091-4
Comments
No comments yet. Why don't you start the discussion?