
A cluttered desk undermines both productivity and aesthetics. Among the most persistent challenges in modern workspaces is managing the tangle of cords from monitors, laptops, chargers, and peripherals. Many resort to drilling holes through desks or walls—permanently altering furniture—just to achieve a clean look. But what if you could eliminate cable chaos without damaging your desk or violating rental agreements? The good news: it’s not only possible, it’s easier than you think.
With the right tools and techniques, you can create a sleek, organized workspace using entirely non-invasive methods. Whether you’re in a home office, dorm room, or shared workspace, these strategies prioritize reversibility, affordability, and simplicity—all while maintaining a professional appearance.
Why Cord Management Matters Beyond Aesthetics
Clean cord management isn’t just about visual appeal. Tangled wires lead to accidental disconnections, reduced airflow around electronics, and increased dust accumulation. They also pose tripping hazards and make troubleshooting more difficult when something goes wrong. According to interior designer and ergonomic consultant Marcus Lin, “A well-organized desk reduces cognitive load. When your environment feels controlled, your mind follows.”
“A well-organized desk reduces cognitive load. When your environment feels controlled, your mind follows.” — Marcus Lin, Interior & Ergonomic Consultant
Moreover, renters or students often face restrictions on permanent modifications. Drilling into furniture may void warranties or result in deposit deductions. That’s why damage-free solutions aren’t just convenient—they’re essential for many users.
Step-by-Step: How to Hide Cords Without Drilling
Follow this practical timeline to transform a messy desk into a streamlined workstation—no tools, no damage, no regrets.
- Assess Your Setup (5 minutes): Identify every device and its power/data cables. Note which cords are essential daily and which can be unplugged after use.
- Gather Supplies (10–15 minutes): Purchase adhesive-backed clips, cable sleeves, under-desk trays, and Velcro straps. All are inexpensive and widely available online or at office supply stores.
- Group and Bundle Cords (10 minutes): Use twist ties or Velcro straps to group similar cables (e.g., monitor, laptop charger, USB hub) together. Avoid tight bundling to prevent overheating.
- Route Cables Along the Desk (15 minutes): Attach adhesive cable clips along the back edge of the desk to guide cords downward and out of sight.
- Secure Under-Desk Components (10 minutes): Mount an adhesive-backed under-desk tray to hold power strips or docking stations.
- Final Check and Adjust (5 minutes): Test all connections, ensure strain relief, and adjust routing for easy access when needed.
Top 5 Damage-Free Cord-Hiding Solutions
Not all cord organizers are created equal. These five methods deliver maximum results with zero impact on your furniture.
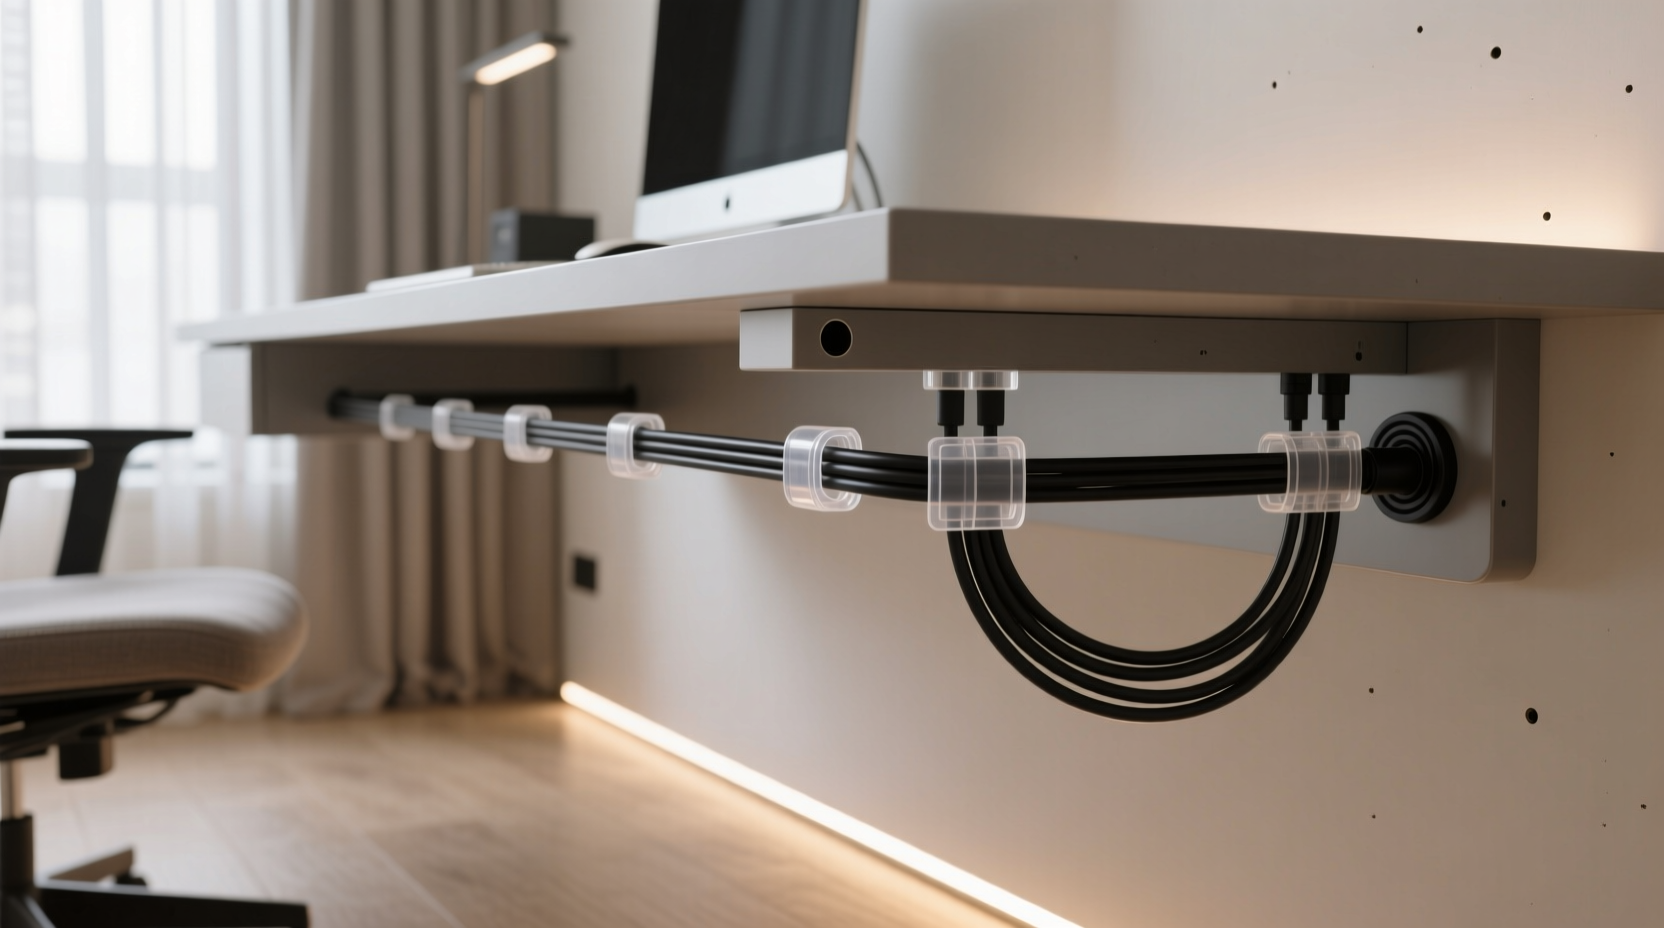
1. Adhesive Cable Clips
These small plastic or silicone clips stick firmly to surfaces using strong, removable adhesive. Place them along the rear lip of your desk to route cords neatly toward the floor. Most support up to 5 lbs per clip and leave no residue when removed properly.
2. Under-Desk Cable Trays
These trays mount underneath the desk surface using industrial-strength adhesive pads. They act as a platform for power strips, hubs, or excess cord slack. Choose models with open sides for ventilation and easy access.
3. Braided Cable Sleeves
Instead of letting individual wires snake across your desk, bundle them inside a stretchable braided sleeve. Available in various colors and diameters, these sleeves unify cords into a single, tidy strand. Ideal for running cables from desk to floor.
4. Magnetic Cable Ties
Unlike traditional zip ties, magnetic versions allow repeated opening and closing. Wrap them around grouped cords and attach to metal parts of your desk frame (if applicable). Great for quick adjustments or temporary setups.
5. Cord Covers with Adhesive Backing
Rigid or flexible raceways with peel-and-stick backing can be mounted vertically down a desk leg or along a wall baseboard. Feed multiple cords inside and snap the cover shut. Paintable versions blend seamlessly into any décor.
Do’s and Don’ts of Non-Invasive Cord Management
| Do’s | Don’ts |
|---|---|
| Use Velcro straps instead of zip ties for flexibility | Over-tighten bundles, which can damage internal wiring |
| Choose adhesive products rated for your surface type (wood, laminate, metal) | Apply heavy loads to adhesive mounts beyond their weight limit |
| Leave slack in cords to prevent strain on ports | Run power and data cables directly alongside each other (can cause interference) |
| Test adhesive removal technique on a small area first | Use heat guns or sharp tools to remove adhesives—can scratch surfaces |
| Label cords for future troubleshooting | Ignore manufacturer guidelines for ventilation around power adapters |
Real-World Example: Sarah’s Apartment Office Transformation
Sarah, a freelance graphic designer living in a rented Brooklyn apartment, struggled with a chaotic desk setup. Her dual-monitor station, laptop dock, lamp, and audio interface generated a jungle of cords spilling onto the floor. Landlord restrictions prohibited any drilling or wall modifications.
She implemented a four-phase solution: First, she used adhesive cable clips to route cords down the back of her IKEA desk. Next, she installed an under-desk tray to house her power strip and USB hub. Then, she bundled visible cords with a black braided sleeve that matched her desk color. Finally, she ran the main bundle into a paint-matched adhesive raceway along the baseboard to her outlet.
The entire project cost $37 and took under an hour. Not only did her workspace look professional enough for client video calls, but she also found herself working more efficiently. “I didn’t realize how much mental clutter those cords were causing,” she said. “Now I actually enjoy sitting at my desk.”
Essential Tools Checklist
Before starting your cord cleanup, gather these items:
- Adhesive cable clips (pack of 10–20)
- Braided cable sleeve (2–3 ft length)
- Velcro reusable straps or magnetic ties
- Under-desk cable management tray
- Self-adhesive cord raceway or cover
- Isopropyl alcohol wipes (for surface prep)
- Labels or colored tape for identification
- Scissors or wire cutters (for trimming sleeves)
Frequently Asked Questions
Will adhesive products damage my desk when removed?
Most high-quality adhesive mounts use removable glue technology designed for smooth removal. To minimize risk, warm the adhesive gently with a hairdryer and peel slowly at a 180-degree angle. Residue can usually be cleaned with rubbing alcohol and a soft cloth. Always check product specifications for surface compatibility.
Can I hide cords without an under-desk tray?
Absolutely. While under-desk trays help centralize components, they’re not mandatory. You can use adhesive clips to route cords directly behind the desk and down the leg. Bundle them neatly with a sleeve and secure with Velcro straps at intervals. Just ensure nothing dangles where it can be pulled accidentally.
How do I manage cords if my desk is against a wall?
This is actually ideal for cord hiding. Use a flat adhesive raceway along the baseboard to run cords horizontally to the nearest outlet. Combine with vertical clips to bring wires down from the desk edge. If outlets are far away, consider a slim, low-profile power strip placed discreetly behind a decorative box or plant.
Expert Insight: The Psychology of a Clean Workspace
Dr. Lena Patel, a cognitive behavioral researcher at the University of Michigan, has studied the relationship between physical organization and focus. “Our brains interpret visual clutter as unfinished tasks,” she explains. “Even subconsciously, tangled cords signal disorder, increasing stress hormones like cortisol.”
“Our brains interpret visual clutter as unfinished tasks. Even subconsciously, tangled cords signal disorder, increasing stress hormones like cortisol.” — Dr. Lena Patel, Cognitive Researcher
Her studies show that participants in organized environments completed tasks 27% faster and reported higher satisfaction levels. Simple interventions like cord management contributed significantly—even when subjects weren’t explicitly aware of the changes.
Final Thoughts: Simplicity Is Sustainable
Hiding cords without drilling isn’t a compromise—it’s a smarter approach. Permanent modifications lock you into a single configuration, making future upgrades or relocations more complicated. Reversible, modular solutions offer flexibility, portability, and peace of mind.
The best part? You don’t need technical skills or expensive gear. With less than $50 and one evening of effort, you can transform your desk into a model of efficiency and calm. And because every solution is temporary, you can refine your system over time as your needs evolve.


 浙公网安备
33010002000092号
浙公网安备
33010002000092号 浙B2-20120091-4
Comments
No comments yet. Why don't you start the discussion?