
A cluttered workspace doesn’t just look unprofessional—it can also slow you down. One of the biggest contributors to desk chaos is tangled cords. From monitors and laptops to lamps and chargers, every device seems to come with its own power cable, adapter, or USB cord. While store-bought cable management solutions can cost $20 to $50 or more, most are overpriced for what they offer: basic organization. The good news? You don’t need to spend a dime on specialized gear to achieve a clean, streamlined setup. With everyday household items and a bit of ingenuity, you can hide cords under your desk neatly and efficiently—no shopping required.
Why Cord Clutter Matters More Than You Think
Beyond aesthetics, disorganized cords pose real problems. Tangled cables increase the risk of accidental unplugging, make troubleshooting difficult, and create dust traps that are hard to clean. A study by the University of California, Irvine found that visual clutter in the workspace reduces focus and increases stress levels. Managing your cords isn't just about neatness—it's about creating a functional environment that supports productivity.
Professional interior designer Maria Tran notes:
“Cable management is one of the most overlooked aspects of workspace design. A clean desk sends a subconscious message of control and order, which directly impacts your ability to concentrate.” — Maria Tran, Interior Designer & Workspace Consultant
Step-by-Step Guide to Hiding Cords Under Your Desk for Free
You don’t need Velcro straps from Amazon or magnetic cable reels to get started. Follow this practical, no-cost method to transform your workspace in under 30 minutes.
- Unplug and Remove All Cables: Start by turning off and unplugging every device connected to your desk. Lay them out on the floor so you can see exactly what you're working with.
- Group Devices by Usage Zone: Identify which devices belong together—your computer tower, monitor, and speakers form one cluster; your lamp, phone charger, and desk fan another. Grouping helps reduce cross-cable sprawl.
- Trim Excess Length: Don’t coil excess cable tightly—that promotes wear. Instead, use the “figure-eight” loop method (described later) or secure loose ends with twist ties made from old bread bags or zip ties saved from packaging.
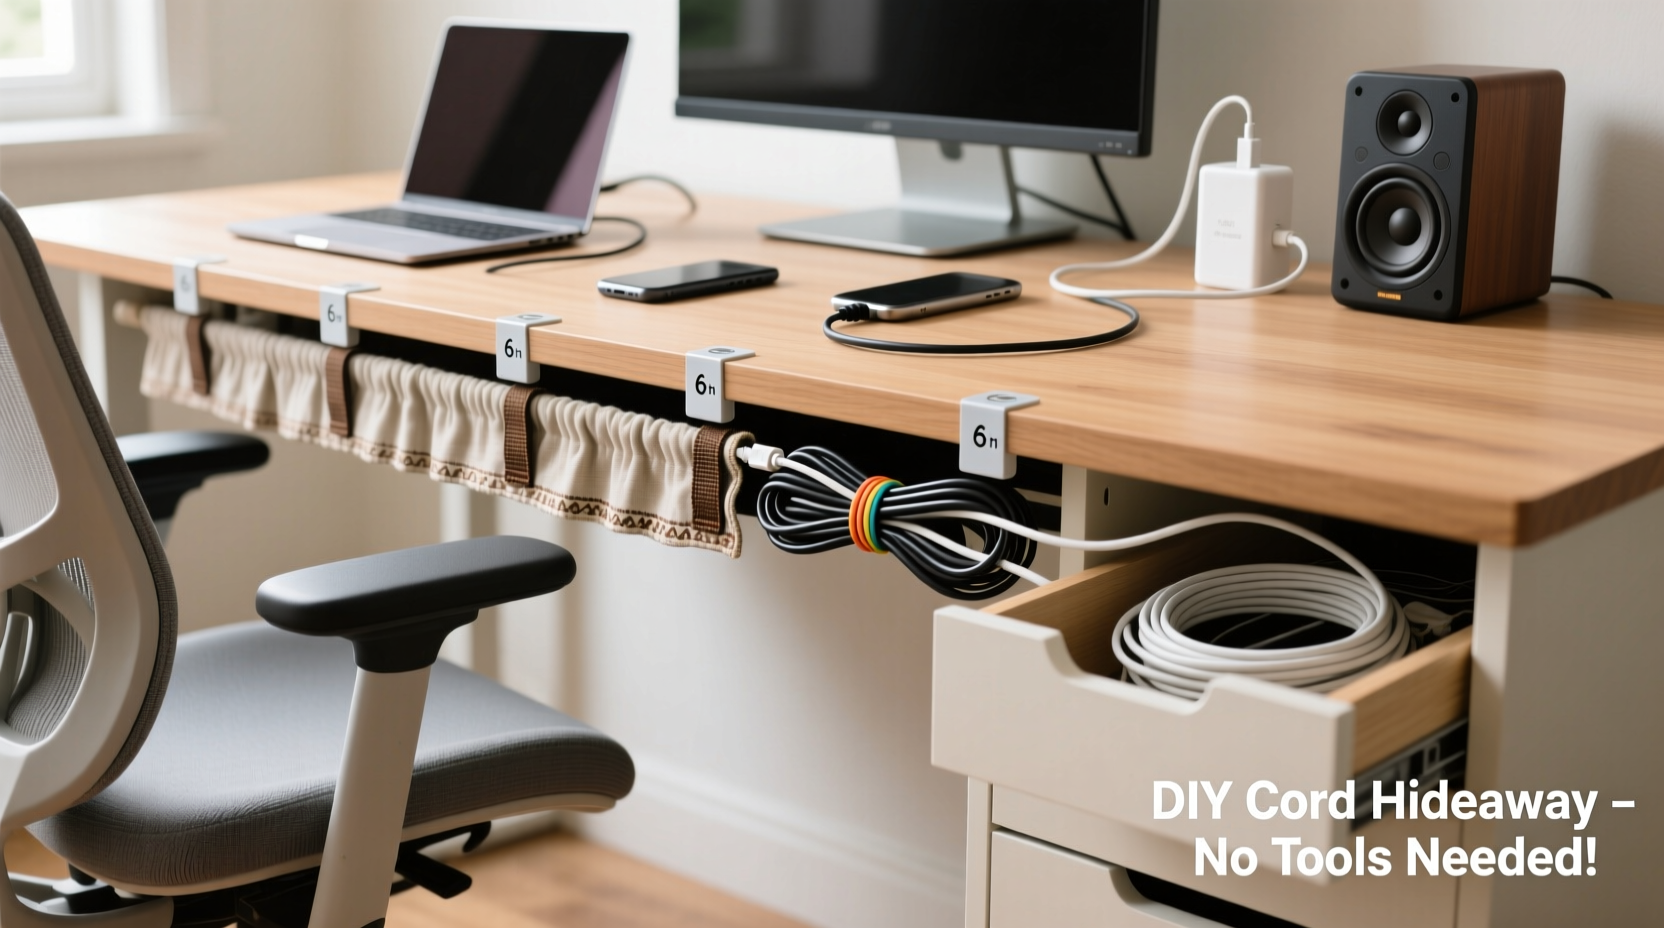
- Route Cables Along the Back Edge: Use the natural shadow line along the back of your desk as a hidden highway. Most desks have a small lip or overhang that blocks the view from seated positions.
- Secure with Repurposed Materials: This is where creativity replaces cost. Use binder clips, rubber bands, or even folded cardboard to anchor cables in place.
- Create a Central Hub Behind the Desk: Bundle all power strips and adapters behind the desk, ideally mounted vertically using double-sided tape or tucked into a shoebox-sized container secured underneath.
Cheap & Effective Household Items That Work Better Than Store-Bought Organizers
Before you buy anything, check your junk drawer. Many common household items outperform commercial cable managers. Here’s how to repurpose them:
- Binder Clips: Clip them to the back edge of your desk and thread cords through the metal arms. They hold surprisingly well and allow easy access.
- Cardboard Toilet Paper Rolls: Slide multiple cords through a single roll to keep them grouped. Tape it to the underside of the desk with packing tape.
- Old Shoelaces or Fabric Strips: Tie loose cables into neat bundles. Unlike plastic zip ties, fabric won’t damage insulation and can be reused indefinitely.
- Mailing Envelopes (Bubble Wrap Type): Cut open and fold into a pouch. Attach under the desk with tape to store extra-long cords or adapters.
- Wooden Clothespins: Clip onto the desk edge and use them to hold cords in place. Paint them to match your decor if desired.
| Household Item | Best For | Limitations |
|---|---|---|
| Binder Clip | Securing individual cords to desk edges | May scratch finishes on delicate surfaces |
| Toilet Paper Roll | Grouping multiple cords together | Not durable long-term; best for temporary setups |
| Shoelace | Soft bundling without kinking | Requires manual tying; not adjustable |
| Empty Tissue Box | Hiding power strips and routing cords downward | Flammable near heat sources; avoid near radiators |
| Fridge Magnet + Paperclip | Mounting small adapters or USB hubs | Only works on metal surfaces |
Real Example: How Sarah Cleared Her Home Office in 25 Minutes
Sarah, a freelance graphic designer from Portland, was frustrated with her constantly tangled mess of laptop chargers, monitor cables, and external drive cords. She had two power strips dangling mid-air, held only by their cords. After reading an article on zero-cost organization, she decided to try a DIY approach.
She used three large binder clips to anchor her main cords to the back of her IKEA desk. Then, she cut up an old Amazon box to create a rectangular channel, taping it under the desk to guide all cables toward a central drop point. She bundled excess lengths with shoelaces saved from winter boots and labeled each with painter’s tape. Finally, she placed her power strips inside a repurposed tissue box, cutting holes for plugs and ventilation.
The entire process took 25 minutes and cost nothing. “It looks like I bought a $40 organizer,” she said. “But really, it was just stuff I already had.”
Do’s and Don’ts of DIY Cable Management
To avoid common pitfalls, follow this simple checklist:
| Do | Don't |
|---|---|
| Use soft materials like fabric or foam to cushion sharp edges | Wrap cords too tightly—this damages internal wires |
| Leave some slack for mobility (e.g., rolling chairs) | Run cables across walking paths where they can be tripped over |
| Anchor heavy transformers (like laptop bricks) securely | Daisy-chain too many high-power devices on one strip |
| Label everything clearly | Use damaged or frayed cords—even temporarily |
| Check connections monthly for looseness or heat | Ignore ventilation needs around power strips |
DIY Cord Spool: Reuse a Pizza Box for Neat Storage
One of the cleverest low-cost solutions comes from IT technician James Lin, who uses flattened pizza boxes to create custom cord spools. Here’s how:
- Flatten a clean cardboard pizza box.
- Cut a rectangular section slightly larger than your largest adapter or power brick.
- Fold the cardboard into a U-shape channel and tape the seams.
- Slide the transformer into the base and wrap excess cord around the outside.
- Attach the unit under your desk with strong tape or magnets (if metal).
This method keeps bulky adapters off the floor, prevents tangling, and allows quick removal when needed. Plus, it’s fully recyclable when worn out.
FAQ: Common Questions About No-Cost Cord Hiding
Can I use duct tape to secure cords?
Yes, but with caution. Duct tape can leave residue and degrade over time, especially in warm environments. If you use it, apply it to a cardboard or plastic backing first, then attach that to the desk. Avoid direct contact with painted or laminated surfaces.
What if my desk has no back lip to hide cords?
No problem. Create a false lip using scrap wood or thick cardboard. Attach it horizontally to the underside of the desk with L-brackets or heavy-duty adhesive. Even a suspended shelf from a hardware store (under $10) can act as a cord barrier and still be far cheaper than specialty organizers.
How often should I reorganize my cables?
Every 3–6 months. Dust buildup, new devices, and accidental tugs can undo even the neatest setup. Schedule a quick 10-minute “cable check” during seasonal cleaning.
Final Checklist: Achieve a Clean Desk in One Evening
Follow this concise action plan to eliminate cord clutter tonight:
- ✅ Unplug all devices and lay them out
- ✅ Identify primary usage zones (workstation, lighting, charging)
- ✅ Gather free materials: binder clips, shoelaces, cardboard, tape
- ✅ Trim or loop excess cable length using the figure-eight method
- ✅ Anchor cords along the back edge using repurposed tools
- ✅ Bundle related cords together with soft ties
- ✅ Label each cord for easy identification
- ✅ Test all connections and ensure no strain on ports
- ✅ Do a final sweep for safety (no pinched wires, proper ventilation)
Conclusion: Neatness Doesn’t Require a Budget—Just Intention
A tidy workspace isn’t reserved for those who can afford sleek cable boxes or modular desks. The most effective solutions often come from resourcefulness, not retail. By using what you already have—binder clips, cardboard, fabric scraps, and a little planning—you can achieve a professional-looking setup that enhances both function and focus. The goal isn’t perfection; it’s progress. Spend one evening organizing your cords, and you’ll save countless minutes untangling, replugging, and searching in the weeks ahead. Start small, stay consistent, and enjoy the quiet confidence of a clean, controlled workspace.


 浙公网安备
33010002000092号
浙公网安备
33010002000092号 浙B2-20120091-4
Comments
No comments yet. Why don't you start the discussion?