
Exposed light cords trailing across baseboards are more than an eyesore—they disrupt the flow of a room and can pose tripping hazards. While many solutions involve drilling, cutting, or permanent modifications, there’s a smarter, gentler alternative: removable paintable caulk. This method allows you to secure and conceal cords without damaging walls, making it ideal for renters, historic homes, or anyone who values flexibility and aesthetics.
Paintable caulk is commonly used in finishing work to seal gaps between trim and walls. But when applied strategically, it becomes a discreet yet effective cord management tool. Unlike clips, tapes, or raceways, it blends seamlessly into your décor and can be painted over to match any wall color. Even better, it's fully removable—leaving no residue or marks when you're ready to reconfigure or move out.
Why traditional cord concealment methods fall short
Most people reach for cord covers, adhesive clips, or zip ties when dealing with exposed cords. While functional, these approaches come with drawbacks:
- Cord covers often look bulky and industrial, especially on lighter-colored walls.
- Adhesive clips lose grip over time and can peel paint when removed.
- Zip ties create tension points that may damage cords and are difficult to adjust.
- Wall chiseling or recessing is invasive, costly, and not permitted in rental units.
These methods prioritize function over form, but modern living demands both. Removable paintable caulk bridges this gap by offering a near-invisible solution that respects your space’s integrity.
The science behind paintable caulk as a cord-hiding medium
Paintable acrylic latex caulk—commonly found in white or almond—is formulated to adhere well to porous surfaces like drywall, wood, and base molding. It remains flexible after curing, which prevents cracking during seasonal expansion and contraction. Most importantly, it accepts paint beautifully, allowing it to vanish into your wall finish.
When applied correctly, a thin bead of caulk can gently cradle a standard lamp or string light cord (up to 5mm in diameter) against a baseboard. The cured material acts like a soft channel, holding the cord in place while remaining pliable enough to release later with minimal effort.
Unlike silicone-based caulks, which resist paint and leave oily residues, acrylic versions are water-based and designed for interior trim work. They also clean up easily with water during application, reducing mess and improving precision.
“Caulk isn’t just for sealing—it’s one of the most underutilized tools in invisible home organization.” — Derek Langston, Interior Finish Specialist & Contractor
Step-by-step guide: Concealing cords with removable paintable caulk
Follow this detailed process to achieve professional-looking results without specialized tools.
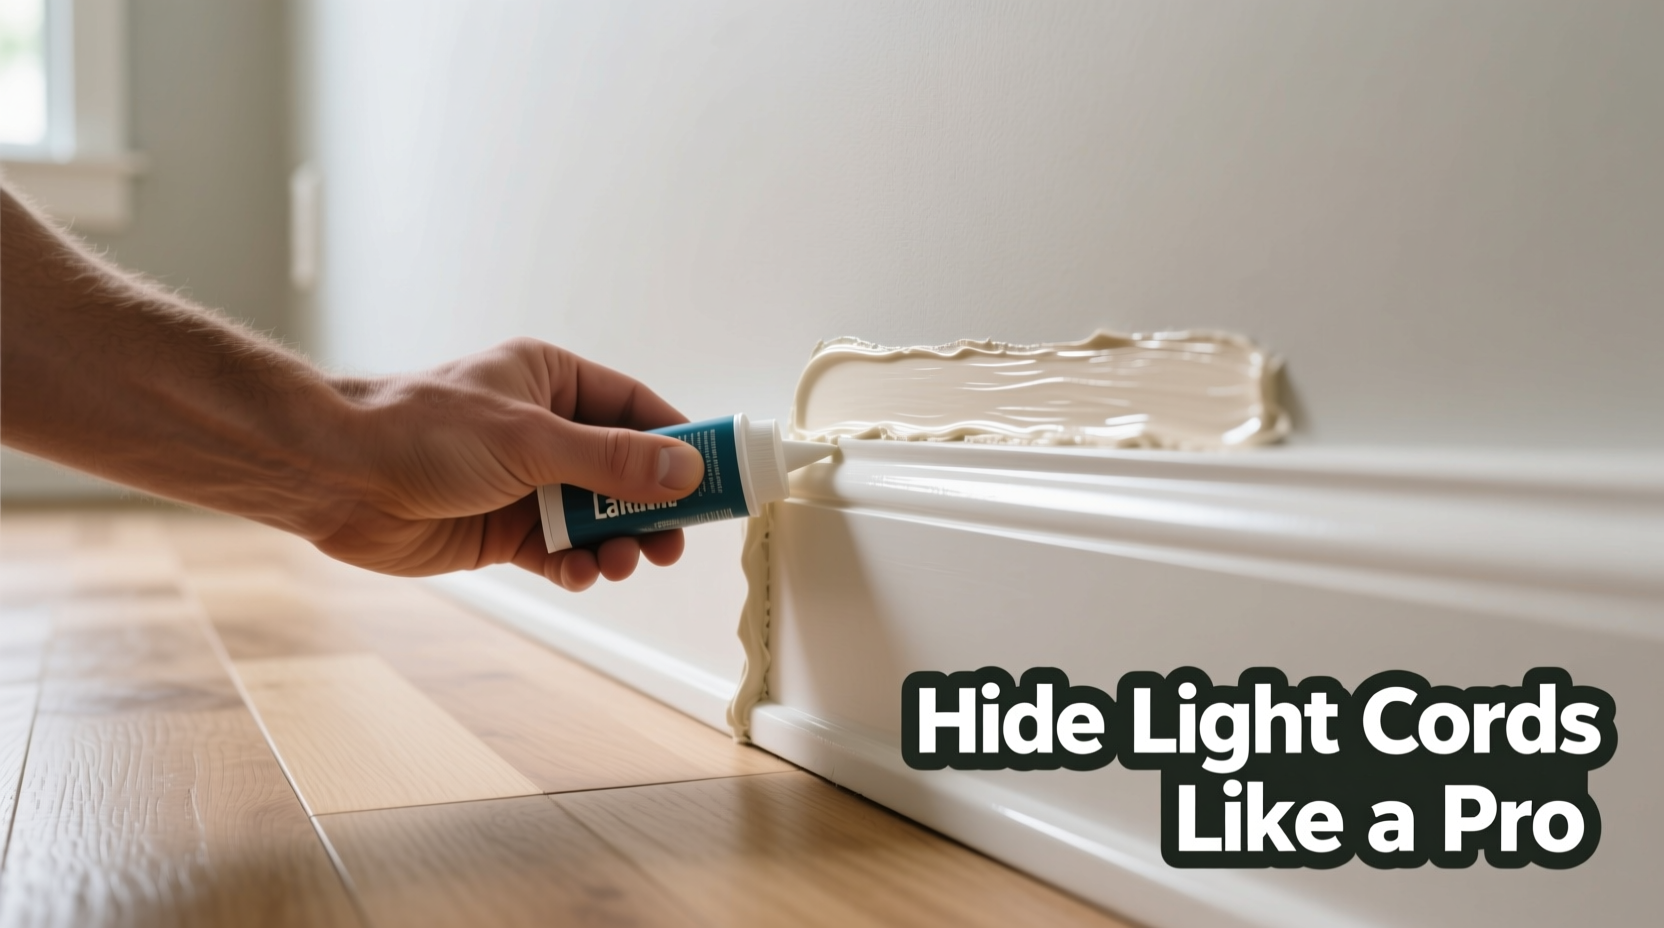
- Gather materials: You’ll need paintable acrylic caulk (e.g., DAP Alex Plus), a caulk gun, utility knife, painter’s tape, damp sponge, and optionally, a small putty knife.
- Prepare the surface: Wipe the baseboard and adjacent floor with a dry cloth to remove dust and debris. Ensure the area is completely dry.
- Route the cord neatly: Lay the cord flat against the baseboard, following the most direct path. Avoid kinks or sharp bends.
- Apply painter’s tape: Place tape 3–5mm above and below the cord along its entire length. This protects the wall and creates crisp edges.
- Cut the caulk nozzle: Trim the tip at a 45-degree angle to create a narrow opening—about 3mm wide—for precise control.
- Apply a continuous bead: Run a thin, even line of caulk directly over the center of the cord. Keep pressure steady on the caulk gun for uniform thickness.
- Smooth the bead: Dip a fingertip or damp sponge in water and lightly drag it along the caulk to flatten and shape it. This embeds the cord slightly and ensures full adhesion.
- Remove tape immediately: Pull off the painter’s tape while the caulk is still wet to avoid peeling. <9> Allow curing: Let the caulk dry for 24 hours in normal indoor conditions (70°F/21°C, 50% humidity).
- Paint (optional): Once cured, apply matching wall paint if needed. Most white caulk dries slightly translucent and benefits from one coat.
After painting, the installed cord will appear flush with the wall, nearly indistinguishable from the surrounding trim. The result is a seamless, built-in look typically seen in high-end renovations.
When and where this method works best
This technique excels in specific scenarios where discretion and reversibility matter most:
- Rental apartments where tenants cannot modify walls permanently
- Historic homes with original trim that must remain intact
- Living rooms or bedrooms where visual clutter detracts from ambiance
- Temporary lighting setups like holiday lights or accent lamps
- Spaces requiring frequent reconfiguration, such as studios or galleries
It performs poorly on uneven surfaces, textured walls, or where cords exceed standard thickness (e.g., heavy-duty extension cords). In such cases, consider combining this method with low-profile cord channels mounted only at endpoints.
Removal: How to undo the installation cleanly
One of the greatest advantages of paintable caulk is its removability. When you’re ready to remove the cord or repaint the wall, follow these steps:
- Carefully lift one end of the cord using a fingernail or plastic scraper.
- Peel the caulk upward slowly. It should detach in a single strip, especially if applied thinly.
- Use a soft cloth to wipe away any minor residue. For stubborn bits, dampen with warm water and rub gently.
- If paint was applied over the caulk, removal may take small fragments of paint with it. Touch up as needed with a fine brush.
Because the caulk bonds primarily to the baseboard and wall—not the cord itself—there’s no risk of damaging insulation or conductors during removal.
Comparison: Caulk vs. other cord concealment options
| Solution | Visibility | Removability | Installation Effort | Cost (per 10 ft) |
|---|---|---|---|---|
| Paintable caulk | Low (paintable, blends in) | High (peels off cleanly) | Medium (requires precision) | $2–$4 |
| Adhesive cord clips | Medium (visible hardware) | Low (may peel paint) | Low | $3–$6 |
| Plastic cord raceway | High (bulky, noticeable) | Medium (screws or strong adhesive) | Medium | $8–$12 |
| Baseboard groove routing | Very low (built-in) | None (permanent) | High (tools required) | $15+ (labor-intensive) |
| Fabric cord sleeves | Medium (textured, stands out) | High | Low | $5–$10 |
As shown, paintable caulk offers the best balance of invisibility, cost, and reversibility—especially for short to medium runs along straight baseboards.
Real-world example: A renter’s living room transformation
Maria, a graphic designer renting a 1920s apartment in Portland, struggled with multiple cords running from floor lamps and a TV console across her beige-painted baseboards. She couldn’t drill into the original hardwood floors or modify the crown molding. Temporary clips kept falling off, and cord covers clashed with her minimalist aesthetic.
After researching non-damaging solutions, she tried paintable caulk. She routed three cords—two lamp cords and a charging cable—along a 12-foot stretch of baseboard, applying a thin bead over each. After smoothing and painting with leftover wall paint, the cords vanished into the trim.
“It looks like the lights were hardwired,” she said. “My landlord never noticed, and when I moved out, I peeled everything off in under ten minutes. No touch-ups needed.”
This case illustrates how a simple material, used creatively, can solve persistent design challenges without compromising lease agreements or interior harmony.
Common mistakes and how to avoid them
Even a straightforward method can go wrong without attention to detail. Here are frequent errors and their fixes:
- Applying too much caulk: Thick beads crack over time and are harder to remove. Use a narrow nozzle and steady hand.
- Skipping surface prep: Dust or grease prevents adhesion. Always clean the area before starting.
- Removing tape too late: Once caulk skins over, tape pulls cause jagged edges. Remove within 5–10 minutes of application.
- Using non-paintable caulk: Silicone or kitchen/bath formulas won’t accept paint and may yellow. Stick to labeled “paintable” types.
- Pressing too hard when smoothing: Excessive pressure can push the cord into the wall or distort the bead. Use a light touch.
FAQ: Your questions answered
Can I use this method on carpeted floors?
Yes, but ensure the baseboard is clean and dry. The caulk adheres to the vertical face of the trim, not the floor. If the carpet meets the baseboard tightly, use a putty knife to gently tuck the cord behind the edge before applying caulk.
Will the caulk damage my cord’s insulation over time?
No. Paintable acrylic caulk is non-corrosive and remains flexible. It does not generate heat or chemical reactions that degrade common PVC or rubber cord jackets. However, avoid using on cords that become hot during operation (e.g., space heaters).
How long does the caulk last before needing replacement?
Under normal indoor conditions, a properly applied bead lasts 3–5 years. High-traffic areas or frequent adjustments may reduce lifespan. Reapplication is simple and doesn’t require full removal unless repainting.
Checklist: Hiding cords with caulk—quick reference
- Choose paintable acrylic latex caulk
- Clean baseboard surface thoroughly
- Test caulk adhesion on a small area
- Have painter’s tape, damp sponge, and utility knife ready
- Apply tape above and below the cord
- Use a thin, consistent bead
- Smooth with wet finger or sponge
- Remove tape while wet
- Wait 24 hours before painting or disturbing
- Paint over if necessary
- Inspect for loose ends periodically
Final thoughts: Rethinking cord management with intention
Managing cords shouldn’t mean choosing between function and beauty. With removable paintable caulk, you gain a tool that honors both. It’s a testament to how everyday materials, when applied thoughtfully, can elevate the quality of our spaces without permanence or compromise.
Whether you’re staging a home, optimizing a workspace, or simply tired of tripping over wires, this method delivers lasting results with minimal investment. It respects architectural integrity, supports sustainable living (no waste from disposable covers), and empowers renters and owners alike to take control of their environment.


 浙公网安备
33010002000092号
浙公网安备
33010002000092号 浙B2-20120091-4
Comments
No comments yet. Why don't you start the discussion?