
A sleek wall-mounted TV can instantly elevate the look of any living room or bedroom. But all too often, that modern aesthetic is ruined by a messy tangle of cords snaking down the wall—power cables, HDMI lines, audio connectors, and streaming device wires. The good news? You don’t need an electrician or a major renovation to fix it. With a few basic tools and some smart planning, you can conceal those unsightly cables neatly and safely. This guide walks you through proven, budget-friendly methods to hide your TV cables like a pro.
Why Hiding TV Cables Matters
Beyond just aesthetics, exposed cables pose real risks. Tripping hazards, accidental yanks on connectors, dust buildup, and even pet chewing are common issues. A clean cable setup not only improves safety but also protects your expensive electronics from wear and tear. Plus, a tidy entertainment area contributes to a more relaxing and organized home environment.
“Cable management isn’t just about looks—it’s a critical part of maintaining both functionality and safety in modern home setups.” — James Reed, Home Automation Technician with 12 years of experience
Essential Tools and Materials
Before starting, gather the right supplies. Most of these items are affordable and widely available at hardware stores or online. Having everything ready ensures a smooth process without mid-project delays.
- Cable raceway (surface-mount conduit)
- Stud finder
- Measuring tape
- Level
- Drywall saw or keyhole saw
- Fish tape (for in-wall routing)
- Wall anchors and screws
- Power drill
- Wire clips or adhesive cable ties
- Outlet relocation kit (optional, for in-wall power)
- Voltage tester (safety first!)
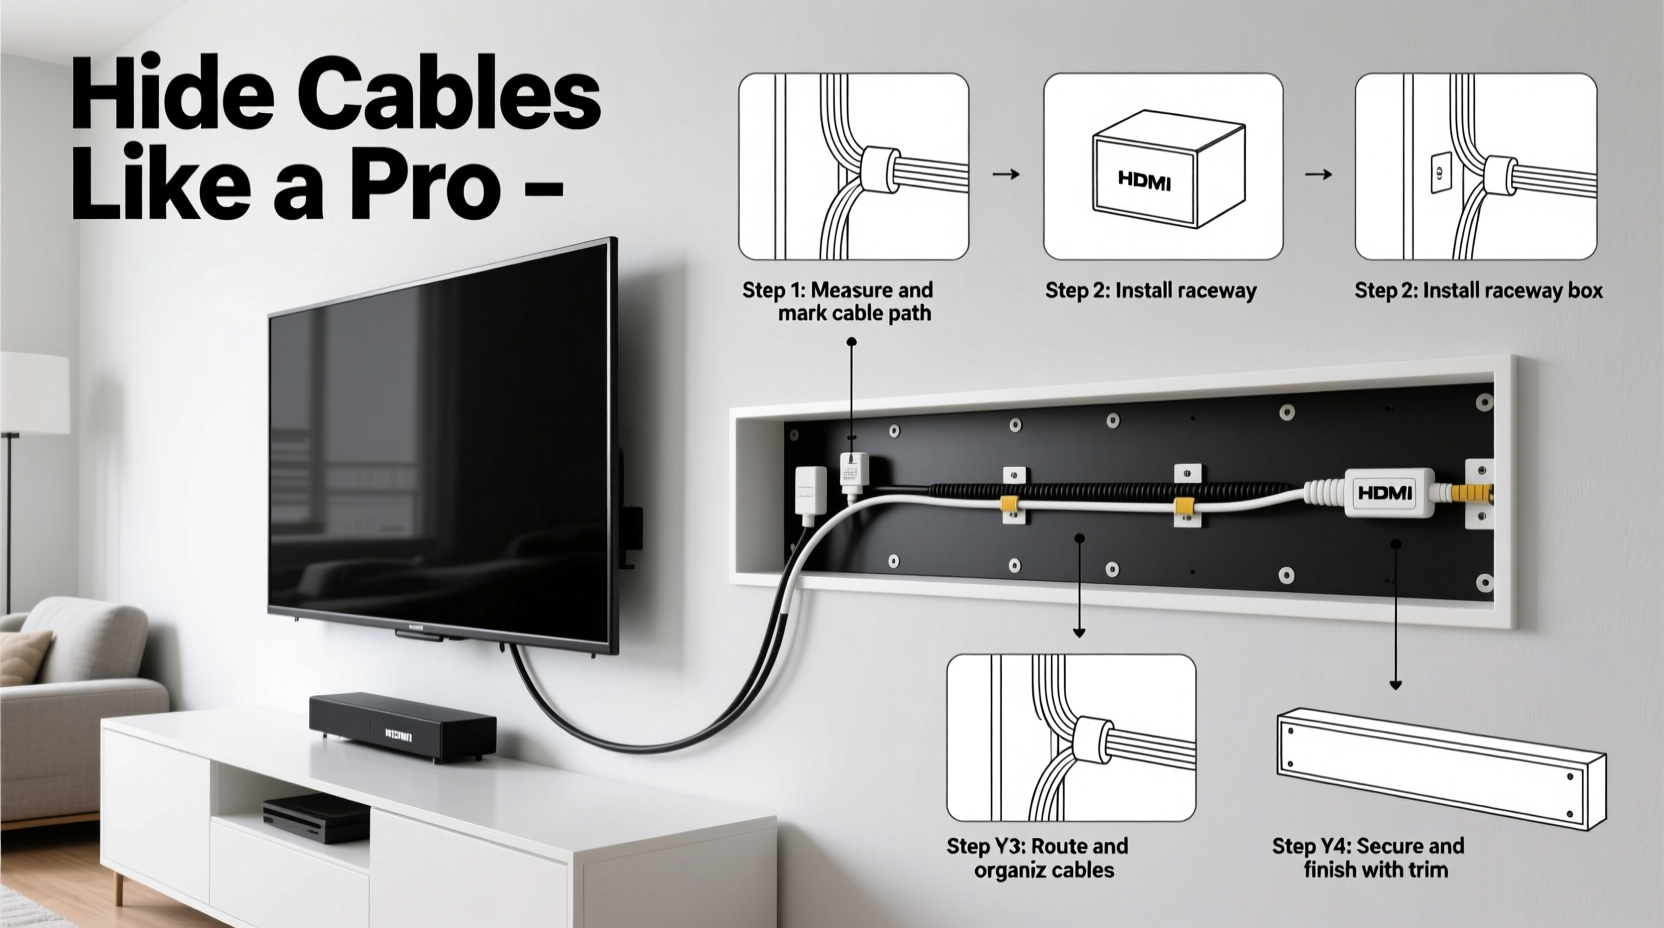
Step-by-Step: How to Hide Cables Behind Your Wall-Mounted TV
Follow this detailed sequence to achieve a clean, professional-looking result—even if you’ve never done drywall work before.
- Turn Off Power and Clear the Area
Unplug the TV and nearby electronics. Move furniture out of the way to give yourself full access to the wall. - Locate Studs and Plan Your Path
Use a stud finder to identify the wooden studs behind the drywall. Mark their positions lightly with a pencil. Most TVs must be mounted directly into studs for safety. Note where your existing outlet is and determine the shortest, safest route from there to the TV location. - Mount the TV Bracket
Attach the mounting bracket securely to the studs using appropriate lag bolts. Double-check alignment with a level. This step comes first because once cables are hidden, adjusting the mount becomes difficult. - Run Cables Through the Wall (Optional Advanced Method)
If you're comfortable with minor drywall work:- Cut a small hole near the baseboard (just above the existing outlet) using a drywall saw.
- Cut a second hole high up behind where the TV will sit, making sure it's centered and within reach of the back panel.
- Use fish tape to pull cables from the lower hole to the upper one. Attach cables to the fish tape with electrical tape and gently pull them through.
Note: Do not run standard power cords inside walls unless they are rated for in-wall use. Instead, consider an in-wall power extension kit designed for this purpose.
- Surface Cable Management (Easier Alternative)
If cutting into the wall feels too involved, use a cable raceway:- Measure the vertical distance from the outlet to the TV.
- Cut the raceway to size with a hacksaw.
- Mark screw points and drill pilot holes.
- Secure the raceway to the wall using screws and wall anchors if not hitting studs.
- Place all cables inside and snap the cover shut.
- Connect and Test
Reconnect all devices—TV, soundbar, gaming console, streaming stick—and plug them in. Turn on the system to ensure all signals and power are working properly. - Final Touches
Touch up any drywall cuts with spackle and paint to match. For raceways, paint the cover if desired. Use small adhesive wire clips to manage slack behind the TV.
Choosing the Right Method: In-Wall vs. Surface Solutions
Not every home or homeowner is suited for in-wall cabling. Here’s a comparison to help you decide based on your needs, skill level, and budget.
| Factor | In-Wall Routing | Surface Raceway |
|---|---|---|
| Visibility | Completely hidden | Slightly visible, but low-profile |
| Difficulty Level | Advanced (drywall, fishing wires) | Beginner-friendly |
| Cost | Moderate to high (kits, tools, patching) | Low ($10–$25 per raceway) |
| Permanence | Permanent; hard to modify later | Removable and repositionable |
| Safety Compliance | Requires proper materials and code adherence | No special codes needed |
| Best For | New installations, renovations, long-term setups | Rentals, temporary fixes, DIY beginners |
Real-World Example: Sarah’s Living Room Makeover
Sarah rented a downtown apartment and wanted a theater-like feel in her small living room. She mounted her 55-inch TV above the fireplace—but hated how the cords dangled across the brick veneer. She didn’t own the place, so cutting into the wall wasn’t allowed.
Her solution? A flat, white cable raceway painted to match the trim. She ran it vertically from the floor-level entertainment center up to the TV, securing it with adhesive-backed clips since nails weren’t permitted. Inside, she bundled HDMI, power, and optical audio cables together. After painting the raceway, guests assumed it was part of the original molding. Total cost: $18. Time invested: under two hours. Landlord-approved and fully removable.
This shows that even with restrictions, you can achieve a clean look with minimal tools and no permanent changes.
Common Mistakes to Avoid
Even simple projects can go wrong without attention to detail. Steer clear of these frequent errors:
- Ignoring stud placement: Mounting a heavy TV into drywall alone can lead to detachment and damage.
- Using non-rated cables in walls: Standard power cords aren’t fire-safe for in-wall use. Always use UL-listed in-wall rated kits.
- Overstuffing conduits: Packed cables generate heat and make future upgrades harder.
- Forgetting future access: Seal holes too tightly and you’ll regret it when adding a new device later.
- Skipping the level: A crooked raceway or misaligned TV distracts from an otherwise clean setup.
“The number one issue I see? People try to hide everything but leave one power cord hanging. That single wire ruins the illusion. Hide *all* cables or none.” — Marcus Lin, AV Installation Specialist
Checklist: Cable Concealment Done Right
Use this checklist before, during, and after your project to ensure success:
- ✅ Unplugged all devices and turned off circuit breaker if working near outlets
- ✅ Located studs and marked drill points
- ✅ Chose between in-wall and surface method based on skill and rental rules
- ✅ Purchased correct materials (raceway, in-wall kit, fish tape, etc.)
- ✅ Measured twice, cut once
- ✅ Tested all connections after installation
- ✅ Secured loose ends and used clips behind TV
- ✅ Patched and painted (if drywall was cut)
- ✅ Verified remote sensors still work (some covers block IR signals)
FAQ: Your Cable Hiding Questions Answered
Can I run power cables inside the wall safely?
Only if you use an in-wall power extension kit that is UL-listed and specifically designed for this purpose. Regular extension cords are not safe or code-compliant for concealed installation due to fire risk.
Will hiding cables affect my Wi-Fi or remote performance?
Generally, no. However, thick metal raceways or dense wall materials may interfere with infrared (IR) remotes. If your remote stops working, use an IR repeater kit or position the receiver outside the enclosure.
I’m renting—can I still hide my cables?
Absolutely. Surface-mounted raceways, adhesive cord covers, and fabric sleeves are renter-friendly options. Most are paintable or come in neutral colors and can be removed without damage at move-out.
Final Thoughts: A Cleaner Setup Starts Today
Hiding cables behind your wall-mounted TV doesn’t require technical expertise or expensive gear. Whether you choose to run wires inside the wall for a seamless finish or opt for a surface raceway for simplicity, the result is the same: a cleaner, safer, and more polished living space. The effort pays off every time you turn on the TV and enjoy a distraction-free viewing experience.
Start small—gather your tools, measure your path, and take one step at a time. Even a basic cable cover makes a noticeable difference. Once you see the transformation, you might be inspired to tackle other clutter spots around the house.


 浙公网安备
33010002000092号
浙公网安备
33010002000092号 浙B2-20120091-4
Comments
No comments yet. Why don't you start the discussion?