
Every year, the joy of assembling a lush, full floor-standing Christmas tree is subtly undermined by one persistent eyesore: the tangle of extension cords, transformer boxes, and power strips snaking across the floor. Unlike tabletop trees or pre-lit wall-mounted displays, freestanding trees demand real-world electrical integration—often in high-traffic living rooms, entryways, or open-concept spaces where exposed wiring clashes with festive elegance. Worse, haphazard wire management isn’t just unsightly—it poses tripping hazards, invites pet chewing, and increases wear on insulation from foot traffic and furniture shifts. This isn’t about aesthetics alone; it’s about safety, longevity, and preserving the immersive magic of the season. The solutions below are drawn from professional holiday installers, interior stylists, and electricians who routinely outfit homes, model homes, and retail displays. They prioritize durability over quick fixes, accessibility over permanent concealment, and code-compliant practices over DIY shortcuts.
Why Wire Visibility Matters More Than You Think
Exposed wiring under a floor-standing tree creates three overlapping problems: visual disruption, physical risk, and functional vulnerability. A single 16-gauge extension cord may seem innocuous—but when stretched across hardwood or tile, it becomes a visual anchor that pulls attention downward, breaking the vertical flow of the tree’s silhouette. More critically, the National Fire Protection Association (NFPA) reports that over 70% of holiday-related electrical fires involve damaged or overloaded cords—many of which were pinched under furniture legs, stepped on repeatedly, or coiled tightly while hot. Floor-standing trees also generate unique strain points: the base often sits directly over outlets, requiring cords to bend sharply upward before running horizontally to a nearby power source. That repeated flexing degrades insulation faster than linear runs. Finally, visible wiring signals poor planning to guests—and undermines the curated ambiance homeowners invest in through ornaments, lighting, and themed décor. Hiding wires isn’t cosmetic polish. It’s integrated design thinking applied to infrastructure.
Five Proven Methods to Conceal Wires—Ranked by Effectiveness & Safety
Not all wire-hiding techniques are equal. Some sacrifice accessibility, others violate electrical codes, and many degrade after two seasons. Below is a field-tested hierarchy based on durability, ease of setup, and compliance with NFPA 101 (Life Safety Code) and UL standards.
| Method | Best For | Installation Time | Reusability | Safety Notes |
|---|---|---|---|---|
| Cord Cover Raceway System (e.g., PVC or paintable plastic channels) | Hard floors, rental homes, high-traffic areas | 15–25 minutes | High (multi-season) | UL-listed versions support up to 15A; avoid adhesive-only models on textured walls or uneven floors |
| Furniture Integration (sofa skirts, ottoman bases, built-in console legs) | Permanent setups, cohesive living room layouts | 10–20 minutes | Very high | Requires at least 3\" clearance behind furniture for airflow; never block ventilation slots on transformers |
| Decorative Fabric Draping (burlap runners, velvet ribbons, faux-fur throws) | Photogenic displays, rustic or luxe themes | 5–12 minutes | Moderate (fabric washes well; hardware reusable) | Keep fabric ≥2\" away from transformer surfaces; avoid synthetic fabrics near warm electronics |
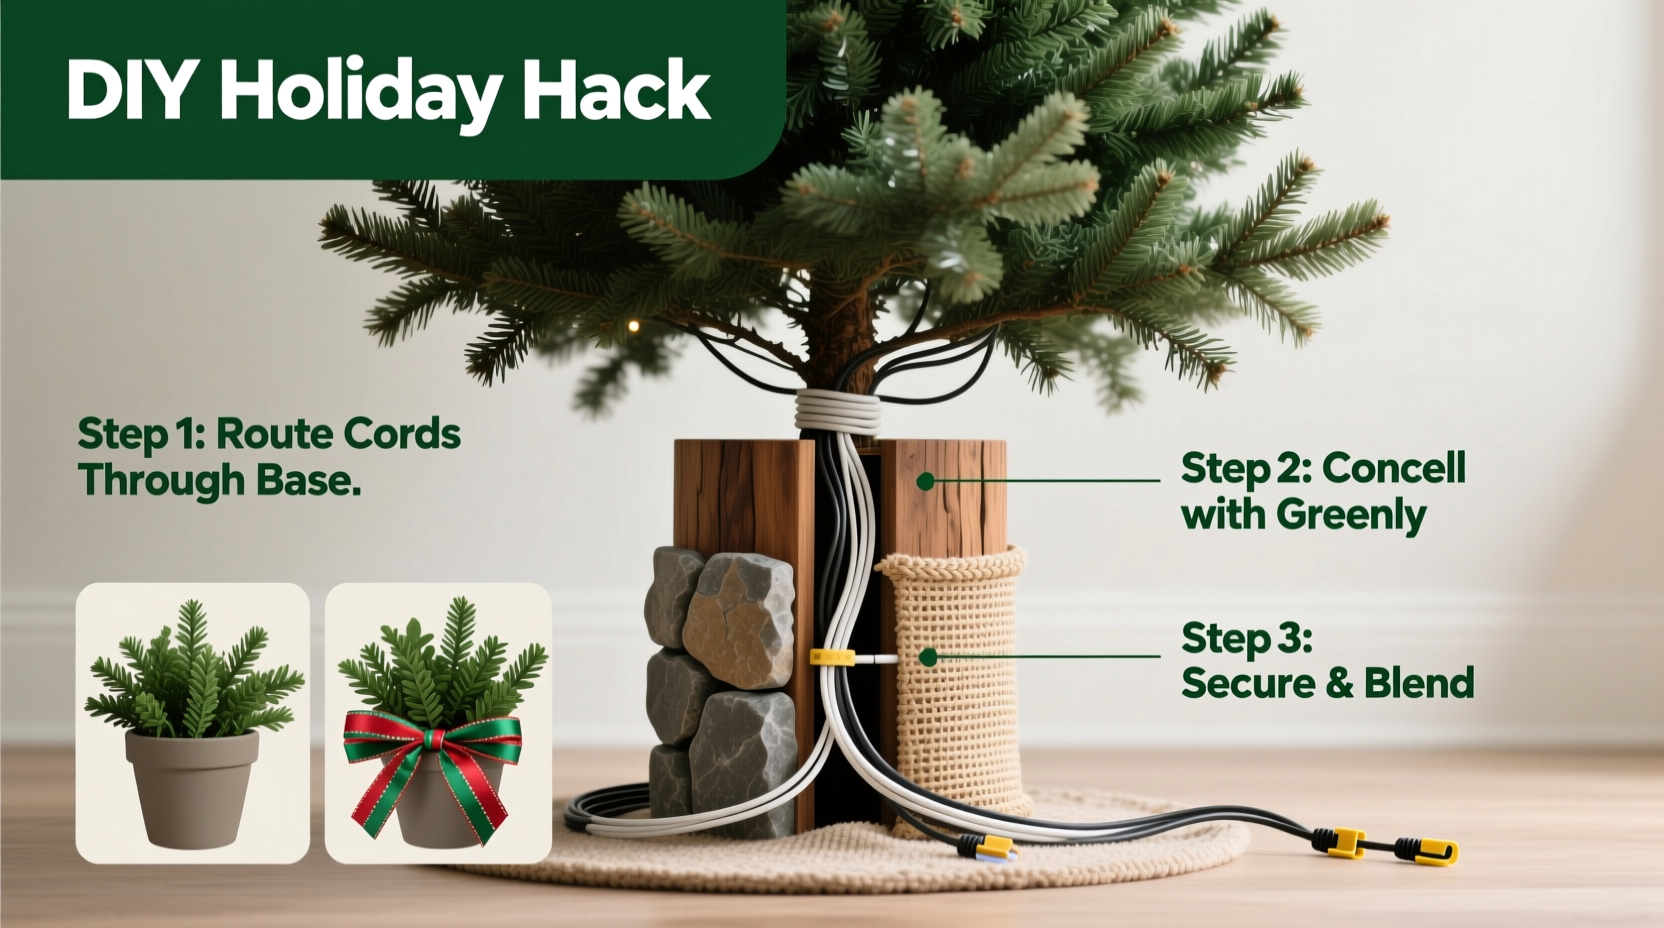
| Base-Built Concealment (custom tree stand with internal cord routing) | New tree purchases, serious decorators, gift-giving | 3–5 minutes (post-assembly) | Very high | Only use stands with UL certification and listed cord capacity (e.g., “Rated for 2 x 50-light strands”) |
| Wall-Mounted Vertical Drop (cord routed up wall to outlet via low-profile raceway) | Minimalist spaces, apartments with limited floor outlets | 30–45 minutes (requires drilling) | High | Must use non-metallic sheathed cable (NM-B) if inside wall; surface raceways must be secured every 4.5 ft per NEC 352.30 |
A Step-by-Step Guide: Installing a Cord Cover Raceway in Under 20 Minutes
The cord cover raceway is the most universally applicable solution—especially for renters or those unwilling to modify walls or furniture. When installed correctly, it disappears visually while remaining fully accessible for troubleshooting or seasonal adjustments. Follow this sequence precisely to avoid gaps, lifting edges, or compromised adhesion.
- Measure and plan the route: Trace the shortest path from your tree’s base to the nearest grounded outlet. Add 6 inches for slack at both ends. Note any transitions (e.g., floor-to-wall corner) where you’ll need matching elbow connectors.
- Select the right raceway: Choose a width that accommodates all cords without compression—typically 0.75\" wide for 2–3 standard light strands plus a transformer. Opt for paintable matte-finish PVC over glossy plastic for better blending.
- Prepare the surface: Clean the floor thoroughly with isopropyl alcohol (not water) to remove wax, dust, or oils. Let dry completely. Lightly sand glossy baseboards if mounting vertically.
- Apply adhesive backing: Peel liner from 12-inch segments only as you go. Press firmly with a credit card edge to eliminate air bubbles. Do not stretch or overheat the adhesive—this weakens long-term bond.
- Feed and secure cords: Insert cords gently—never force. Use included snap-on covers immediately after placement. For corners, attach pre-bent elbows before continuing the straight run.
- Final check: Gently tug each cord end to confirm no slippage. Verify the cover lies flat with no翘起 (lifting) at seams. Test lights before finalizing décor placement.
Real Example: How a Chicago Interior Stylist Solved Her Client’s “Tripping Hazard” Dilemma
In November 2023, interior stylist Lena Ruiz was hired to stage a downtown Chicago loft for holiday open houses. The space featured polished concrete floors, mid-century modern furniture, and a 7.5-foot Nordmann fir—a stunning centerpiece that drew immediate praise—until guests began apologizing for nearly stumbling over the three tangled cords feeding its LED lights, rotating base motor, and integrated speaker system. Temporary tape solutions failed within hours; rug placement blocked the only functional outlet. Lena’s solution combined method #2 (furniture integration) and #3 (fabric draping): She positioned a low-slung, upholstered ottoman 18 inches from the tree’s base, oriented so its longest side faced the main walkway. She then ran all cords into the ottoman’s hollow interior through a discreet 1.5-inch grommet drilled into its back panel (pre-approved by building management). From there, a single 12-foot, heavy-duty cord emerged through a second grommet at the ottoman’s far end, disappearing beneath a 36-inch-wide strip of charcoal-gray burlap pinned to the floor with museum putty. The burlap extended just beyond the ottoman’s front edge—creating visual continuity without hiding the furniture’s clean lines. Guests noticed only texture and intention—not infrastructure. The client kept the setup year-round, repurposing the ottoman’s interior for remote-control storage and charging cables.
“Wires shouldn’t be hidden *from* the design—they should be designed *into* it. The best concealment feels inevitable, not concealed.” — Marcus Bell, Lead Designer, Lumina Holiday Studios (12+ years installing commercial holiday displays)
What NOT to Do: Critical Safety & Aesthetic Mistakes
Some popular “hacks” circulate online with dangerous consequences. These aren’t merely ineffective—they violate electrical best practices and increase fire risk.
- Never use duct tape, masking tape, or painter’s tape to secure cords to floors. Adhesives degrade, leave residue, and lose grip under temperature fluctuations—causing cords to lift and create trip hazards.
- Avoid stuffing multiple cords into a single narrow tube or decorative sleeve. Heat buildup from bundled transformers and LED drivers exceeds safe dissipation thresholds. UL 2238-rated sleeves specify maximum cord count and gauge—ignore these at your peril.
- Don’t drape cords over radiators, heating vents, or fireplace mantels. Ambient heat accelerates insulation brittleness. One study by Underwriters Laboratories found cord failure rates increased 300% when operated within 12 inches of forced-air heat sources.
- Never plug more than two light strands into a single outlet via daisy-chained adapters. Most residential outlets are 15-amp circuits. A single 100-light LED strand draws ~0.04A—but add a rotating base (0.5A), speaker (0.3A), and fog machine (1.2A), and you’re nearing thermal overload.
- Don’t bury cords under thick carpet padding or underlayment. Compression damages conductors, and trapped heat has no escape path—creating potential ignition points invisible until smoke appears.
FAQ: Practical Questions Answered by Electrical & Holiday Experts
Can I use a power strip inside my tree stand?
No—unless the stand is explicitly engineered and UL-listed for internal power strip use. Most wooden or metal stands lack ventilation, fire-resistant lining, or strain relief. Even “waterproof” outdoor-rated strips generate heat that cannot safely dissipate in an enclosed, insulated base. Instead, mount a slim, wall-mounted power strip (like the Belkin 12-Outlet PivotPlug) on the wall behind the tree, feeding cords downward through a raceway.
Is it safe to run cords under baseboards?
Only if done by a licensed electrician using approved NM-B cable and proper junction boxes. DIY attempts to fish cords behind baseboards often result in nails puncturing insulation or inadequate box fill—both code violations with serious insurance implications. Surface-mounted raceways are safer, reversible, and code-compliant for temporary holiday use.
How do I hide the cord for a tree with a rotating base?
Rotating bases require special handling because constant movement stresses connections. Use a dedicated swivel adapter (e.g., Holiday Time Rotating Base Power Adapter) that mounts *under* the stand and rotates with it, eliminating cord twist. Route the primary feed cord into a flexible, braided conduit (like Southwire’s FlexiDuct) before entering the raceway—this absorbs micro-movements and prevents kinking at the pivot point.
Conclusion: Make Infrastructure Invisible—So Magic Can Shine
Hiding wires for a floor-standing Christmas tree isn’t about erasing utility—it’s about honoring the intention behind the season: presence, warmth, and unhurried beauty. When cords vanish, attention returns where it belongs—to the scent of pine, the flicker of lights, the laughter gathered beneath boughs. The methods outlined here require minimal investment, zero permanent alterations, and deliver measurable gains in safety and serenity. Start with the raceway system if you’re new to wire management; experiment with furniture integration once you know your layout; and always prioritize certified components over clever hacks. Remember: every cord you conceal thoughtfully is a small act of care—for your home, your loved ones, and the quiet joy of December evenings. Your tree deserves to stand unburdened. So do you.


 浙公网安备
33010002000092号
浙公网安备
33010002000092号 浙B2-20120091-4
Comments
No comments yet. Why don't you start the discussion?