
Wrapping columns with Christmas lights adds warmth and elegance to any home’s holiday decor. But nothing ruins the magic faster than exposed wires snaking down the sides or tangled cords marring an otherwise polished look. A seamless lighting display isn’t just about brightness or color—it’s about presentation. The secret to a professional-grade finish lies in concealing those wires effectively. Whether you're dressing up porch pillars, interior support columns, or outdoor lampposts, hiding the wiring transforms your setup from DIY to designer.
This guide walks through practical, tested strategies to keep cords out of sight while ensuring safety, accessibility, and ease of installation. From adhesive solutions to strategic routing and hardware tricks, you’ll learn how to achieve a wire-free illusion—without sacrificing function.
Why Hiding Wires Matters Beyond Aesthetics
A clean light wrap does more than look good—it enhances safety, prolongs equipment life, and simplifies maintenance. Exposed wires are vulnerable to weather, foot traffic, pets, and accidental tugs. When cords hang loosely, they’re prone to fraying, water damage, and tripping hazards. Hidden wiring also prevents tampering and reduces wear from UV exposure and temperature swings.
Additionally, concealed wires make seasonal storage easier. When cords aren’t knotted around fixtures or embedded in tape residue, disassembly becomes quicker and less destructive. A well-hidden system is not only beautiful but sustainable across multiple holiday seasons.
“Professional installations don’t just use better lights—they hide the infrastructure so the focus stays on the glow.” — Marcus Bell, Holiday Lighting Designer & Contractor
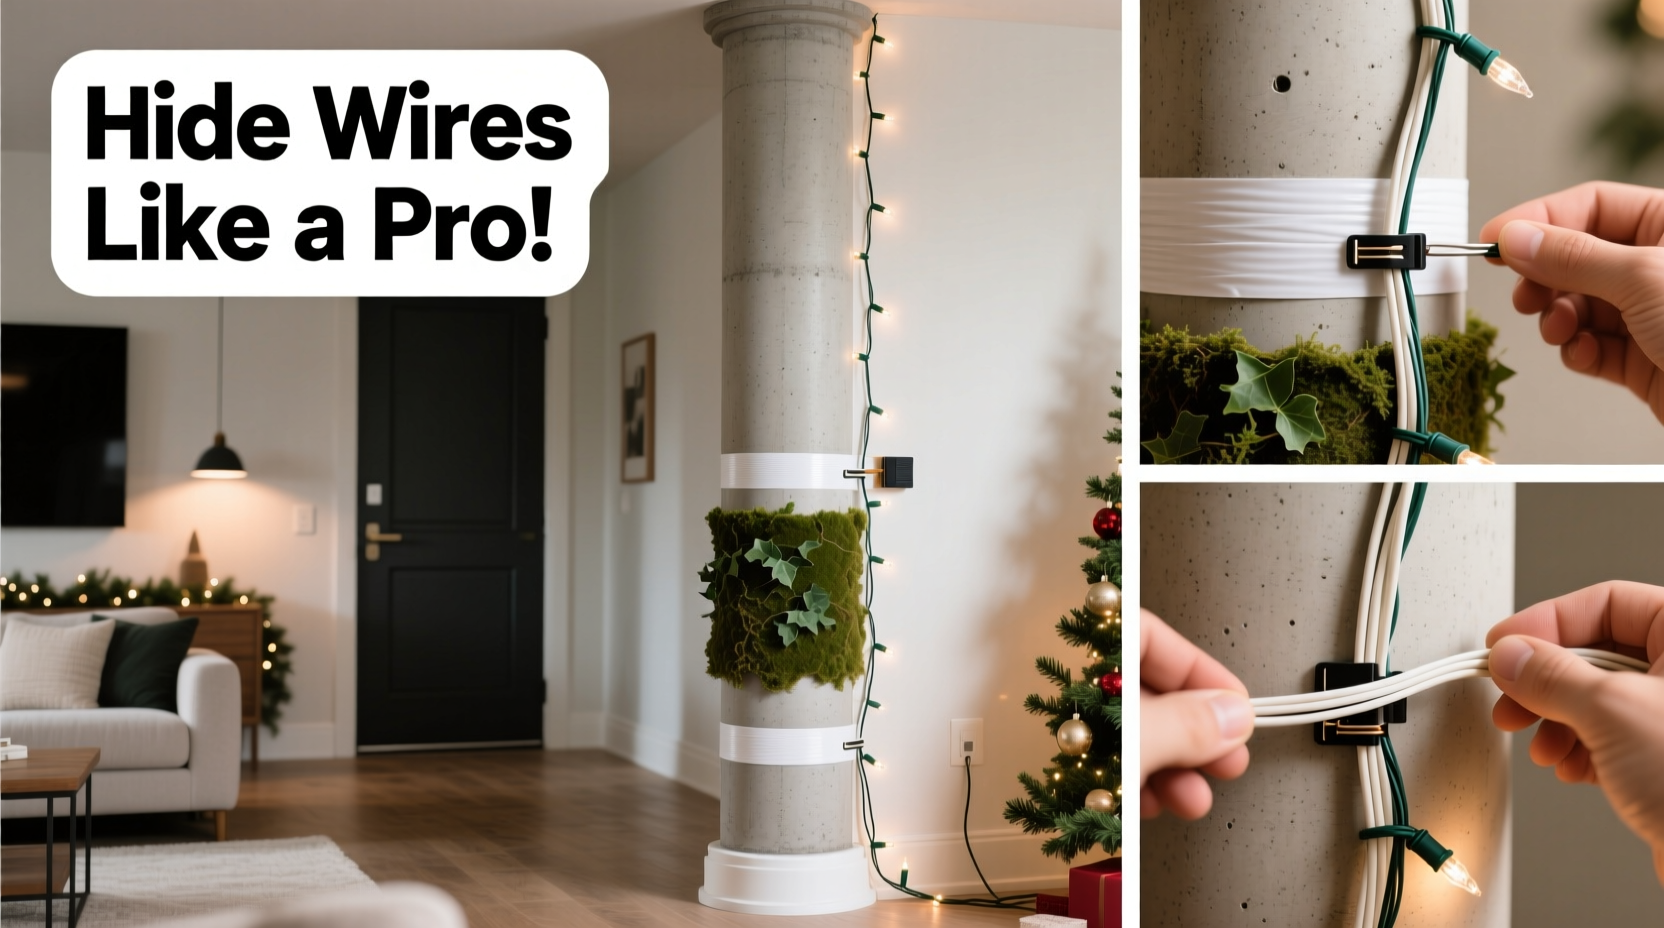
Step-by-Step: How to Wrap a Column and Hide the Wires
Follow this proven sequence to install Christmas lights on a column with minimal visible wiring.
- Assess the column type and location: Is it wood, stone, stucco, PVC, or metal? Indoor or outdoor? This determines which adhesives or fasteners are safe to use.
- Measure and plan your layout: Decide whether you want vertical runs, spiral wraps, or crisscross patterns. Mark starting and ending points for power access.
- Choose your concealment method: Based on material and permanence, select clips, raceways, adhesive channels, or recessed routes.
- Run the main power cord first: Route the extension cord or outlet lead along the least visible side—often the back or adjacent wall—before attaching lights.
- Attach lights with consistent spacing: Use small clips or ties every 6–8 inches to secure strands without tension.
- Conceal connection points: Bundle plug-ins and adapters behind junction boxes, planters, or trim pieces.
- Test before finalizing: Turn on all strings to ensure no flickering or dead sections before sealing anything permanently.
- Secure and inspect: Double-check that no wires are pinched, stretched, or exposed to moisture.
Best Methods to Hide Wires on Columns
No single solution works for every situation. Here are five effective techniques tailored to different materials and settings.
1. Adhesive Cord Covers (Raceways)
These flexible plastic channels stick directly to surfaces using strong double-sided tape. Paint them to match the column for near-invisibility. Ideal for smooth surfaces like painted wood, vinyl, or drywall.
2. Wire Clips with Built-in Channels
Self-adhesive clips have a hinged lid that snaps shut over the cord. They’re reusable and low-profile. Best for temporary setups or rental properties where damage must be avoided.
3. Recessed Routing (for Wood or Soft Materials)
Use a utility knife or Dremel tool to cut a shallow groove along the column’s edge. Nestle the wire into the channel and seal with matching caulk or paint. Offers the most seamless finish but is permanent.
4. Back-Wrap Technique
Instead of spiraling lights front-to-back, wrap them entirely around the backside of the column after each loop. The wire stays hidden behind the structure. Works best on square or rectangular columns.
5. Magnetic Clips (for Metal Columns)
If your column is steel or iron, magnetic wire holders securely grip the surface without adhesives. Easily repositionable and ideal for industrial or modern architecture.
| Method | Best For | Visibility | Removability | Durability |
|---|---|---|---|---|
| Adhesive Raceways | Smooth indoor/outdoor walls | Low (if painted) | Moderate (may peel) | Seasonal |
| Wire Clips with Lids | Rentals, delicate finishes | Medium | High | Reusable |
| Recessed Grooves | Wood, soft stone | Near-zero | None (permanent) | Excellent |
| Back-Wrap Spiral | Square/rectangular posts | Low | Full | Good |
| Magnetic Holders | Metal poles, railings | Low to medium | Full | Long-term |
Checklist: Preparing Your Column Wrap Project
- ☐ Measure column height and circumference
- ☐ Calculate total linear feet of lights needed (add 10% extra)
- ☐ Choose bulb type (LED recommended for heat and energy efficiency)
- ☐ Select wire-hiding method based on material and season length
- ☐ Gather tools: scissors, measuring tape, level, pencil, caulk gun (if recessing)
- ☐ Buy necessary supplies: clips, raceways, extension cords, surge protectors
- ☐ Locate nearest GFCI outlet for outdoor setups
- ☐ Test all light strands before installation
- ☐ Plan cord path from outlet to base of column
- ☐ Mark vertical alignment lines with chalk or removable tape
Real Example: Transforming a Porch Pillar in Suburban Ohio
Homeowner Sarah M. wanted to upgrade her brick-columned front porch for the holidays. Previous years involved taping lights directly to the surface, leaving ghost marks and loose wires every January.
This year, she opted for a cleaner approach. She used white PVC raceways painted to match the column’s stucco cap. Starting at the top, she routed the main extension cord down the backside, securing it inside the raceway every 18 inches. She then wrapped LED mini lights in a tight spiral, feeding the connecting wire into the same rear channel.
To hide the power source, she placed a weatherproof outlet cover box behind a potted evergreen near the porch base. All plugs and transformers were tucked inside, accessible only by removing the planter.
The result? A magazine-worthy display with zero visible cords. Neighbors asked if she hired a professional. Total cost: under $75. Time invested: three hours over two evenings.
Common Mistakes to Avoid
- Using duct tape or zip ties too tightly: These can damage surfaces and compress wires, leading to overheating.
- Ignoring voltage drop: Long runs of incandescent lights dim at the end. Use shorter strands or higher-voltage LEDs.
- Routing cords across walkways: Creates tripping hazards and increases wear. Elevate or bury (in conduit) if unavoidable.
- Overloading circuits: Most household outlets handle 1,440 watts max. Spread loads across multiple breakers.
- Skipping surge protection: Power spikes can fry entire displays. Always use UL-listed surge protectors outdoors.
“Eighty percent of service calls I get are for issues caused by poor wire management—not faulty lights.” — Diego Ruiz, Licensed Electrician & Seasonal Installer
Frequently Asked Questions
Can I paint over adhesive cord covers?
Yes, most plastic raceways accept latex or acrylic paint. Clean the surface with rubbing alcohol first, apply primer, then paint in thin coats. Allow full curing before exposure to weather.
What’s the safest way to hide wires on a brick column?
Brick is porous and hard to patch, so avoid drilling unless necessary. Instead, use heavy-duty outdoor-rated adhesive raceways or run wires down mortar joints. Silicone-based adhesives bond better with masonry than standard tapes.
How do I prevent animals from chewing outdoor wires?
Rats, squirrels, and even deer may chew insulation. Use metal-sheathed cables or run cords through flexible plastic conduit. Some homeowners apply bitter-tasting deterrent sprays (pet-safe formulas only) to discourage gnawing.
Final Tips for a Flawless Finish
Even the smallest details affect perception. After installing lights and hiding wires, step back and view the column from multiple angles—day and night. Look for:
- Shadow lines where cords might still show
- Gaps between clips or uneven spacing
- Bulbs pointing in inconsistent directions
- Glare from exposed connectors
Consider adding a subtle diffuser effect by choosing warm-white bulbs or frosted lenses. They soften the light and reduce hotspots that draw attention to mounting points.
Finally, label each strand at the plug end. When it’s time to take everything down, labeled cords make sorting and rewinding far easier. Store them on reels or spools to prevent tangles next year.
Conclusion: Shine Bright Without Showing the Strings
Hiding wires when wrapping columns with Christmas lights isn’t about perfectionism—it’s about respect for craftsmanship and safety. With the right planning and tools, anyone can create a display that looks professionally installed. The effort pays off in curb appeal, longevity, and peace of mind.
Start small if you’re new: pick one method, test it on a single column, refine your technique. Next year, you’ll wonder why you ever accepted messy cords as part of the holiday tradition.


 浙公网安备
33010002000092号
浙公网安备
33010002000092号 浙B2-20120091-4
Comments
No comments yet. Why don't you start the discussion?