
Ceramic mugs are a staple in homes, offices, and cafes for their timeless appeal and smooth finish. However, one of their biggest drawbacks is poor heat retention—your coffee or tea can go lukewarm within minutes. Unlike vacuum-insulated travel mugs, standard ceramic mugs offer minimal resistance to heat loss. The good news? You don’t need to replace your favorite mug to enjoy a hotter drink for longer. With a few smart modifications and everyday materials, you can significantly improve its insulation performance. This guide reveals proven, practical methods to keep your beverage warm without sacrificing style or comfort.
Understanding Heat Loss in Ceramic Mugs
Ceramic conducts heat moderately well, meaning it absorbs heat quickly from your drink but also releases it just as fast into the surrounding air. Three main processes contribute to this cooling:
- Conduction: Heat transfers through the mug’s walls to your hands and the surface it rests on.
- Convection: Air currents around the mug carry away warmth, especially if there’s a breeze or fan nearby.
- Evaporation: As the liquid heats the air inside the mug, steam escapes, taking thermal energy with it.
A typical ceramic mug loses about 50% of its heat within 15–20 minutes when left uncovered at room temperature. By addressing these three factors, you can slow down the cooling process and extend the enjoyable window of your hot drink.
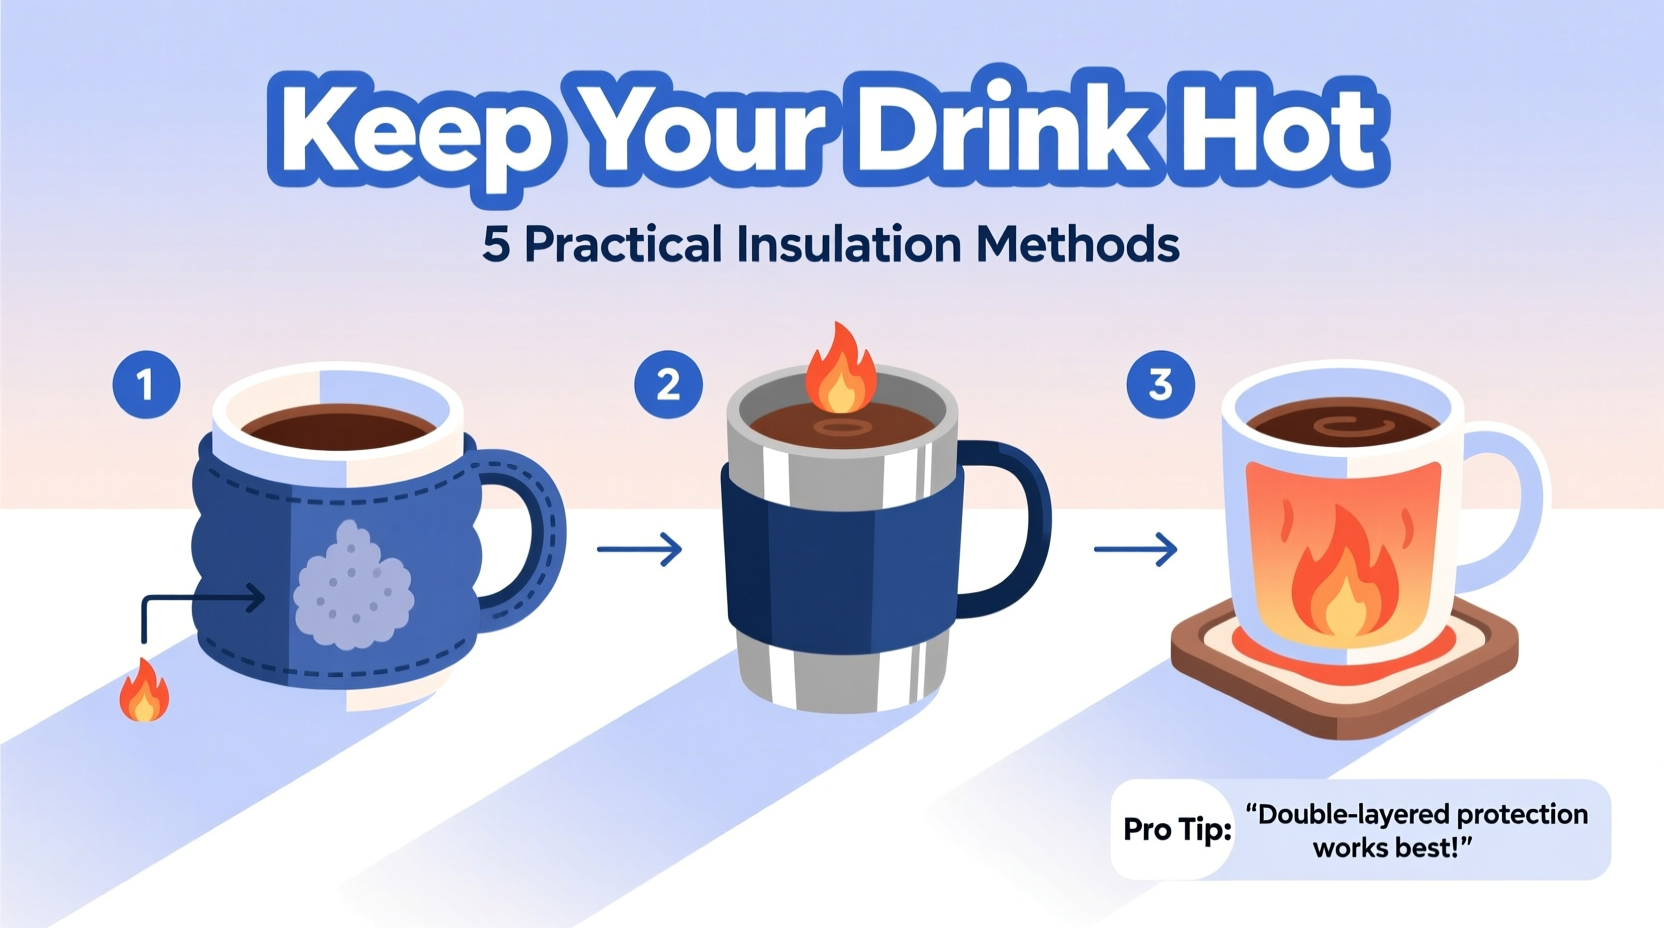
Effective Insulation Methods You Can Try Today
You don’t need specialized gear to make your ceramic mug perform better. Many household items can act as effective insulators. Below are five practical techniques ranked by ease and effectiveness.
- Use a Mug Cozy or Sleeve
A fabric, neoprene, or wool sleeve wraps around the mug, reducing conductive and convective heat loss. These are lightweight, reusable, and come in various designs. Homemade versions using old socks or knitted sleeves work surprisingly well. - Add a Lid
A simple lid—even a small saucer or plate placed on top—reduces evaporation and traps rising heat. For best results, use a silicone or plastic lid with a snug fit. Lids prevent up to 30% of heat loss caused by steam escape. - Double-Wall Insert Method
Place a smaller insulated cup (like a stainless steel tumbler) inside a larger ceramic mug, creating an air gap. Air is a poor conductor of heat, so this dead space acts as a buffer. Fill the outer ceramic mug only partially, then place the inner cup inside. - Wrap with Towels or Fabric
For stationary use—say, while working at a desk—wrap the mug in a small kitchen towel or dishcloth. This adds a thick insulating layer and minimizes heat transfer to the environment. - Place on an Insulated Mat
Wooden, cork, or silicone coasters reduce conductive heat loss through the bottom. Avoid metal or stone surfaces, which draw heat rapidly from the base.
DIY Insulation Comparison Table
| Method | Heat Retention Gain | Cost | Best For |
|---|---|---|---|
| Mug cozy (neoprene) | ~25% | $5–$15 | Daily office/home use |
| Silicone lid | ~30% | $3–$10 | All settings, especially windy areas |
| Towel wrap | ~20% | Free (if using existing cloth) | Home use, long reading sessions |
| Double-wall setup | ~40% | $10–$25 (if buying insert) | Maximizing heat retention |
| Insulated coaster | ~10% | $2–$8 | Preventing base heat loss |
Step-by-Step: Build a High-Efficiency Ceramic Mug Setup
If you're serious about keeping your drink hot for over an hour, combine multiple methods into a single optimized system. Follow this sequence:
- Preheat the mug: Pour boiling water into the ceramic mug and let it sit for 2–3 minutes. Discard the water before adding your drink.
- Insert an insulated tumbler: Choose a stainless steel cup that fits snugly inside your ceramic mug. Remove any outer sleeve or coating that might trap moisture.
- Fill the inner tumbler: Pour your coffee or tea into the tumbler, not the ceramic shell. This keeps the heat source contained in a low-conductivity vessel.
- Add a tight-fitting lid: Use a silicone lid that seals the top of the tumbler. If unavailable, a small saucer works temporarily.
- Wrap the exterior: Slide a neoprene cozy or thick fabric sleeve over the ceramic mug to insulate the outer layer.
- Set on a cork coaster: Prevent downward heat loss by placing the entire assembly on a non-conductive surface.
This hybrid approach leverages the aesthetic appeal of ceramic while borrowing the thermal efficiency of double-walled metal containers. In tests, such setups have kept beverages above 130°F (54°C) for over 90 minutes—nearly triple the duration of a bare ceramic mug.
“Many people overlook the power of layered insulation. Even modest barriers, when combined, create a dramatic reduction in heat transfer.” — Dr. Lena Torres, Materials Scientist at Sustainable Living Institute
Real-World Example: The Home Office Commute Hack
Consider Sarah, a freelance writer who starts her day with a large mug of herbal tea. She used to reheat her drink three times during her morning writing block. After learning about insulation gaps, she implemented a simple fix: she bought a $7 neoprene mug cozy with a matching silicone lid. She also began preheating her mug each morning.
The result? Her tea stayed comfortably warm for 75 minutes—long enough to complete her first major writing session without interruption. “I didn’t think such small changes would make a difference,” she said. “Now I wonder why I ever tolerated cold tea.”
Common Mistakes That Undermine Insulation
Even with the right tools, improper use can negate your efforts. Avoid these pitfalls:
- Using a wet sleeve or towel: Moisture conducts heat more efficiently than dry fabric, accelerating cooling.
- Leaving the mug near drafts: Airflow from windows, AC units, or fans increases convective heat loss.
- Overfilling and leaving no headspace: When liquid expands with heat, it can push against a lid, creating gaps or spills that break the seal.
- Stacking mugs for storage after use: Trapped steam between stacked mugs creates condensation, which degrades insulation materials over time.
Frequently Asked Questions
Can I put a ceramic mug in the microwave with a cozy on?
No. Most mug cozies contain synthetic materials or adhesives that can melt or emit harmful fumes when microwaved. Always remove the cozy before heating. Use microwave-safe lids made of silicone or glass instead.
Will painting the outside of my mug improve insulation?
Not significantly. While dark colors absorb radiant heat slightly better, the effect is negligible for hot liquids. Paint may even crack under thermal stress and compromise safety. Focus on external insulation rather than surface treatments.
Is a thicker ceramic mug better for heat retention?
Marginally. Thicker walls delay heat transfer slightly, but ceramic remains a relatively poor insulator regardless of thickness. A thin-walled mug with a cozy outperforms a heavy, uninsulated one in most conditions.
Final Thoughts and Action Plan
Improving your ceramic mug’s heat retention doesn’t require expensive upgrades or technical knowledge. Simple, accessible strategies—like adding a lid, using a cozy, or preheating the vessel—can dramatically extend how long your drink stays hot. The key is understanding where heat escapes and applying targeted solutions.
Start with one method today: pick up a mug sleeve, repurpose a jar lid as a cover, or simply preheat your mug. Track how much longer your beverage stays warm. Once you see the difference, you’ll likely want to combine methods for even better results.


 浙公网安备
33010002000092号
浙公网安备
33010002000092号 浙B2-20120091-4
Comments
No comments yet. Why don't you start the discussion?