
Modern vehicles are packed with advanced electronics—from engine control units (ECUs) to infotainment systems and driver-assistance modules. While jump starting a dead battery is a common fix, doing it incorrectly can send voltage spikes through these sensitive circuits, potentially causing costly damage. With the right approach, you can revive your car’s battery safely and efficiently, protecting both the vehicle and yourself in the process.
The key isn’t just connecting jumper cables; it’s understanding the electrical system, following a precise sequence, and using tools correctly. Whether you're helping a stranded friend or dealing with a morning failure in a parking lot, this guide walks you through every step to ensure a safe, successful jump start—without frying your car’s brain.
Understanding the Risks to Modern Car Electronics
Today’s automobiles rely on dozens of microprocessors managing everything from fuel injection to climate control. A sudden surge during a jump start—caused by reversed polarity, loose connections, or improper grounding—can overload these components. Even a brief voltage spike above 15 volts can permanently damage an ECU or alternator regulator.
One of the most vulnerable points is the alternator diode pack. It converts AC current from the alternator into DC power for the battery and electrical systems. Reverse polarity or incorrect cable connection can destroy these diodes instantly. Similarly, modern sensors like oxygen, crankshaft position, and ABS wheel speed sensors operate at low voltages and are easily compromised by electrical faults.
“Improper jump-starting is one of the top causes of preventable electronic failures in vehicles under five years old.” — James Liao, Automotive Electrical Systems Engineer, Ford Motor Company Retired
Beyond internal damage, there’s also risk to personal safety. Lead-acid batteries emit hydrogen gas, which can ignite if sparks occur near the terminals. That’s why correct procedure matters—not just for the car, but for the person holding the cables.
Essential Tools and Safety Gear
Before attempting a jump start, gather the necessary equipment. Having the right tools ensures control and reduces the chance of error.
- Jumper cables: At least 12 feet long, with thick-gauge wire (4 to 6 AWG recommended). Thin cables overheat and deliver insufficient current.
- Booster pack (portable jump starter): A safer alternative to another vehicle. Many models include built-in protection against reverse polarity and overvoltage.
- Gloves and eye protection: Batteries contain sulfuric acid. A short circuit can cause sparks, melting metal, or even explosion.
- Wrench or pliers: In case terminals are tight or corroded.
- Voltmeter (optional but useful): To confirm battery voltage before and after charging.
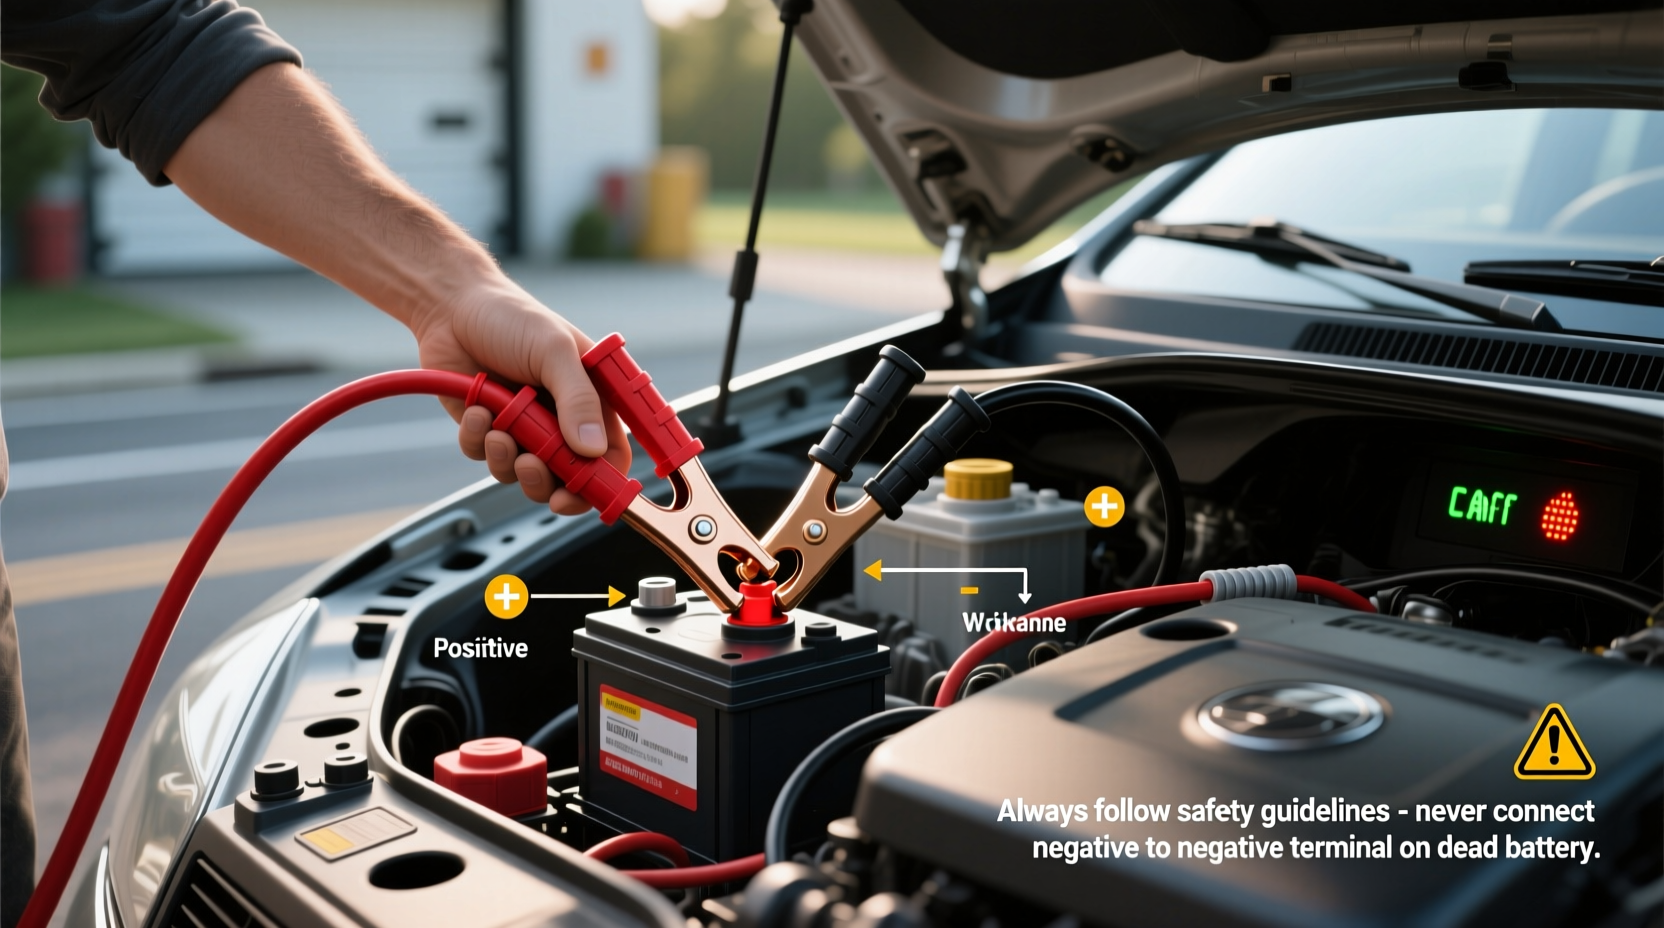
Step-by-Step Guide to a Safe Jump Start
Follow this exact sequence to minimize risk and maximize success. This method applies whether you’re using another car or a portable jump starter.
- Park the donor vehicle close—but not touching. Align both cars so the batteries are within cable reach. Turn off both engines, set parking brakes, and shift into park (automatic) or neutral (manual).
- Inspect both batteries. Look for cracks, leaks, or bulging cases. If any are present, do not proceed—replace the battery instead.
- Turn off all electrical loads. Disable headlights, radio, climate control, and phone chargers in both vehicles. This prevents surges when current flows.
- Connect positive (+) to positive (+). Attach the red clamp to the dead battery’s positive terminal. Then connect the other red clamp to the donor battery’s positive terminal.
- Ground the negative cable safely. Connect the black clamp to the donor battery’s negative terminal. Attach the other black clamp to an unpainted metal surface on the disabled car’s engine block or chassis—away from the battery, fuel lines, and moving parts. This reduces spark risk near the battery.
- Start the donor vehicle first. Let it run for 2–3 minutes at 1,500 RPM to stabilize voltage output.
- Attempt to start the disabled car. Crank for no more than 10 seconds. If it doesn’t start, wait 30 seconds and try again. Repeat up to three times.
- Once running, disconnect in reverse order. Remove the black clamp from the ground point, then from the donor battery. Remove red clamps last—positive from donor, then from previously dead battery.
- Let the revived car idle for 10–15 minutes. Or better yet, drive it gently for at least 20 miles to allow the alternator to recharge the battery fully.
Why Grounding Away from the Battery Matters
Connecting the final negative clamp directly to the dead battery’s negative terminal risks igniting hydrogen gas emitted during discharge. By grounding to a distant metal component—like a bolt on the engine block—you move the spark away from the source of gas. This simple step dramatically improves safety.
Do’s and Don’ts: Protecting Electronics During a Jump Start
| Do’s | Don’ts |
|---|---|
| Use thick, high-quality jumper cables | Never use frayed or thin cables |
| Double-check polarity before connecting | Never reverse positive and negative clamps |
| Ground the negative clamp to chassis/engine block | Don’t attach negative clamp directly to dead battery if avoidable |
| Let donor car run before starting dead car | Don’t attempt to jump start a frozen or damaged battery |
| Disconnect in reverse order | Don’t rev donor engine excessively |
| Drive the car after jump start to recharge battery | Don’t shut off the engine immediately after starting |
Real-World Example: A Close Call in Winter
Daniel, a software engineer from Minneapolis, tried to start his 2021 Honda Accord after a sub-zero night. The engine clicked once and died. He borrowed cables from a neighbor and connected them quickly—red to red, black to black—but attached the final black clamp to the dead battery’s negative terminal.
As he started the donor SUV, a small pop came from under the hood. The Accord started, but the dashboard lit up with warnings: “Check Engine,” “ABS,” and “Lane Assist Unavailable.” A scan at a local shop revealed a blown fuse in the powertrain control module and corrupted data in the stability control unit. The repair cost $480.
The technician explained that a spark near the battery likely caused a voltage spike. Had Daniel grounded the negative cable to the engine block instead, the fault might have been avoided. His car survived, but only after firmware resets and replacement of a critical relay.
This case underscores how fast things go wrong—and how a single deviation from protocol can lead to expensive consequences.
Using a Portable Jump Starter: A Safer Alternative
Portable lithium jump starters have become reliable and affordable. Units like the NOCO Genius or Tacklife offer up to 20 jumps per charge and include smart safeguards:
- Reverse polarity alarms (beep and LED warnings)
- Overcurrent and short-circuit protection
- Spark-proof connectors
- USB ports for charging devices
To use one:
- Turn off the car and all electronics.
- Attach the red clamp to the battery’s positive terminal.
- Clip the black clamp to a solid ground point (engine bolt, bracket).
- Power on the jump starter.
- Start the vehicle.
- After starting, turn off the jump starter and remove clamps in reverse order.
Frequently Asked Questions
Can jump starting damage the alternator?
Yes—if cables are reversed or a voltage spike occurs, the alternator’s diode rectifier can be destroyed. This often results in a failed charging system, requiring full alternator replacement. Always follow proper connection order to prevent this.
Is it safe to jump start a car with start-stop technology?
Generally yes, but extra caution is needed. These vehicles use advanced AGM (Absorbent Glass Mat) or EFB (Enhanced Flooded Battery) types that are more sensitive to incorrect charging. Use a smart charger when possible, and avoid frequent jump starts, which shorten battery life.
How long should I drive after a jump start?
At least 20–30 minutes of continuous driving at highway speeds. Short trips won’t fully recharge a deeply depleted battery. For best results, consider using a dedicated battery maintainer or trickle charger afterward.
Final Checklist Before You Jump Start
- ✔ Battery condition:
- No cracks, leaks, or bulges.
- ✔ Cable quality:
- Thick, insulated, no exposed wires.
- ✔ Polarities confirmed:
- Red to positive, black to ground—never reversed.
- ✔ Electrical loads off:
- Lights, radio, heater fans turned off.
- ✔ Ground point selected:
- Unpainted metal away from battery and fuel lines.
- ✔ Safety gear on:
- Gloves and eye protection worn.
Conclusion: Confidence Through Knowledge
Jump starting a car doesn’t have to be risky. With the right knowledge, tools, and attention to detail, you can bring a dead battery back to life without harming your vehicle’s sophisticated electronics. The few extra seconds spent verifying connections and choosing the correct ground point can save hundreds—or thousands—in repair bills.
Modern cars demand respect for their electrical architecture. Treat the jump-start process not as a quick hack, but as a controlled electrical procedure. Whether you keep jumper cables in your trunk or invest in a smart portable starter, being prepared means you’ll never be stranded unnecessarily.


 浙公网安备
33010002000092号
浙公网安备
33010002000092号 浙B2-20120091-4
Comments
No comments yet. Why don't you start the discussion?